Tag Archives: Flanging
Friday Tip of the Week: Through-Zero Flanging
Flanging that Actually Sounds Like Vintage Tape Flanging
Personal bias alert: I like digital flangers, but most can’t do what true, analog-based, tape flanging could do. Back in the day, the sessions for my band’s second album were booked following Jimi Hendrix’s sessions for Electric Ladyland. His flanging setup remained after the session, so we took advantage of it and used it on our album… and the sound of true, tape-based flanging was burned into my brain. This tip is about obtaining that elusive sound.
The tape flanging process used two tape recorders, one with a fixed delay and one with variable speed. As you sped up and slowed down one recorder, it could lag or lead the other recorder, and the time difference produced the flanging effect. If the audio path for one of them was out of phase, as one tape recorder pulled ahead of the other one (or fell behind after pulling ahead), the audio passed through the “through-zero” point where the audio canceled. This left a brief moment of silence when the flange hit its peak.
To nail “that sound,” first you need two delays. One has to be able to go forward in time, but since that’s not possible without violating the laws of physics (which can lead to a hefty fine and up to five years in jail), a second delay provides a fixed delay so the other can get ahead of it. Second, don’t use LFO control—if you don’t control the flanging effect manually, it sounds bogus.

In this implementation, a Splitter in normal mode feeds two Analog Delays. One of them goes through the Mixtool to flip the phase for the through-zero effect. Start with the Analog Delay settings shown in the screen shot; they’re identical for both delays, except for the Factor control on the delay that feeds the Mixtool.
To hear the tape flanging effect, move the Factor control from full counter-clockwise to clockwise. At the center point, you’ll hear the through-zero effect as the signals cancel. (Actually you can move either Factor control as long as the other one is pointing straight up.)
Variations on a Theme
It’s also fun to make an FX chain to allow for more variations. The left-most knob controls the Factor knob, whose parameter is called Delay Speed. Delay Time chooses how low the flanger goes. It’s scaled to a range from 1 ms to 13 ms; I find 4 – 9 ms about right (copy this curve for the second Analog Delay, because you want their times to track). Delay Inertia uses the control on the same Analog Delay as the Factor knob being controlled. This adds a bit of “tape transport inertia vibe” when you move the Factor knob.
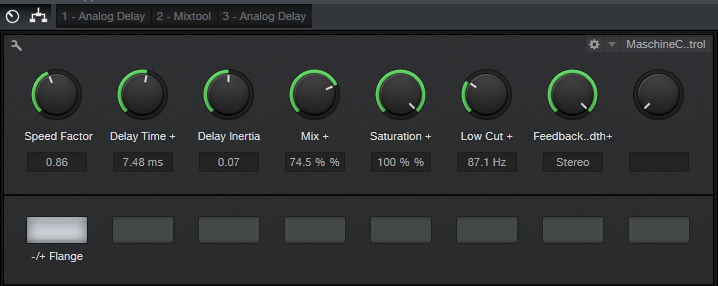
The Mix knob controls the mix on one of the delays from 0% to 100%. (Note that if the Mix controls on both delays are at 0%, the audio should cancel; if it doesn’t, adjust the Mixtool Gain knob until it does.) 100% gives the most dramatic flanging effect, but back in the day, cancellations weren’t “digitally perfect” so setting Mix for one delay to 60-75% gives a smoother through-zero sound. Saturation controls the Saturation parameter on both delays when you want a little more grit, and a Low Cut control for both Analog Delays reduces some of the muddiness that can occur with long Delay Time settings. The Feedback control also ties to both Analog Delays. You’ll usually want to leave this in the stereo position (full clockwise). Finally, -/+ Flange controls the Invert Left and Invert Right buttons on the Mixtool module. Enable them for through-zero (“negative”) flanging, disable for positive flanging.
So does it really sound like tape flanging? Listen for yourself. I took an excerpt from a song on my YouTube channel, applied flanging to it, and posted it as an audio example on craiganderton.com (click on the Demos tab).
Bonus fun: Stick Binaural Pan after the two splits mix back together, and set Width to 200%. If Feedback is set to stereo, this produces a variation on the flanging effect.
Click here to download the preset described in this post! (Updated 4-10-18 with multipreset link)