Friday Tip: The TonalVerb
Okay, Studio One isn’t lacking for reverb. Nor is the rest of the world. But we also aren’t lacking for tools to make new kinds of reverb sounds, and that’s what this week’s tip is all about.
Note that the TonalVerb is a bus effect, so don’t insert it in a track. (Or, do insert it in a track—you never know what might happen!) As with last week’s tip there’s a preset you can download, but I recommend reading about how this preset works. FX Chains are very powerful, and once you learn what you can do with them, you can create your own signature sounds instead of sounding like everyone else.
HOW IT WORKS

A Splitter, set to Normal mode, feeds two Mixverbs in parallel. One of the parallel paths goes through a Mixtool with both channel phases (polarities) inverted, so the summed audio cancels. Except… one Mixverb has damping fixed at 50%, while the other is variable (as set by the FX Chain Tone control). With both Damp controls at 50%, there’s no audio due to cancellation. However setting damping below 50% cancels the low frequency reverb components, yet the high frequency reverb components remain. With damping set above 50%, the reverse occurs—the high frequency reverb components cancel, while the low frequency components remain. The closer Tone is to 50%, the greater the cancellation so you may need to increase the bus level under these conditions.
This effect is very different compared to altering tone via equalization for several reasons, but the main one is that damping varies over time. At the onset of the reverb, there’s more cancellation because the two parallel signals have more in common. This reduces the attack of the signal being reverberated, which has its own uses—for example, you might want the crack of a drum to be more prominent, rather than being washed in reverb. With tone set to 0% and Size at a relatively high value (e.g., 70%), it’s almost like the reverb has an attack time of its own.
Regarding the other FX Chain controls, Predelay, Size, and Width all vary their respective Mixverb controls simultaneously over their full ranges. The only one that works differently, as noted above, is the Tone (damping) control.
So… why be normal? Here’s your chance to try a different type of reverb sound that’s especially well suited to EDM productions.
Quantum and DigiMax DP88 Overview and Test from Brian at PC Audio Labs / OBEDIA
Longtime friend and PreSonus advocate Brian Lorelle of OBEDIA and PC Audio Labs recently interconnected four Quantums and four DigiMax DP88s for a series of test runs in his laboratory in Nashville, taking a close look at CPU usage and latency under varying conditions including different sample rates, plug-in counts, buffer sizes, etc. If you’ve been looking for a Windows recording solution that takes advantage of the speed and power of Thunderbolt, with tons of I/O, this is a must-watch!
- You can get a Rok Box MC X Pro Audio PC here
- Get one on one training and tech support for PreSonus hardware and software with OBEDIA
Friday Tip: Old School-Style Tape Variable Speed
Back in the days of variable-speed analog tape, we often cheated and sped up the master just a bit. This had three beneficial effects: it made the tempo a bit more lively, raised the pitch for a slightly brighter sound, and tightened timing. Even a 2% change could make a significant difference. (If you ever tried to play along with an old pop tune and found your instrument had to be tuned somewhat sharp, this is probably why.)
Digital technology gave us a major advance by making it possible to change tempo without changing pitch, or change pitch without changing tempo. Curiously, though, there aren’t as many options if you want to change both simultaneously. Fortunately, Studio One can do this easily.
The key is the Inspector’s Speedup and Tune parameters. A speedup of 2% is about right for making a noticeable, but not obvious change; however many older masters were sped up a lot more than that, so don’t feel too constrained. For Tune, 20 cents works well as a general-purpose setting but again, there are no rules about this other than to use your ears.
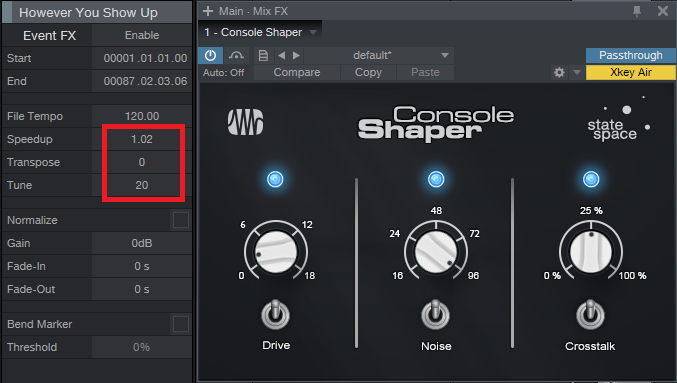
If you enter these changes and then go back to 0 for the two settings, the song will sound less lively. However it’s important to acclimate yourself to any changes, either speeding up or “bypassed,” before making any final decisions about what sounds best.
Note that I much prefer to do any master speed/tune change processing on the finished, two-track mix instead of while working on a song. That way I don’t need to remember to set the Speedup and Tune on each track, or render loops so I can use the needed parameters.
And since we’re in old school territory, consider adding a bit of Console Shaper as well from the Mix FX drop-down. I seldom push drive above 9 o’clock for program material, and some crosstalk makes the sound a bit more speaker-like when wearing headphones (with headphones, you don’t get acoustical crosstalk like you do with speakers, where the left ear hears some of the right speaker, and vice-versa). As to noise…well I’m not a fan of noise, but with some tracks, it does add a little “glue.” Or maybe it just triggers the psychological response of working with older gear.
The audio example plays an excerpt from the remix of “To Say No Would Be a Crime” (from my album “Simplicity”). The first 19 seconds are the original version, the rest of the example speeds it up by 1.02 with a pitch increase of 40 cents. The complete song is available on YouTube/thecraiganderton.
In any case, when you want your music to be a little more lively, brighter, and tighter, try raising the Speedup and Tune parameters just a bit. It really does make a difference.
Friday Tip of the Week: Patterns: Not Just for EDM
Some people see “Pattern” and think “step sequencing—not useful for anything other than EDM.” This tip shows how to use Patterns in a rock drum context to add humanized percussion easily and effectively.
First, let’s subject ourselves to a 16th-note pattern of shaker hits, which is the kind of sound that shows why people don’t like step sequencers. Someone who would use this in a musical context is either not a nice person, or perhaps a pharmaceutical company executive who wants to increase sales of headache remedies.
Let’s start improving matters by copying the shaker to two more pads, and creating some sonic variations.
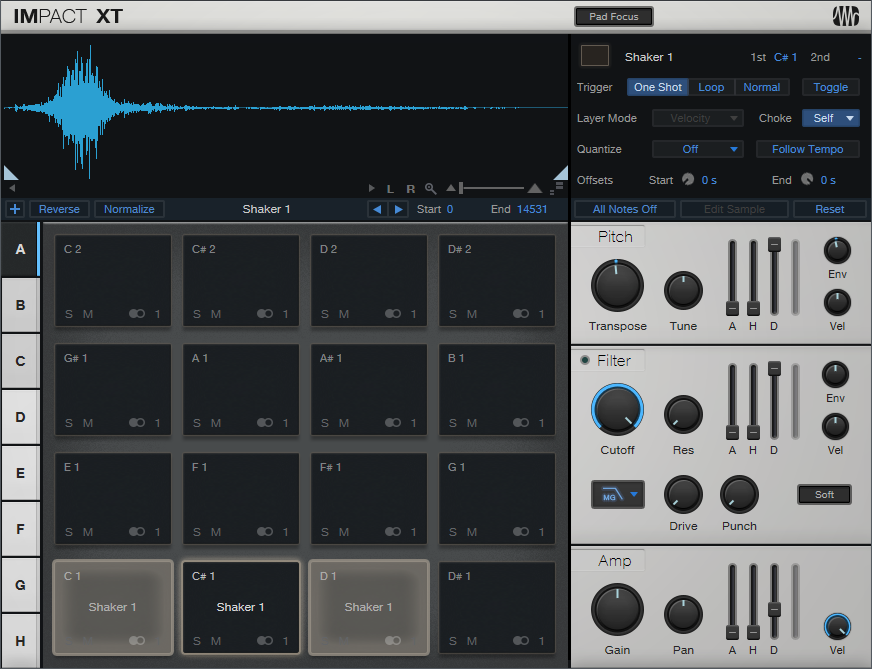
One copy is transposed down two semitones, and has a shorter decay. The other is transposed down three semitones. All three have slightly different filter settings. By alternating the different sounds, we have something that’s better. Well, at least slightly better.
Let’s make it a lot better. We’ll make sure the original shaker sound hits at maximum velocity on every beat to establish a rhythm.
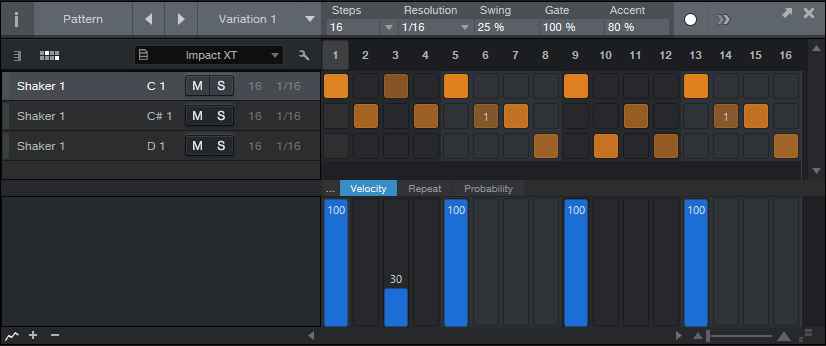
The second row uses a different shaker sound. Because this is a busier part, we’ll create some velocity variations.

Let’s also introduce some repeats so that two of the hits “stutter” a little bit.

However having repeats happen the same way every time doesn’t sound very realistic, and this is where the Pattern’s coolest feature (well, at least in my opinion) comes into play—Probability. The notes with repeats have a fairly low probability, so they’ll show up from time to time but not overstay their welcome. A few of the other notes have lower probability as well. Also, there’s some added swing—not only are Patterns not just for EDM, swing isn’t only for hip-hop.

Now we have a much more interesting shaker part.
If this is too inconsistent for you, it’s easy to make the velocity more similar, increase probabilities…whatever. And of course, we can create variations on these Patterns, make a few changes here and there, and have them sound similar yet different throughout the song.
Thankfully, Patterns don’t have to sound repetitive and boring…unless of course you want them to sound repetitive or boring. But that’s a whole other topic.
Friday Tip: The Customizable Phaser
Studio One’s Phaser is quite sophisticated, especially because you can set the number of stages from 2 to 20. This can emulate many classic phasers, as well as go beyond what was done with typical analog phase shifters. So why do we need yet another phase shifter?
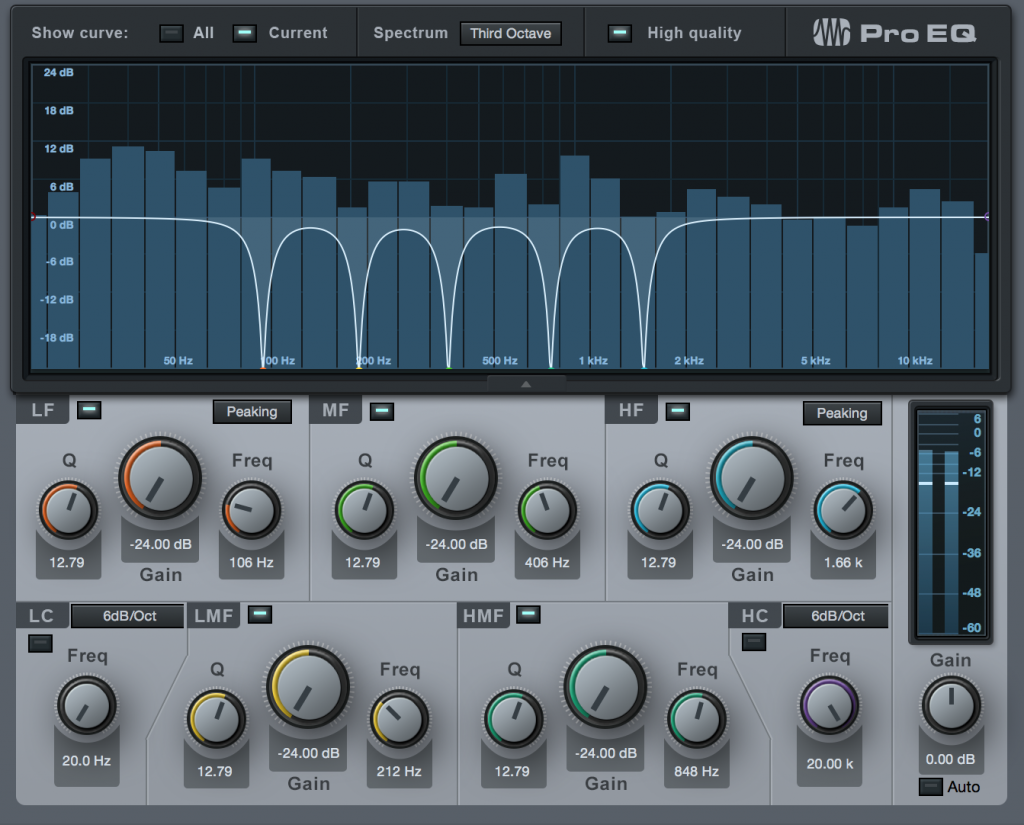
As explained last week, a phaser’s response is like an EQ with multiple notches, because a pair of phase shift stages produces one notch. So for example, if you set Studio One’s Phaser to 8 stages, it produces four notches. The Customizable Phaser differs from standard phasers because every filter stage can be either a notch or peak, to any degree you want. Mixing resonant peaks in with notches produces a sound that recalls a phase shifter, but has a uniquely resonant quality.
Again like last week, the Pro EQ is the star of the show. The five parametric stages are spaced an octave apart and cover a four-octave range. The trick is having a single Frequency control alter all five stages simultaneously… here’s how.
Creating the FX Chain
Although there’s a downloadable preset, delving into how this effect works is instructive. Mapping a control panel knob to a stage’s gain control is easy; open up the control panel to access the Macro Controls Mapping, and for the five Gain knobs, chose the respective Gain parameter as a target. I limited the knob’s range to -24 dB and +18 dB, because a +24 dB peak can be too much gain. After adjusting one knob as desired, copy the graph and paste it into the graph for the other knobs. Map Q similarly; a range of 4 to 16 works well.
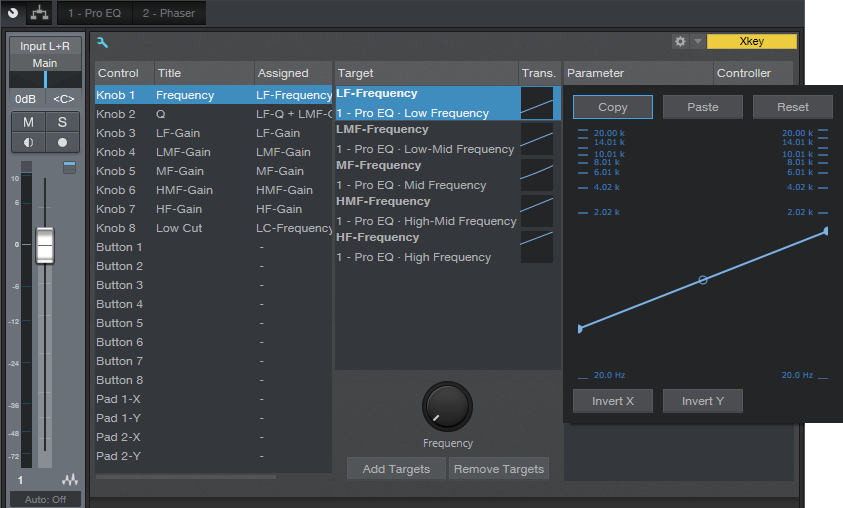
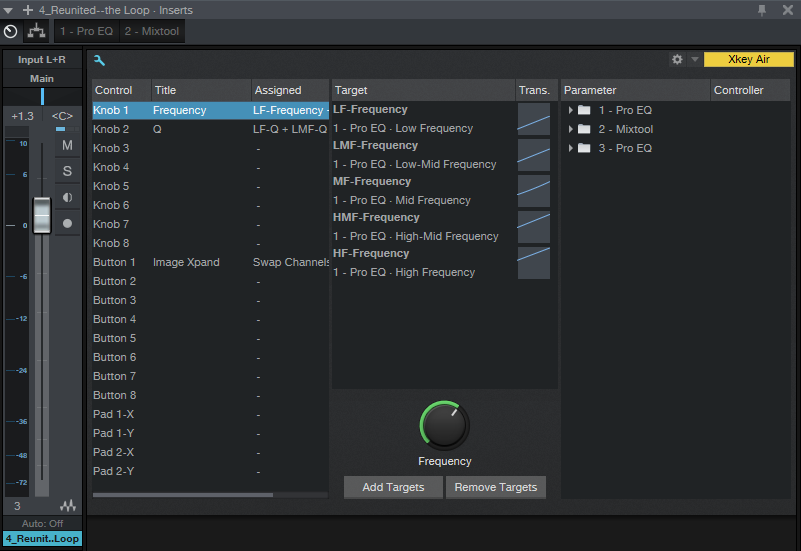
Mapping and offsetting multiple parameters from a single knob is a little more difficult. Start by pinning both the Pro EQ and the Macro Controls Mapping windows. I chose the initial frequencies for the five stages as 75, 150, 300, 600, and 1200 Hz. For the Knob 1 macro, add each stage’s Frequency control as a target.
Suppose you want to map the LF-Frequency target. Set the Frequency knob full counter-clockwise, click on the target’s graph, and while looking at the LF Freq knob on the Pro EQ, adjust the graph’s low node so that the LF Freq knob is at 75 Hz (or thereabouts). Now turn the Freq control fully clockwise, and set the graph’s high node four octaves higher (1.2 kHz) according to the LF Freq knob.
Proceed to the next filter Freq knob and use the same general procedure. For example for the LMF stage, the initial frequency would be 150 Hz, and the highest frequency would be 2.4 kHz. Continue mapping the remaining stages until all the filters cover the desired range when you move the Frequency control.
You’ll also note the Low Cut control is mapped to a knob that covers the range of 20 Hz to 1 kHz. Use this if the signal becomes too “boomy” with the frequency control set to a lower range.
In use
With all the Gain controls set to minimum and a fairly sharp Q, you have the equivalent of a 10-stage phaser. Now try increasing the LMF and HMF gains to around 8 or 9 dB—you’ll hear an immediate difference in the sound. Vary the Q for even more variations. You’ll find that between the Q and Gain controls, it’s possible to obtain phase-shifter sounds, but more importantly, you’ll be able to dial in combinations of resonant peaks and notches that aren’t quite like anything you’ve heard before. Ready for a new phase in phaser sounds? Check out this FX Chain.
Studio One 4 is Here!
The day has arrived! Studio One 4 has been released and is available for purchase from your favorite dealer or shop.presonus.com! Version 4 adds a ton of new features (full list is available in a PDF linked below) but some of the things we’re really excited about include:
- Chord track for real-time chord re-harmonization of instrument tracks and audio tracks; chord selector, Song Key Signature, Chord Transposing
- Impact XT Drum Instrument with 8 pad banks, 32 outputs, filters, trigger quantize, real-time time-stretching, and more
- Sample One XT sampler with record page, live sampling from nearly anything, auto-slicing, robust FX section, real-time time-stretching
- New Music Editing Options including intuitive Drum Editor and Drum and Melodic Patterns
- AAF support and Song Data Import
- New, lighter color options available
Click here to get a complete list of what’s new in Studio One 4. (PDF)
Where to buy: 
- Click here to shop online.
- To find a dealer in the USA, click here.
- To find a dealer outside the USA, click here.
Click here to watch the live webcast announcement with tons of feature videos, artist performances, and more:
Here’s our Studio One 4 YouTube playlist, with all of the webcast segments plus a whole lot more:
Where to buy:
- Click here to shop online.
- To find a dealer in the USA, click here.
- To find a dealer outside the USA, click here.
Notion 6.4’s New Features
NEW FEATURES in Notion 6.4!
Notion 6.4 is here, adding integration with the just-released Studio One 4, and a bevy of other new features! This is a free update for Notion 6 owners that can be obtained by clicking “Check for Updates” within Notion.
Enhanced integration with Studio One v4
With Studio One’s new Chord Track & Key Signature, the integration with Notion has become more powerful than ever. See all the details in the updated User Guide here.
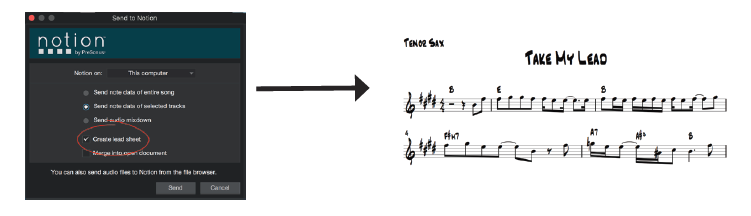
Receive Chords from Studio One’s new Chord Track

Quickly make a lead-sheet, complete with Studio One’s new chords, all with the right formatting and transpositions!
Receive Studio One’s new key signature—This means imported note data can now be “spelt” properly, with the correct enharmonic.
Receive any customised markers from Studio One’s marker track, and display as Rehearsal Marks
Paste enhancements
- You can now make a selection first to paste and replace the contents (this is just an option – you can paste as normal at the cursor for the same result)
- New shortcut for Paste Insert: [Win] Ctrl+Shift+V or [macOS] Cmd+Shift+V
- Paste Insert also added to right click context menu (in addition to Edit>Paste Insert)
- The whole measure is now not replaced/overwritten when pasting a partial measure.
- Paste no longer causes rhythmic changes, when pasting multiple times between different voices or between a grand staff
- Paste now ignores ties in other voices on a grand staff
New text box behaviour
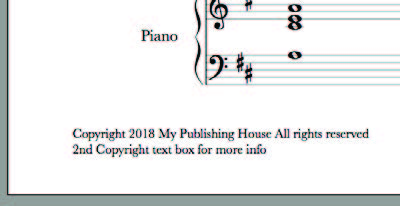
- New checkbox “Link to metadata” in Score>Add Title/Header/Footer. This unlinks a new text box from others of the same style meaning you can create multiples of e.g. copyright notices. This is useful for e.g. creating long copyright notices (such as those required for SMP Press)
All Fixes and Enhancements
Rules, Presets and Sequencer Staff
- East West Quantum Leap presets now loading as expected for most users. Note – You may need to relink your Favourites/Paths to your sample folder from within Play.Legacy presets (from Notion 6.3 and earlier) are still available from your my.presonus.com account
- Updated preset for LA Scoring Strings – please login to your Audiobro account and download from there
- [Win] Custom expressions now showing in Rules Editor as expected
- Shift+Alt+Up/Down now adjusts velocity of a group of notes in increments of 1, as expected
- Up/down arrows now adjusting selected CC data in sequencer staff as expected
Language/International Fixes
- Files now transfer as expected from Studio One, when the file name has non-ASCII characters (e.g. Korean, Japanese, Chinese characters)
- Tuplet dialog is now translated properly in Japanese language
- Music intervals are now translated properly in German language, in transposition window
- Alternative shortcut added for Next/Previous Rehearsal marks – this is for different language keyboards that do not have [ or ] keys (Win: Ctrl+Shift+Left/Right and Mac: Cmd+Shift+Left/Right)
General
- [Win] Surface Pen button now brings up Context menu as expected following Windows 10 Update
- [macOS] Video now attaches to score as expected
- Chord summary at bottom of first page, now saving properly
- Shortcuts PDF updated
PreSonus Giveaway on May 22! #PreSonus4Ever
 We’re hosting a FREE webcast this Tuesday with some preeeeeetttty huge news! We’re excited to share with y’all.
To celebrate, we’re giving away a FaderPort 8 to one lucky entrant during the broadcast! That’s a $500 USD value!
Here’s how to enter:
- Must be following PreSonus on Facebook and/or Twitter.
- Share the Live Webcast to your personal Facebook feed or Tweet the YouTube Link during the broadcast.
- Include #PreSonus4Ever in your post.
And that’s it! You’re entered. One winner will be drawn at random and notified directly on May 22 at 2 pm CST. Contest open globally. Webcast starts at 10 am CST on May 22, 2018 on Facebook and YouTube. TUNE IN!
Friday Tip: The Imaging Phaser
I’ve been experimenting with phasers lately, and found some interesting tricks. This week we’ll create a mind-melting phaser-meets-stereo-imager. Next week, we’ll create a super-customizable phaser with continuously variable peaks and notches, so you can obtain specialized vintage sounds like the original Electro-Harmonix Polyphase.
HOW IT WORKS
You can reproduce the sound of a phaser with several tracking notch filters, so instead of using a phase shifter per se, we can use the Pro EQ.
The five parametric stages are set up as notch filters one octave apart, with a sweep range of four octaves. The FX Chain Frequency control sets their frequencies. If you download the multipreset, I highly recommend reverse-engineering it to see how to control multiple filter stages from a single knob.
The FX Chain Q control sets the phase effect’s resonance/sharpness by altering the Q for all five stages simultaneously. Broader Q settings reduce volume, with a less focused, gentler phasing sound. High Q settings are sharper, with a more pronounced phasing effect.
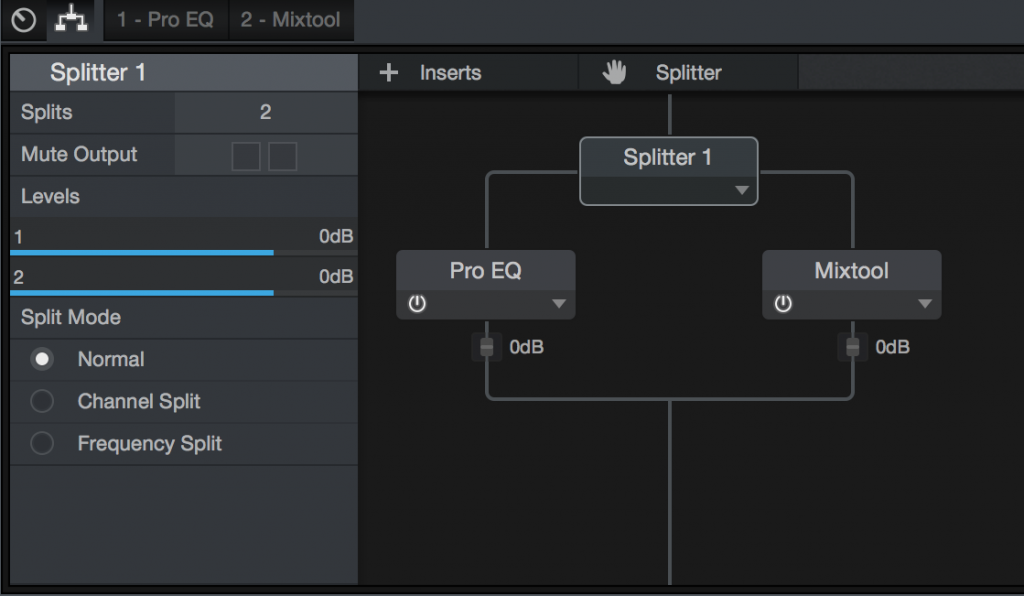
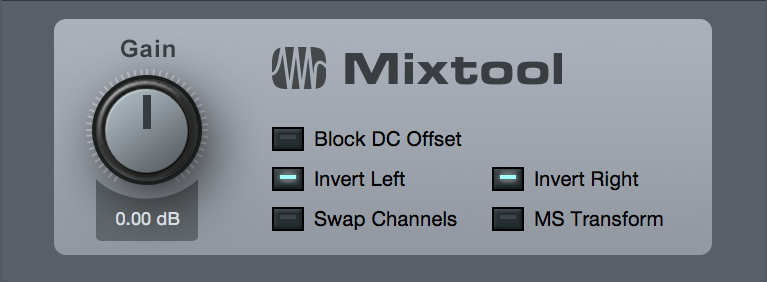
But the secret ingredient here is splitting the signal path into the Pro EQ-meets-phaser and the Mixtool. Inverting the phase for the Mixtool’s left and right channels cancels out any remaining dry signal from the Pro EQ “phaser,” which accents the phasing sound.
If you compare this to the sound of the PreSonus Phaser, it’s like the PreSonus Phaser supplements the audio with the phasing effect, while the Imaging Phaser replaces the audio with the phasing. They both have their uses.
THE IMAGING PHASER
The real mind melt happens if you run program material through the Imaging Phaser and then click the Image Xpand button. This swaps the right and left channels, which because they’re out of phase, creates insane imaging effects. The first time I tried this was on a laptop, and clicking on Image Xpand made it seem like the speakers were located somewhere else in the room. The effect is less dramatic with signals that don’t contain a lot of stereo information and ambiance, or on headphones, but it still makes a difference.
THE AUDIO EXAMPLE
The first part showcases the phaser effect. After the word “Reunited” appears, you’ll hear an unprocessed version of the track for four measures. After that, it’s Image Xpand time, with the FX Chain control being varied to alter the sound somewhat.
And for those without the patience to build their own Imaging Phaser, here’s an FX Chain multipreset you can download. Have fun!
Click here to download the multipreset!
Friday Tip: The Project Page Meets Bluetooth
The Project Page Meets Bluetooth
After mastering a project, I like to check out its suitability in a variety of contexts by listening to it over and over again—in the foreground, in the background while people are talking, while the dishwasher runs, whatever. This can be very instructive when trying for masters that are transportable not just for different playback systems, but for different listening conditions.
And that’s when it hit me: Bluetooth! I have IK Multimedia’s iLoud portable Bluetooth speaker, and carry it around the house to listen to music that’s streaming from a mobile device. Why not carry it around while listening to a mastered Project? Or even loop a Song, so I can get lyric ideas while the instrument tracks play in the background? Or listen over other Bluetooth devices, to get an idea of the type of sonic violence the music will have to endure at the hand of consumers?
Okay, so I was a little slow to tumble to this…but reality checks can indeed be useful, and I hope you find this tip useful as well. We’ll do the Mac first, and then Windows.
Mac
1. Choose Apple menu > System Preferences > Bluetooth.
2. Turn on Bluetooth at the Mac if it isn’t already.
3. Turn on your Bluetooth playback device, and enable pairing for it (usually by pressing a pairing button on the device).
4. When the Connection Request appears, click Connect.
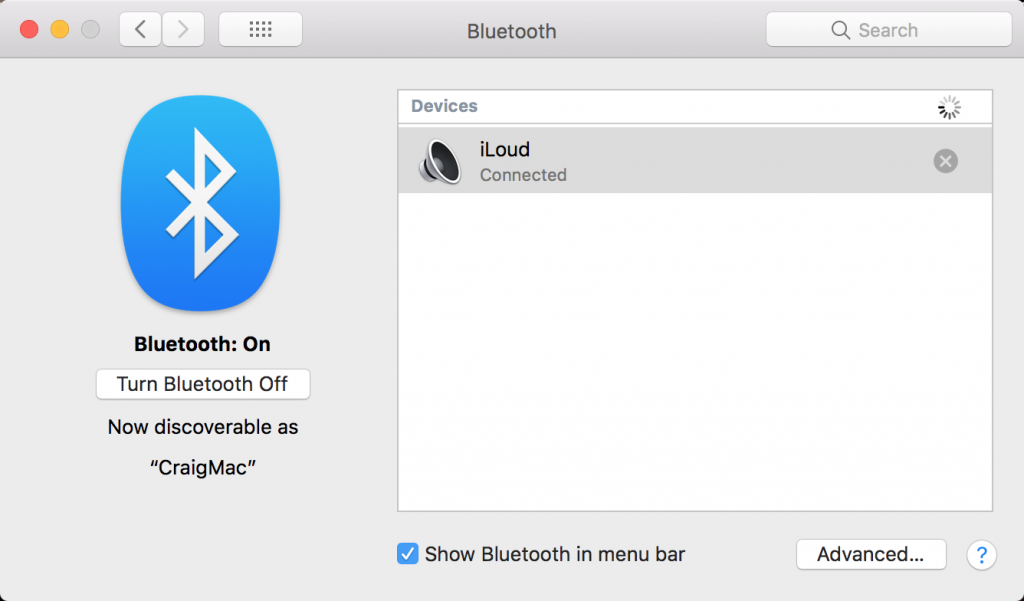
5. The Bluetooth window will show the device as connected.
6. In Studio One, choose Preferences.
![]()
7. For Playback Device, choose your Bluetooth playback device.
Windows
1. Choose Settings > Devices > Bluetooth & other devices.
2. Turn on Bluetooth in Windows if it isn’t already.
3. Click on Add Bluetooth or other device, then choose Bluetooth when Add a Device appears.
4. Turn on your Bluetooth playback device, and enable pairing for it (usually by pressing a pairing button on the device).
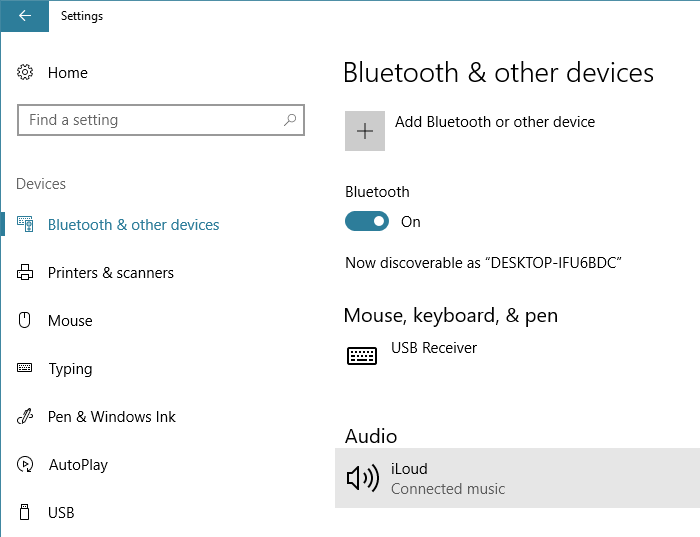
5. Click on the device name to connect it. Once it’s connected, click on Done.
6. In the Windows search box, type Sound and then select Sound Control Panel.
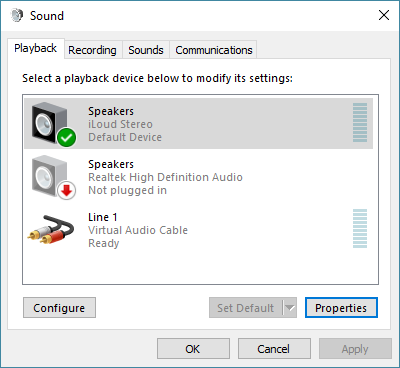
7. Your Bluetooth device should appear in the list of potential playback devices. Click on it, and then click Set Default to make the Bluetooth device your default playback device.
8. Now that Windows is set up, open Studio One, and choose Options. Select Windows Audio for your Audio Device, and you’re good to go.