Mixing Competition with Recording Revolution, Splice, and Briana Tyson
 We’ve partnered with Splice, The Recording Revolution, and Briana Tyson for a mixing competition!
Practice your chops bringing stems from Briana to life and share your best mixing tips and tricks with the rest of the community! Here’s how it works. Click the link below to visit Splice and download the project files and stems for Once all the mixes are in, Graham from Recording Revolution will listen through the mixes and choose the one he thinks is radio ready to win his premiere mixing course Mixing University, a pair of Eris E66 Monitors and a copy of Studio One 4 Professional, an Eyeball microphone cover from Kaotica, a video call with Briana Tyson, and consideration from Briana Tyson for official release!
Click here to learn more and sign up!
Spoons’ Jeff Carter and Sandy Horne on PreSonus Studio One
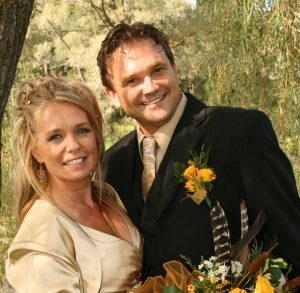
Sandy and Jeff
Spoons are a long-haul Canadian new wave band formed 1979 in Burlington. Jeff Carter is their longtime producer, collaborator, and husband to founding member/bassist Sandy Horne. Jeff got into Studio One after years in analog recording, including some time with PreSonus’ FireStudio interfaces when collaborating with Sandy and helping her set up her studio.
When Studio One version 1 was released, they switched from Cubase… and were able to collaborate so effortlessly together that Jeff actually credits Studio One with helping cement a relationship with Sandy—which culminated in their marriage!
On the other hand, Sandy calls this scenario the “Hire-a-Husband” program, so the truth is probably somewhere in the middle. But they’re married and happily making beautiful music together to this day. Jeff has a lot of nice things to say about why he chose Studio One and how he uses it:

Sandy and Jeff in the Studio
What PreSonus products have you used and which do you currently use?
I’ve used all kinds of PreSonus hardware, going back to the early FireStudios, then the Firestudio Project, and then the Firestudio Tube, which I still use on our older iMac system—the new system is using a Thunderbolt interface. Static in Transmission was recorded entirely with those various FireStudio interfaces, with the help of a Presonus HP4 headphone amp. We also use a new PreSonus Studio 26 as an interface for live shows, for the keyboard player’s virtual instrument outputs and backing tracks. I’ve also had the opportunity to mix live on various versions of the StudioLive consoles, going back to the first generation, which has been a joy, as they’ve all had an intuitive layout, similar in philosophy to Studio One. I’m now using a Faderport Version 2 in the studio as well, which has been great for streamlining certain functions, like scrolling the timeline, mutes and solos, transports, and writing automation.
But overall, Studio One Professional has been far and away the most important addition to Sky Studios, and since its inception, we’ve used every subsequent version of it since the beginning. I have other DAWs… pretty much all of the major ones; I keep them around, mostly just in case clients bring files in from other systems for me to mix; but even then, I’ll bounce the stems over to Studio One, or just export the files as OMF—which is another fantastic addition to Studio One that’s made my life so much easier!

Spoons’ Latest Album
For what applications are you using Studio One Professional?
I use Studio One for almost anything audio and/or MIDI related: composing, recording, mixing, re-mixing, post-production, sound design, and mastering. Now, with Studio One, the big eye-opening moment for me happened with version 3, when the Console Shaper was first added. Finally, my mixes started to have some of that subtly-more dynamic, organic, and harmonically “gelled-together” sound that I had been chasing ever since my days mixing on that big ol’ Trident console back in the 90s. When CTC-1 (on sale now!) came out soon after, I immediately bought it, and it’s made a stunning difference. On New Day New World, I tended to use the Tube Mode on bass and certain synth busses, because there’s a low-end warmth that it imparts that I really dig, and the Classic Mode was sometimes used on guitar or vocal busses—but the big winner was the Custom Mode, which was used on many things, but always used on drums, and on the 2 buss, boosting the “drive” and “character” parameters just enough to get the tracks into that sweet spot where things sound full, yet detailed, and open, yet tight. For all those who have Studio One Pro 3 or above, try it: you’ll know what I’m talking about as soon as you hear it.
What led you to choose Studio One? Was it the company’s reputation, audio quality, ease of use, specific features, price, other factors?
PreSonus has always had a solid reputation, but it was being shown real-world examples of how intuitive it is to work with that really sold me. With Long and McQuade, I almost always physically demonstrate Studio One, as opposed to just talking about it; the workflow sells itself. The audio quality of the 64-bit mix engine, especially with CTC-1 in use, is like nothing I’ve ever worked with, excluding large analog consoles. The Presonus Symphonic Orchestra Add-on is also great sounding, from the subtle, switchable articulation in the string sections, to the warm brass, to the orchestral timpani and percussion. You can hear it all over the opening track of New Day New World, and on the strings at the end of “Love Recall.” The pricing for Studio one is more than reasonable considering what you get; and the Artist version being included with even the least expensive PreSonus interfaces is honestly a total steal.
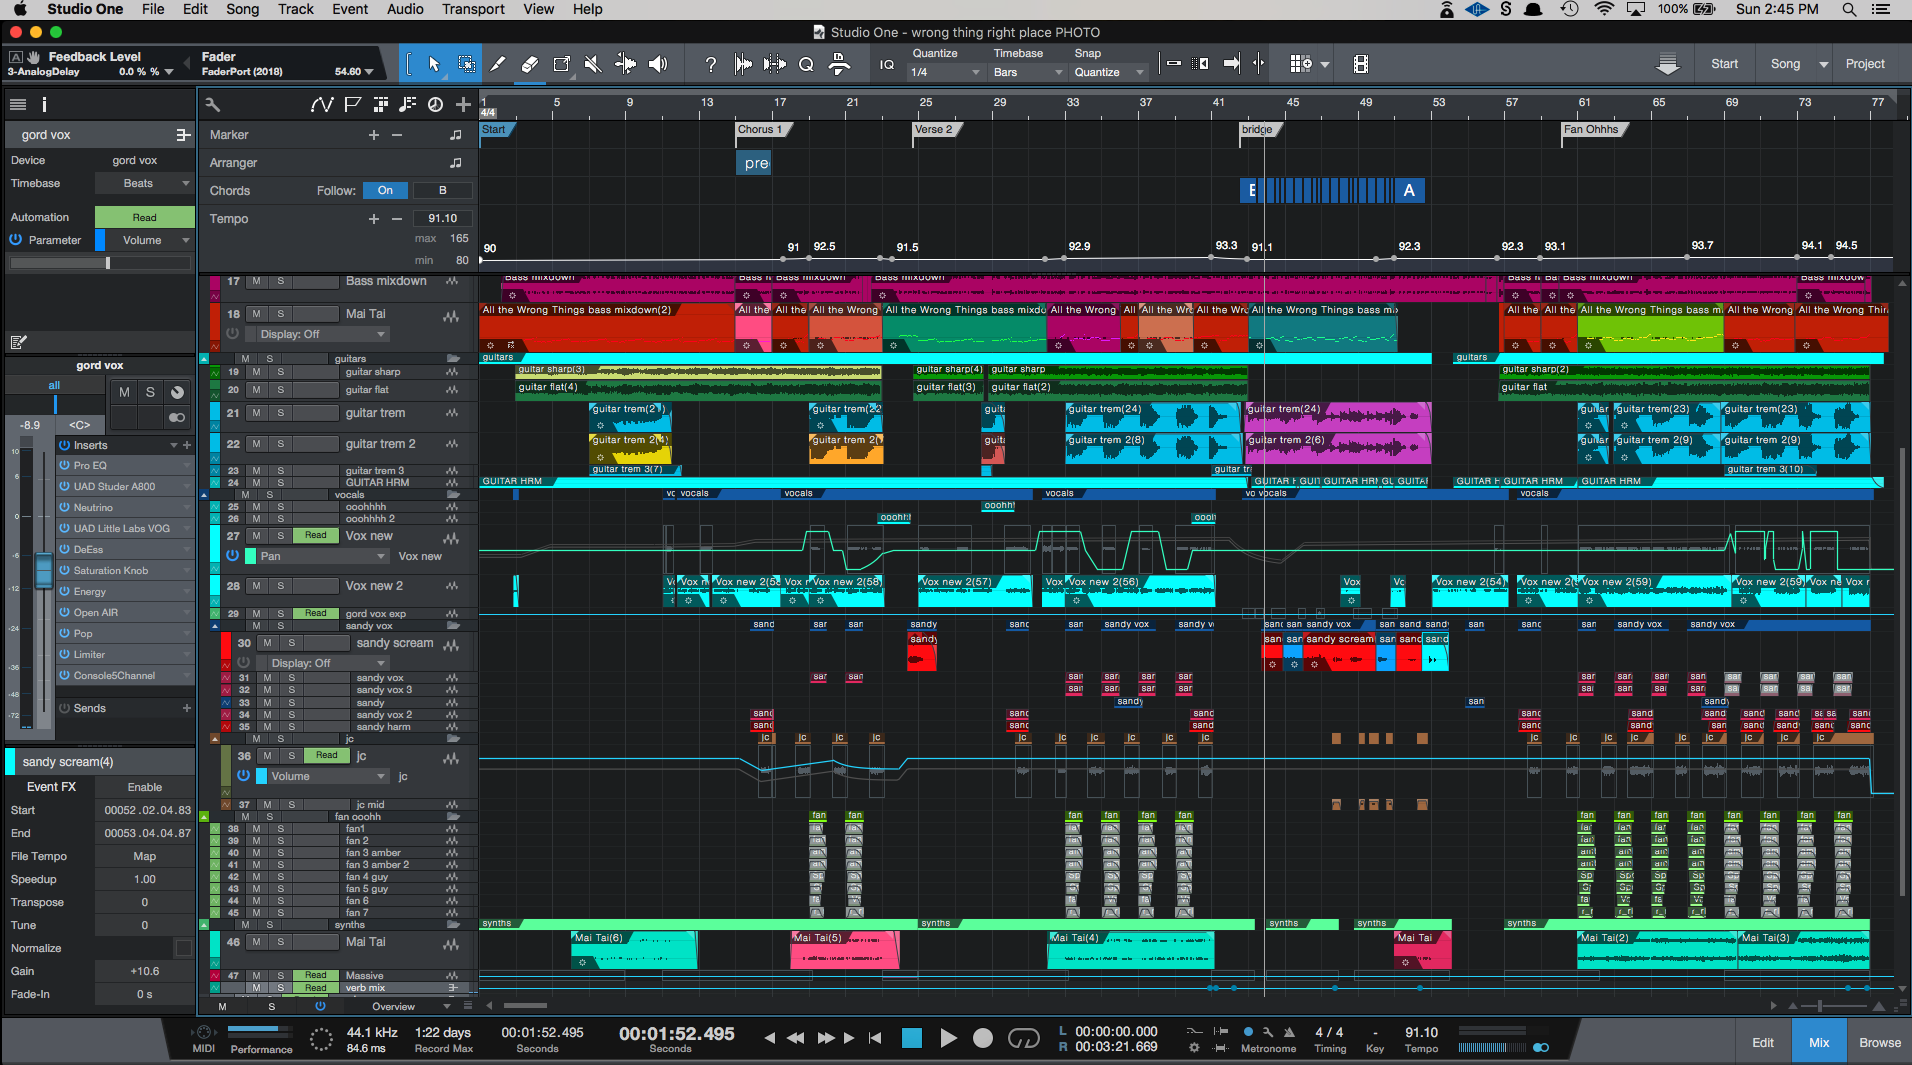
Screenshot of “All the Wrong Things”
What Studio One features have proven particularly useful and why?
The automation mapping is so simple that it encourages me to get more creative, easily automating subtle things like synth detuning, delay mixes, and feedback, or rotary speaker speeds. I’m no longer afraid to try things like that while working with an artist in the studio with me, as it doesn’t really slow down the pace of work, or hamper the creative process, because it can be done so quickly. On previous DAWs, If it was too time-consuming or tedious, I might have to try things like that on my own time, or possibly not at all. There’s a part in the dub/soca-influenced bridge of “All the Wrong Things (In the Right Places),” off New Day New World, where the guitar track pans wildly back and forth, but still in rhythm with the song, while you can hear the Analog Delay plug-in (the long echo on Gord’s vocal) subtly deepening its modulation depth (which detunes the vocal only in the feedback loop), which were all relatively easy to do with the preset automation shapes coupled with the transform function.
Being able to cross-fade overlapping audio clips with just the press of the “x” key, and adjusting the slip points and volume offsets of clips with such easily variable curves is dynamite… something I use all the time. The VCA implementation is logical, and being able to easily write VCA automation to tracks is a real-time saver as well.
The new chord track has come in very handy too; in “Repeatable,” there’s a guitar solo that comes in around the one minute mark that I thought was too similar to the one near the end of the song, so I extracted the chords from another (rhythm) guitar track, then transposed that first solo up 5 or 6 semitones (which obviously put it out of key), but then set it to follow the rhythm guitar’s chord track, which not only put the solo back in key, but it made sure the lead part still followed the song’s changes, creating this new solo part that had the same feel as the later solo, but with a new, higher-pitched variation on the notes, making it quite distinct.
How does Studio One compare to other DAWs you have used? What does it give you that other DAWs don’t?
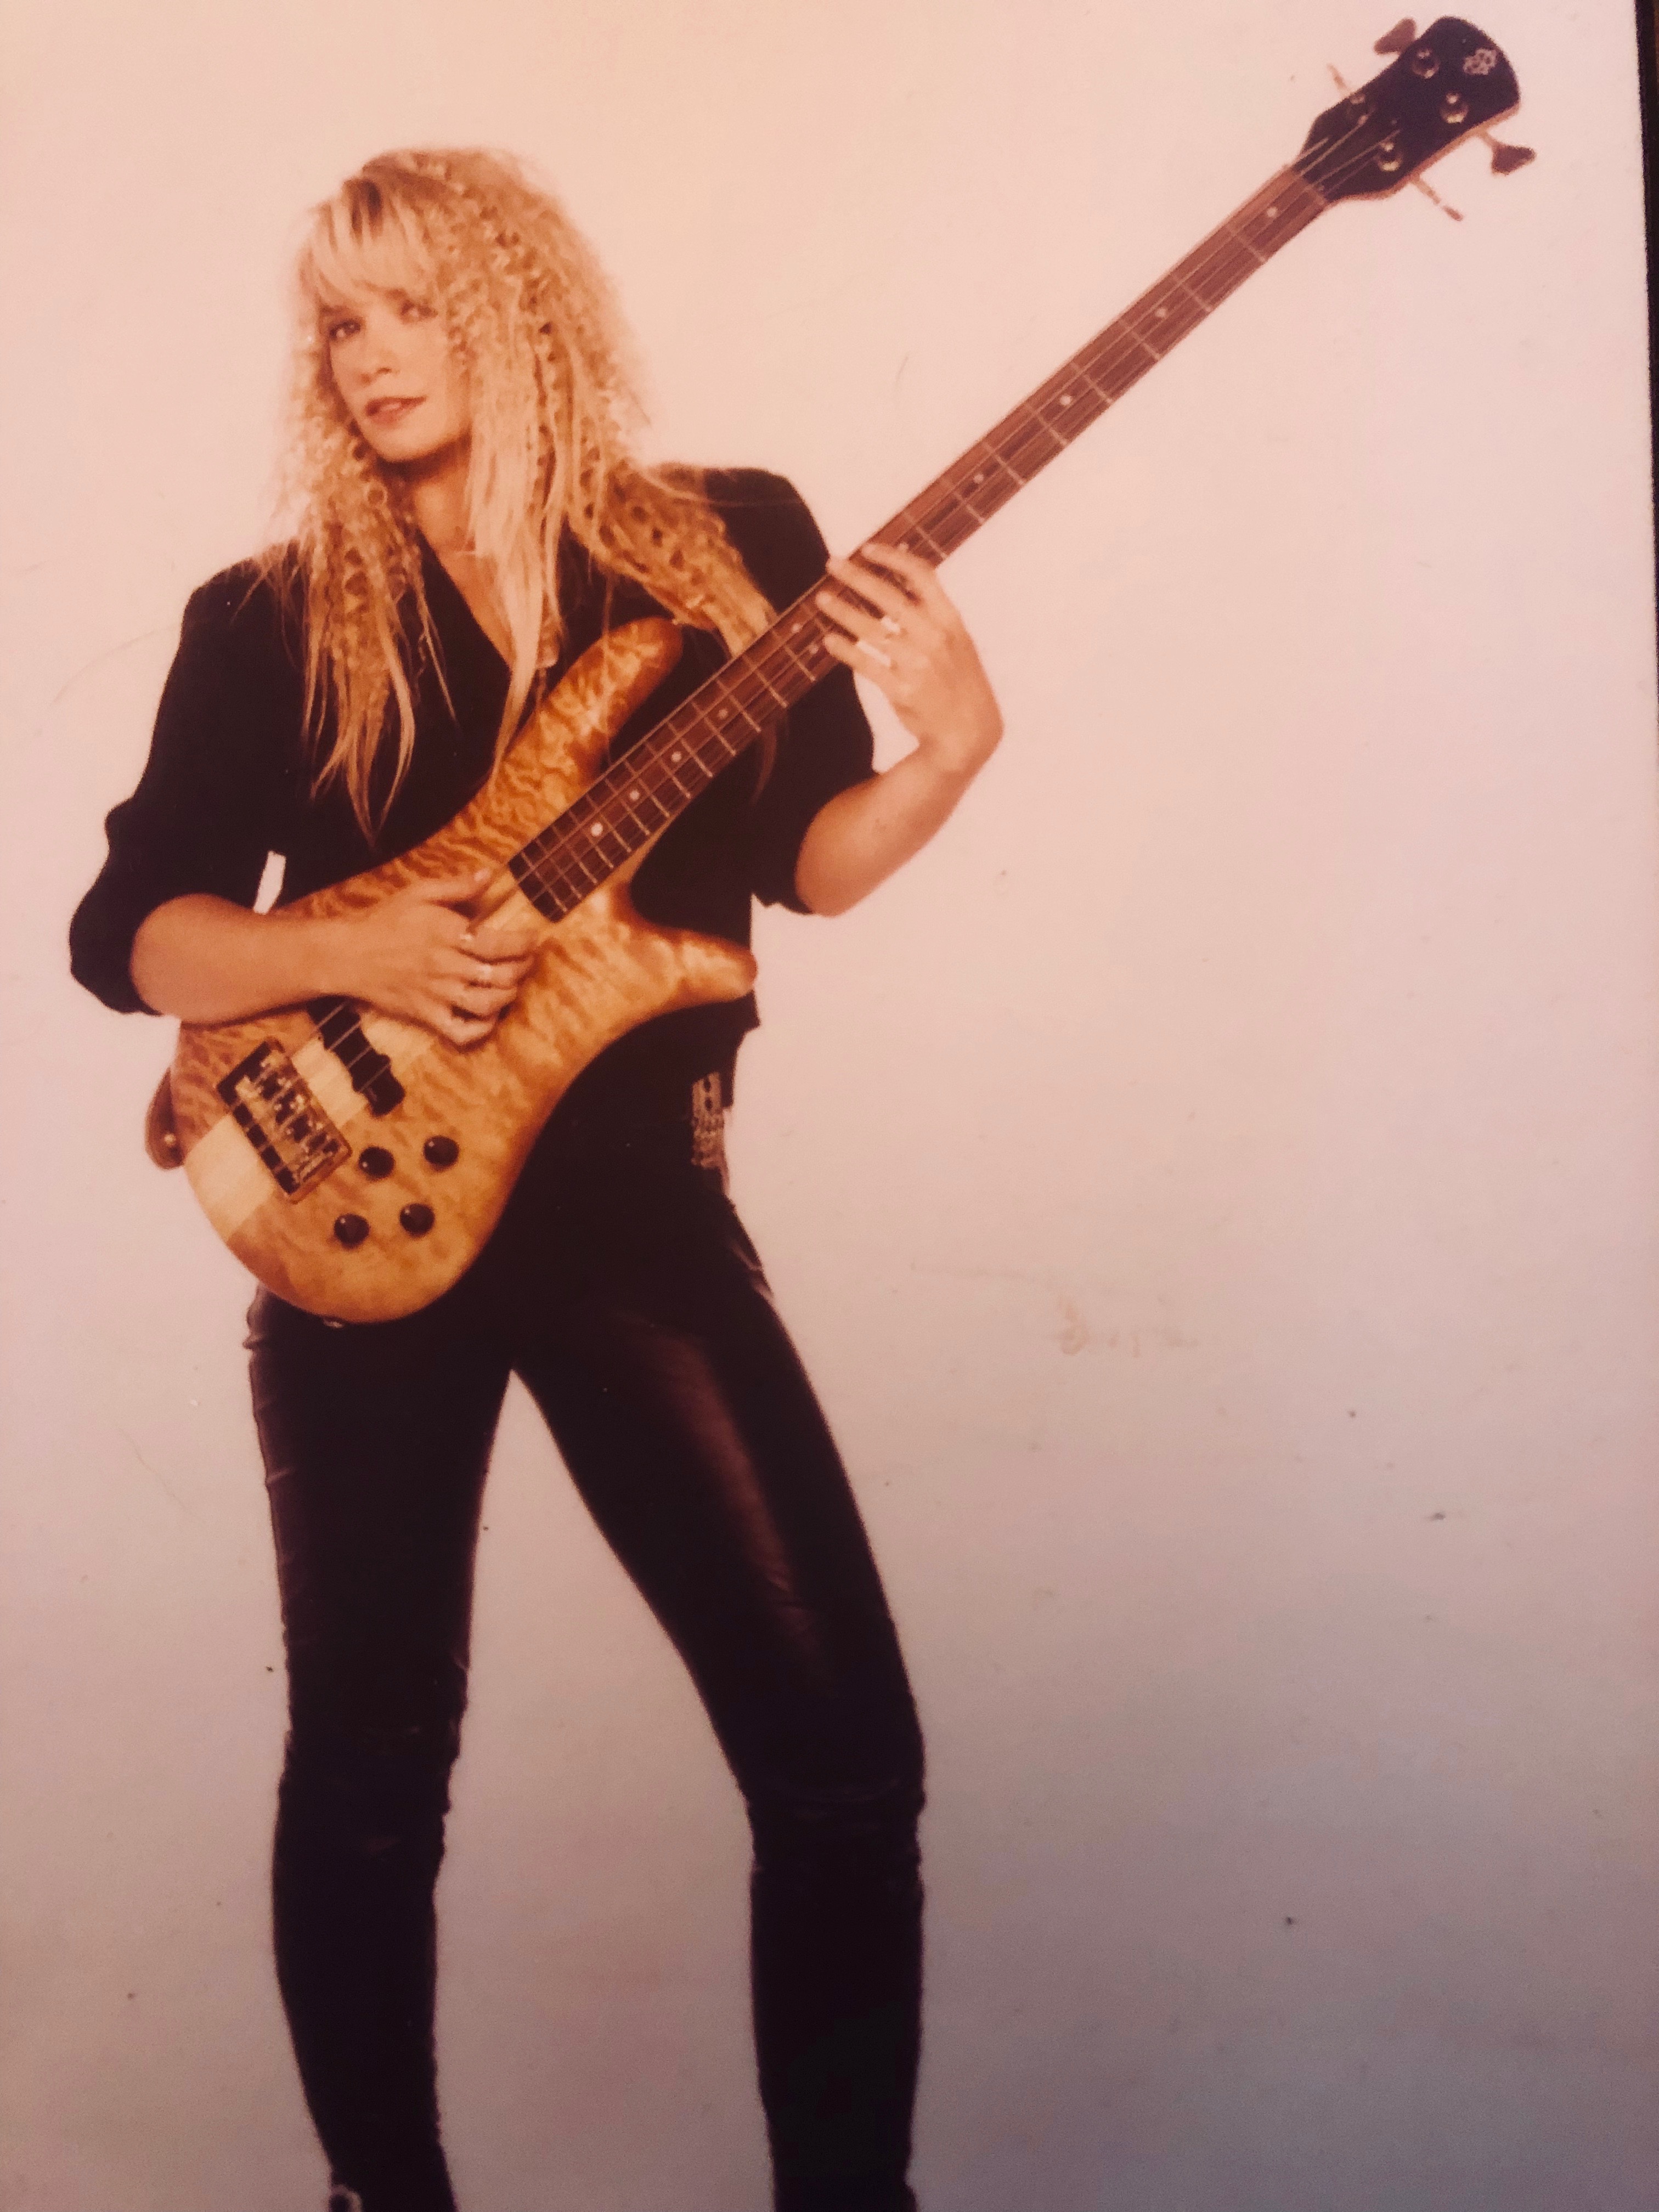
“Sandy_Pants.JPG”
Like I’ve mentioned, workflow is one of the biggest reasons to use Studio One; automation assignments of almost anything that moves on-screen are only a right-click away (or a simple drag-to-track from the little hand in the top right) Clip gain offsets, slip edits, and fade-in/fade-out/crossfade edits are super easy and fast. Time-stretching clips to bar and beat lines is a similarly-simple Alt+drag. In Studio One, I use custom keyboard shortcuts for changing the note values in the drum editor; that way I can switch between painting in 8th note/16th note/and 32nd note hi-hat rolls, for example, on the fly. In most DAWs, that’s not something that’s easy to set up, if possible at all.
The new Tempo editor, with its easy to draw in curves, is a vast improvement over the previous version; I used those curves to give a subtly-increasing energy-boost to the choruses of “All the Wrong Things”.
The MIDI editing is, and has always been great, and it’s not cluttered, and the automatic assignment of sample-pad names (Kick 1, Snare 2, etc.) to lanes in the drum editor is a huge time-saver, and about as easy as I could imagine it being. But I’d really like to see 1/8D and 16D (duplet) showing up by default in the quantize options, along with ⅓ and ⅔ (33.3% and 66.6%) swing values. Would be handy for the jazz and hip-hop crowds as well. Along those lines, I use the X-Trem effect a lot, like on the rhythmic guitar stutter in “Life on Demand,” and the quick, sliced-up synth in the chorus of “Snowglobes.”
Being able to extract MIDI note data from audio recordings (via the Melodyne Editor) is something I never imagined possible, and it’s so simple to do: just drag the “Melodyned” audio clip to an instrument track! I used that trick to create a sub-octave synth bass (triggering the Mai Tai analog synth plugin) that follows along with Sandy’s live electric bass all the way through “All the Wrong Things,” and in certain parts of several other tracks.
Which Studio One feature or concept doesn’t get enough spotlight (or isn’t talked about enough) in your opinion?
CTC-1 and Mix Engine effects doesn’t get near enough praise! Especially the “custom” model. Absolute magic. There’s a screen-shot here of the mixer, with lots of instances of CTC-1 open on all the busses. I’d like to try out the Softube tape shortly as well, as it looks very promising.

CTC-1 in use all over “All the Wrong Things”
Mai Tai is also a fantastic-sounding yet still perhaps under-praised synth; I used it all over this record, not only for pads and sub-bass, but critically, the main, echoed synth-patch which sets the overall tone and vibe of “Landing Lights” is a Mai Tai patch (Poly-Arp3), that I modified to be a bit tighter and pluckier.
Any useful tips/tricks or interesting stories based on your experience with Studio One that would be of interest to our user base?
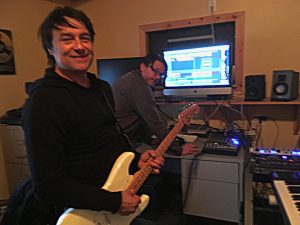
Jeff and Gord of Spoons in the Studio
With Mai Tai, you can get some FM-ish (frequency modulation synthesis) tones out of it, by modulating the rate of LFO 1 (set to max speed) with the rate of LFO2 (also set fairly high, which sends LFO 1 into audio rates) and then assigning LFO1 to oscillator pitch. Then, modulating the rate or amount of LFO2 can give you some cool, edgy/grindy synth FX patches, that are somewhat controllable, but still musical. I used that trick to create the wild “CPU-freaking out” synth-madness you hear on “Perfect Exception”. Of course, I’d LOVE to see a simple, dedicated FM synth added at some point (or even straight-up FM added to Mai Tai!)
Another thing I discovered was a variation on Craig Anderton’s “Tonal Verb” concept, that he wrote about a while ago on the Presonus blog.
But instead of using two nearly identical reverbs on an FX buss, I use the same technique to create two nearly-identical, but out of phase compressors, inserted directly, just changing the attack or release on one or the other; all you end up hearing is the difference between the attack (or release) portions, and I’ve used this to get rid of excessive decay or resonance in snare and shaker parts, setting one compressor’s attack to “0”, and opening the other one up a bit, leaving only the transients. Use longer attacks on both comps to create “soft” guitar or drum parts, where the pick attacks and stick hits swell in.
Similar concept can be used with two near-identical but out-of-phase EQs, where one EQ has peak or valley points and the other doesn’t; all you hear is what’s “inside” those difference-peaks, and nothing else…sort like a multi-band bandpass filter. Great for capturing only the “ring” or resonance points of an interesting, but otherwise-messy snare sample, which can be blended in with other, cleaner snares. ( I used this on one of the drum layers in “Repeatable”, where the original loop was recorded from a drum loop in a vox amplug practice device, that had a neat character that I only wanted to capture certain parts of) The groove extraction feature came in very handy there as well, as I was able easily match up the feel of that sampled drum loop with my added Impact drum samples.
Any final comments about PreSonus and Studio One?
This is the second interview with me that PreSonus has been so kind to do; the first one came out almost eight years ago after Static in Transmission was released. I have to say that PreSonus, as a company, has not only had great support for me and thousands of other customers, but you’ve seemed to go out of your way to encourage and inspire musicians of all kinds. In the past eight years, I’ve grown more and more comfortable with Studio One, but despite that level of comfort, I’m still discovering new things I can do with it every week, partly thanks to the great articles and learning videos you post on your blog. It’s been an incredibly satisfying and exciting experience growing along with your software and your company, and I look forward to it remaining an integral part of my musical life. Thanks for making great software!
Jeff Carter and Sandy Horne—Spoons.
Keep up with Spoons:
- Website
- Sandy Horne Project
- Shroud (Jeff’s Sci-fi / Fantasy animation project!)
Friday Tips: Crazee Snare Enhancements!
You never know where you’ll find inspiration. As I was trying not to listen to the background music in my local supermarket, “She Drives Me Crazy” by Fine Young Cannibals—a song from over 30 years ago!—earwormed its way into my brain. Check it out at https://youtu.be/UtvmTu4zAMg.
My first thought was “they sure don’t make snare drum sounds like those any more.” But hey, we have Studio One! Surely there’s a way to do that—and there is. The basic idea is to extract a trigger from a snare, use it to drive the Mai Tai synth, then layer it to enhance the snare.
Skeptical? Check out the audio example.
ISOLATING THE SNARE
If you’re dealing with a drum loop or submix, you first need to extract the snare sound.
- Create an FX Channel, and insert a Pro EQ followed by a Gate.
- Add a pre-fader send from your mixed drums to the FX Channel. Aside from providing a more consistent level for triggering, a pre-fader send lets you turn down the main drum track. This way you hear only the FX Channel, which makes it easier to tweak the EQ and isolate the snare.
- With the Gate bypassed, tune the Pro EQ to the snare frequency. Use the LC and HC with a 48 dB/octave slope to provide the preliminary isolation, then use a super-sharp bandpass setting to zero in on the snare frequency (Figure 1). The EQ’s background spectrum analyzer can help by making sure the bar in the range you’re boosting goes as high as possible. In stubborn cases, you may need to double up the bandpass filter with a second sharp bandpass filter.
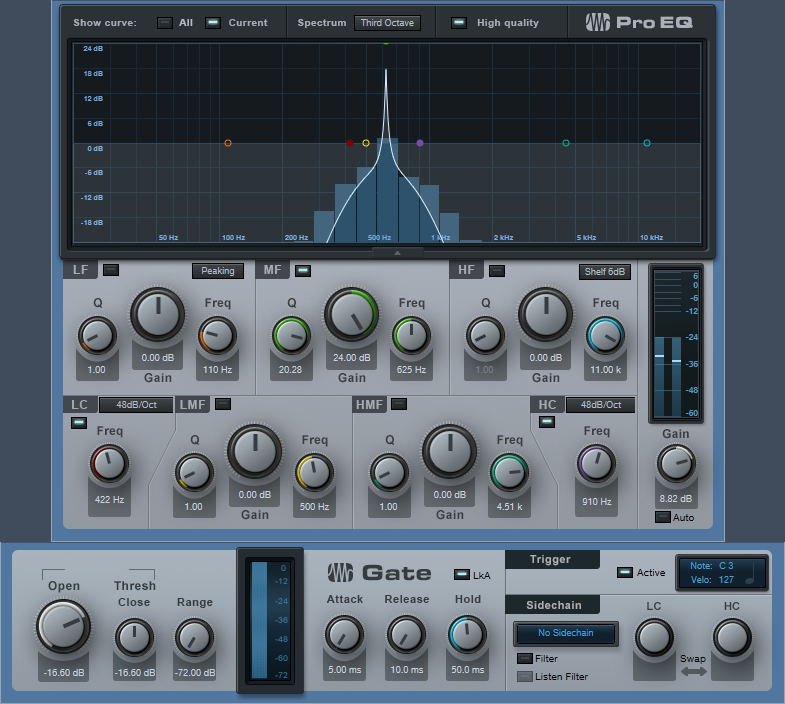
Figure 1: Use the Pro EQ and Gate to extract a snare drum trigger.
- Enable the gate, and click on Active to enable the trigger output. Set the Note and Velocity as desired (however when using noise with Mai Tai, the specific Note isn’t that critical). Adjust the Gate’s settings so that it triggers on the snare hits. Like the Pro EQ, the controls here are critical as well.
- A short attack is usually best.
- Keep release relatively short (e.g., 10 ms), unless you want to mix in some of the peaked/gated sound from this channel along with the Mai Tai and drums.
- Hold times around 50 ms can help prevent false triggering. But you can also get creative with this control. If you don’t want to trigger on hits that are close together (e.g., fills), a long Hold time will trigger on the first snare of the series, but ignore subsequent ones that fall within the hold time.
- Insert the Mai Tai. Set its input to Gate, and enable the mixer’s Monitor button. Figure 2 shows the finished track layout.

Figure 2: Track layout for snare drum extraction.
TWEAKING THE MAI TAI
Now the fun begins! Figure 3 shows a typical starting point for a snare-enhancing sound.
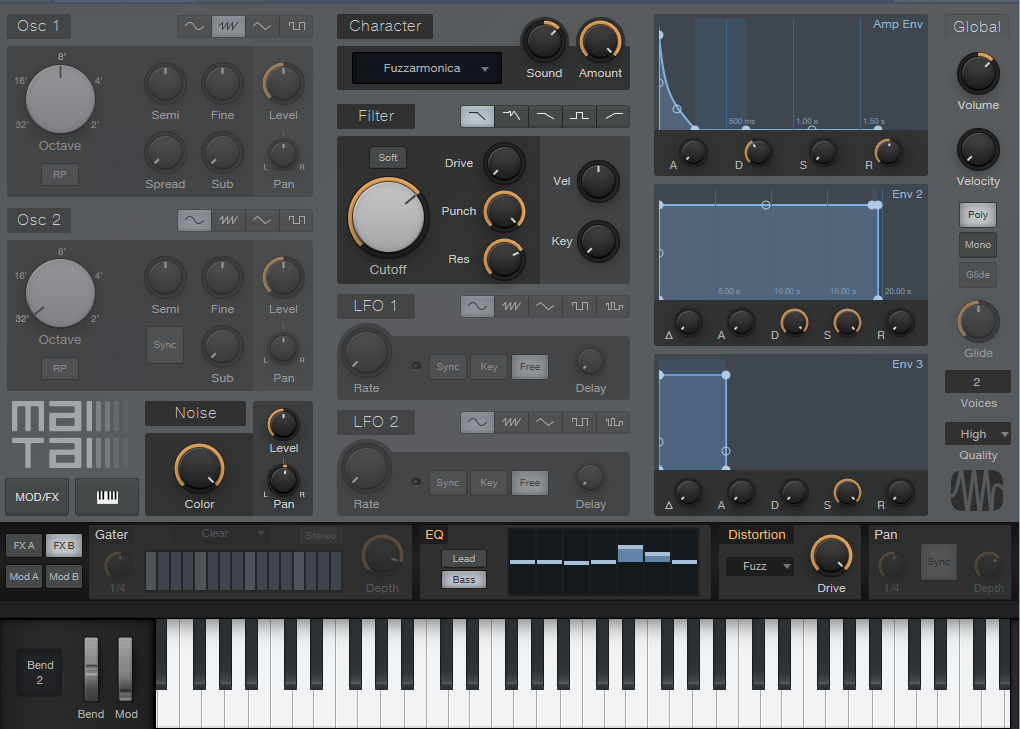
Figure 3: Starting point for a cool snare drum sound with Mai Tai.
The reason for choosing Mai Tai as the sound source is because of its “Character” options that, along with the filter controls, noise Color control, and FX (particularly Reverb, EQ, and Distortion), produce a huge variety of electronic snare sounds. The Character module’s Sound and Amount controls are particularly helpful. The more you play with the controls, the more you’ll start to understand just how many sounds are possible.
BUT WAIT…THERE’S MORE!
If the snare is on a separate track, then you don’t need the Pro EQ or FX Channel. Just insert a Gate in the snare track, enable the Gate’s trigger output, and adjust the Gate Threshold controls to trigger on each snare drum hit. The comments above regarding the Attack, Release, and Hold controls apply here as well.
Nor are you limited to snare. You can isolate the kick drum, and trigger a massive, low-frequency sine wave from the Mai Tai to give those car door-vibrating kick drums. Toms can sometimes be easy to isolate, depending on how they’re tuned. And don’t be afraid to venture outside of the “drum enhancement” comfort zone—sometimes the wrong Gate threshold settings, driving the wrong sound, can produce an effect that’s deliciously “right.”
Watch Graham from The Recording Revolution Demo His Favorite Way to Mix
Graham from The Recording Revolution is primarily a Pro Tools user recently got ahold of a copy of Studio One Pro. After some quick Skype tutorials with Rick, he was good to go! Here he demos how quickly you can enhance your mix at the beginning, a concept known as Top Down Mixing, all with Studio One stock plugins!
Friday Tips: The Limiter—Demystified
Conventional wisdom says that compared to compression, limiting is a less sophisticated type of dynamics control whose main use is to restrict dynamic range to prevent issues like overloading of subsequent stages. However, I sometimes prefer limiting with particular signal sources. For example:
- For mixed drum loops, limiting can bring up the room sound without having an overly negative effect on the drum attacks.
- With vocals, I often use a limiter prior to compression. By doing the “heavy lifting” of limiting peaks, the subsequent compressor doesn’t have to work so hard, and can do what it does best.
- When used with slightly detuned synth patches, limiting preserves the characteristic flanging/chorusing-like sound, while keeping the occasional peaks under control.
- Limiting is useful when following synth sounds with resonant filters, or with instruments going through wah or autofilter effects
THE E-Z LIMITER
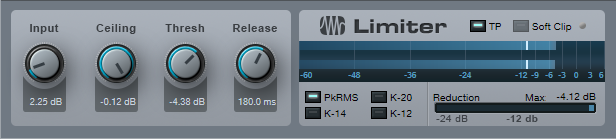
Some limiters (especially some vintage types) are easy to use, almost by definition: One control sets the amount of limiting, and another sets the output level. But Studio One’s limiter has four main controls—Input, Ceiling, Threshold, and Release—and the first three interact.
If the Studio One Limiter looked like Fig. 1, it would still take care of most of your needs. In fact, many vintage limiters don’t go much beyond this in terms of functionality.
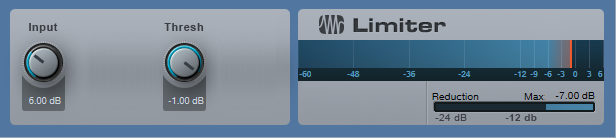
Figure 1: If Studio One’s Limiter had an “Easy Mode” button, the result would look something like this.
To do basic limiting:
- Load the Limiter’s default preset.
- Turn up the input for the desired limiting effect. The Reduction meter shows the amount of gain reduction needed to keep the output at the level set by the Threshold control (in this case, -1.00 dB). For example, if the input signal peaks at 0 dB and you turn up the Input control to 6 dB, the Limiter will apply 7 dB of gain reduction to keep the Limiter output at -1.00.
Note that in this particular limiting application, the Threshold also determines the maximum output level.
THE SOFT CLIP BUTTON
When you set Threshold to a specific value, like 0.00 dB, then no matter how much you turn up the Limiter’s Input control, the output level won’t exceed 0.00 dB. However, you have two options of how to do this.
- With Soft Clip off, gain reduction alone prevents the waveform from exceeding the ceiling.
- With Soft Clip on, clipping the peaks supplements the gain reduction process to keep the waveform from exceeding the ceiling (Fig. 2).
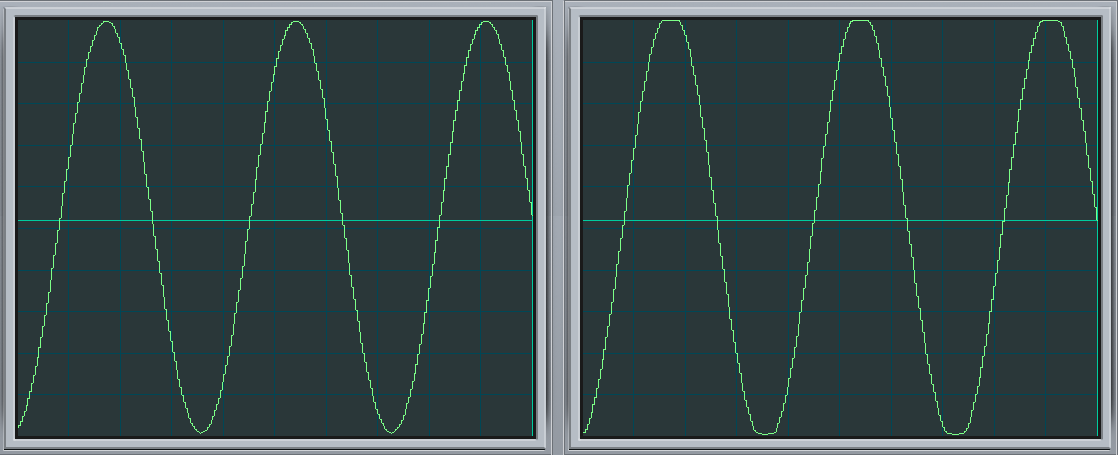
Figure 2: The left screen shot shows the waveform with the input 6 dB above the Threshold, and Soft Clip off. The right screen shows the same waveform and levels, but with Soft Clip turned on. Note how the waveform peak is flattened somewhat due to the mild saturation.
While it may sound crazy to want to introduce distortion, in many cases you’ll find you won’t hear the effects of saturation, and you’ll have a hotter output signal.
ENTER THE CEILING
There are two main ways to set the maximum output level:
- With the Threshold set to 0.00, set the maximum output level with the Ceiling control (from 0 to -12 dB).
- With the Ceiling set to 0.00, set the maximum output level with the Threshold control (from 0 to -12 Db).
It’s also possible to set maximum output levels below -12.00 dB. Turn either the Ceiling or Threshold control all the way counter-clockwise to -12.00 dB, then turn down the other control to lower the maximum output level. With both controls fully counter-clockwise, the maximum output level can be as low as -24 dB.
SMOOTHING THE TRANSITION INTO LIMITING
Setting the Ceiling lower than the Threshold is a special case, which allows smoothing the transition into limiting somewhat. Under this condition, the Limiter applies soft-knee compression as the input transitions from below the threshold level to above it.
For example, suppose the Ceiling is 0.00 dB and the Threshold is -6.00 dB. As you turn up the input, you would expect that the output would be the same as the input until the input reaches around -6 dB, at which point the output would be clamped to that level. However in this case, soft-knee compression starts occurring a few dB below -6.00 dB, and the actual limiting to -6.00 dB doesn’t occur until the input is a few dB above -6.00 dB.
The tradeoff for smoothing this transition somewhat is that the Threshold needs to be set below 0.00. In this example, the maximum output is -6.00 dB. If you want to bring it up to 0.00 dB, then you’ll need to add makeup gain using Mixtool module.
Studio One’s Limiter is a highly versatile signal processor, so don’t automatically ignore it in favor of the Compressor or Multiband Dynamics—with some audio material, it could be exactly what you need.
Introducing StudioLive Series III S!
More Power than You’ll Ever Need.
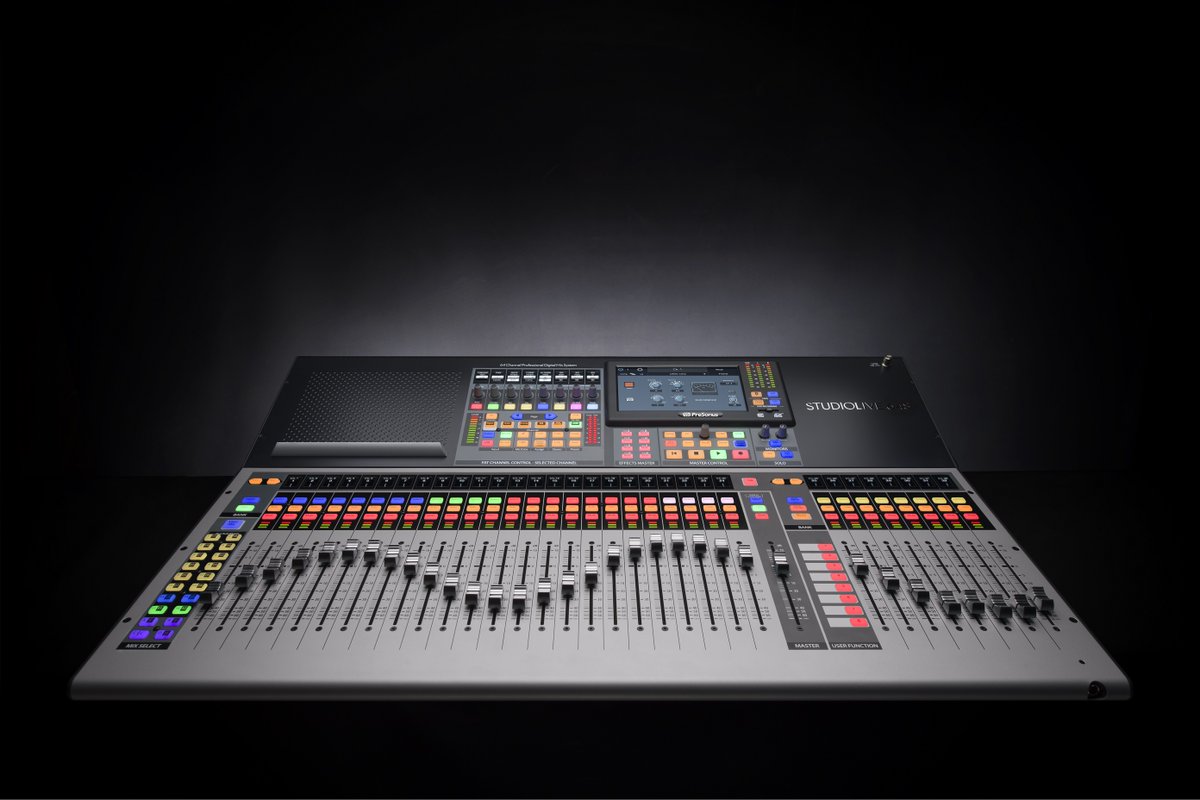 StudioLive 64S
StudioLive 32S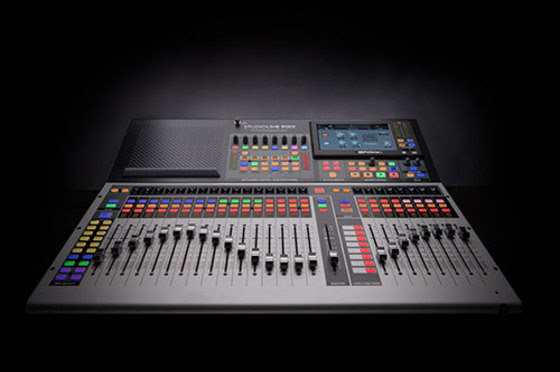
StudioLive 32SX
StudioLive 32SC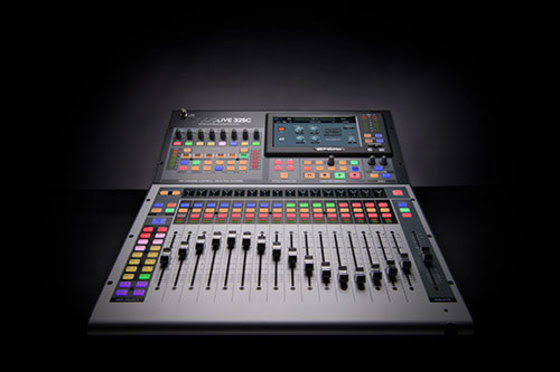
Flex DSP Coming This Week to StudioLive Series III Owners
Friday Tips: Frequency-Selective Guitar Compression
Some instruments, when compressed, lack “sparkle” if the stronger, lower frequencies compress high frequencies as well as lower ones. This is a common problem with guitar, but there’s a solution: the Compressor’s internal sidechain can apply compression to only the guitar’s lower frequencies, while leaving the higher frequencies uncompressed so they “ring out” above the compressed sound. (Multiband compression works for this too, but sidechaining can be a faster and easier way to accomplish the same results.) Frequency-selective compression can also be effective with drums, dance mixes, and other applications—like the “pumping drums” effect covered in the Friday Tip for October 5, 2018. Here’s how to do frequency-selective compression with guitar.

- Insert the Compressor in the guitar track.
- Enable the internal sidechain’s Filter button. Do not enable the Sidechain button in the effect’s header.
- Enable the Listen Filter button.
- Turn Lowcut fully counterclockwise (minimum), and set the Highcut control to around 250 – 300 Hz. You want to hear only the guitar’s low frequencies.
- You can’t hear the effects of adjusting the main compression controls (like Ratio and Threshold) while the Listen Filter is enabled, so disable Listen Filter, and start adjusting the controls for the desired amount of low-frequency compression.
- For a reality check, use the Mix control to compare the compressed and uncompressed sounds. The high frequencies should be equally prominent regardless of the Mix control setting (unless you’re hitting the high strings really hard), while the lower strings should sound compressed.
The compression controls are fairly critical in this application, so you’ll probably need to tweak them a bit to obtain the desired results.
If you need more flexibility than the internal filter can provide, there’s a simple workaround.
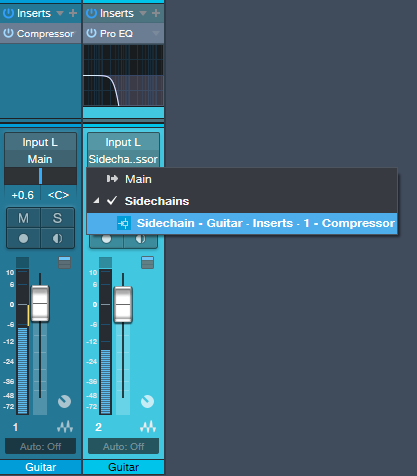
Copy the guitar track. You won’t be listening to this track, but using it solely as a control track to drive the Compressor sidechain. Insert a Pro EQ in the copied track, adjust the EQ’s range to cover the frequencies you want to compress, and assign the copied track’s output to the Compressor sidechain. Because we’re not using the internal sidechain, click the Sidechain button in the Compressor’s header to enable the external sidechain.
The bottom line is that “compressed” and “lively-sounding” don’t have to be mutually exclusive—try frequency-selective compression, and find out for yourself.
Introducing the StudioLive Flex DSP Update!
[UPDATED 3-28-19: The FLEX DSP Update is LIVE! GET IT!]
Big news for StudioLive Series III mixer owners—get ready for some dramatic improvements to your mixer in the new StudioLive FLEX DSP update!
This update,w̶h̶i̶c̶h̶ ̶w̶i̶l̶l̶ ̶b̶e̶ ̶r̶e̶l̶e̶a̶s̶e̶d̶ ̶n̶e̶x̶t̶ ̶w̶e̶e̶k̶, which you can get RIGHT NOW, consists of:
- Universal Control 3.0
- UC Surface 3.0
- StudioLive Series III Firmware 2.0
- Capture 3.0
- QMix-UC 3.0
- Studio One 4.1.4
Once you’ve installed the above, here’s what you’ll get:
New in StudioLive Series III Firmware 2.0:
- You’ll be able to place Fat Channel compressor and EQ plug-ins on every output bus simultaneously (this is in addition to every input channel supported in previous firmware)
- Scenes will be updated to improved Project/Scene workflow
- Ten highly customizable User Profiles with deep custom permissions settings
- Fader response now 50% faster
- Screen updates more than 70% faster
- Screen touch response 90% faster
- Scene loading up to 75% faster
- Increased USB and AVB channel counts: 128 (64×64) via each USB and AVB
Note that this update WILL restructure your existing scenes—be sure to back them up before installing the update! Click here for instructions on how to do that.
New in Capture 3.0:
- Export a Capture session from your computer for SD Card playback on a Series III console mixer
- Import and export AAF files for compatibility with other DAWS
- New metering options including Peak/RMS meter, adjustable RMS and VU-Hold time to better fit multiple various use cases
- Channel color syncs with Series III mixers
- Updated user interface with light and dark modes for better viewing in different environments
New in Studio One 4.1.4:
- This is a simple maintenance update to add compatibility with the above mixer features
New in UC Surface 3.0:
- Added support for all the amazing new features listed above!
Click here for Firmware update instructions.
Questions? Check out this series of videos from Ray on all the new stuff.
StudioLive Flex DSP Update—Auf deutsch
Großartige Neuigkeiten für alle Besitzer von StudioLive Series III Mixern – macht euch auf einige dramatische Verbesserungen im neuen StudioLive FLEX DSP Update gefasst!
Dieses Update, welches wir in ca. einer Woche veröffentlichen werden, enthält:
- Universal Control 3.0
- UC Surface 3.0
- StudioLive Series III Firmware 2.0
- Capture 3.0
- QMix-UC 3.0
- Studio One 4.1.4
Sobald diese Updates installiert sind, erhaltet ihr folgendes:
Neu in StudioLive Series III Firmware 2.0:
- Es wird möglich sein, Fat Channel Kompressor- und EQ-Plugins auf jedem Output-Bus gleichzeitig einzusetzen (zusätzlich zu jedem Input-Channel, was bereits durch die vorherige Firmware möglich war)
- Szenen werden zugunsten eines verbesserten Projekt- / Szene-Workflows aktualisiert.
- Zehn hochgradig anpassbare User-Profile mit tiefgreifenden, individuell abgestimmten Zugriffsrechten
- Fader reagieren jetzt 50% schneller
- Szenen aktualisieren mehr als 70% schneller
- Reaktionszeit des Touch-Screens um 90% verbessert
- Szenen laden bis zu 75% schneller
- Erhöhte Anzahl von USB- und AVB-Kanälen: 128 (64×64) sowohl via USB, als auch AVB
Bitte beachtet, dass dieses Update bereits existierende Szenen NEU STRUKTURIEREN wird – Bitte lege für diese ein Backup an, bevor das Update installiert wird! Hier klicken, um die Backup-Anleitung zu lesen.
Neu in Capture 3.0:
- Es ist jetzt möglich, eine Capture Session vom Computer zu exportieren und via SD-Karte vom Series III Mixer abzuspielen
- AAF-Import und -Export für Kompatibilität mit anderen DAWs
- Neue Metering-Optionen, inklusive Peak/RMS Meter und anpassbaren RMS- und VU-Hold-Zeiten für bessere Abstimmung mit verschiedenen Anwendungsszenarien
- Kanalfarben-Synchronisation mit Series III Mixern
- Aktualisiertes User Interface mit Light- und Dark-Modi für bessere Lesbarkeit in unterschiedlichen Umgebungen
Neu in Studio One 4.1.4:
- Dies ist ein Maintenance-Update, welches die Kompatibilität mit den oben aufgeführten Mixer-Features ermöglicht.
Neu in UC Surface 3.0:
- Bietet Unterstützung für all diese fantastischen neuen Features!
Friday Tips: The Sidechained Spectrum
You’re probably aware that several Studio One audio processors offer sidechaining—Compressor, Autofilter, Gate, Expander, and Channel Strip. However, both the Spectrum Meter and the Pro EQ spectrum meter also have sidechain inputs, which can be very handy. Let’s look at Pro EQ sidechaining first.
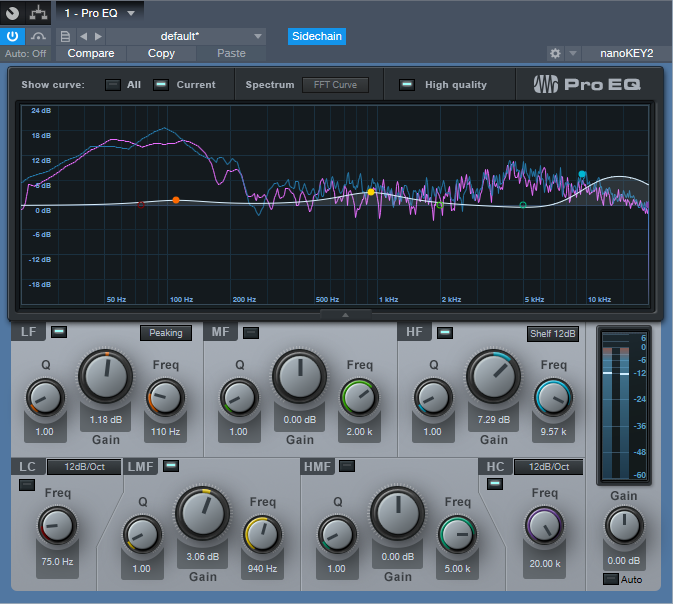
When you enable sidechaining, you can feed another track’s output into the Pro EQ’s spectrum analyzer, while still allowing the Pro EQ to modify the track into which it’s inserted. When sidechained, the Spectrum mode switches to FFT curve (the Third Octave and Waterfall options aren’t available). The blue line indicates the level of the signal going through the Pro EQ, while the violet line represents the sidechain signal.
As a practical example of why this is useful, the screen shot shows two drum loops from different drum loop libraries that are used in the same song. The loop feeding the sidechain loop has the desired tonal qualities, so the loop going through the EQ is being matched as closely as possible to the sidechained loop (as shown by a curve that applies more high end, and a slight midrange bump).
Another example would be when overdubbing a vocal at a later session than the original vocal. The vocalist might be off-axis or further away from the mic, which would cause a slight frequency response change. Again, the Pro EQ’s spectrum meter can help point out any differences by comparing the frequency response of the original vocal to the overdub’s response.
The Spectrum Meter
Sidechaining with the Spectrum Meter provides somewhat different capabilities compared to the Pro EQ’s spectrum analyzer.
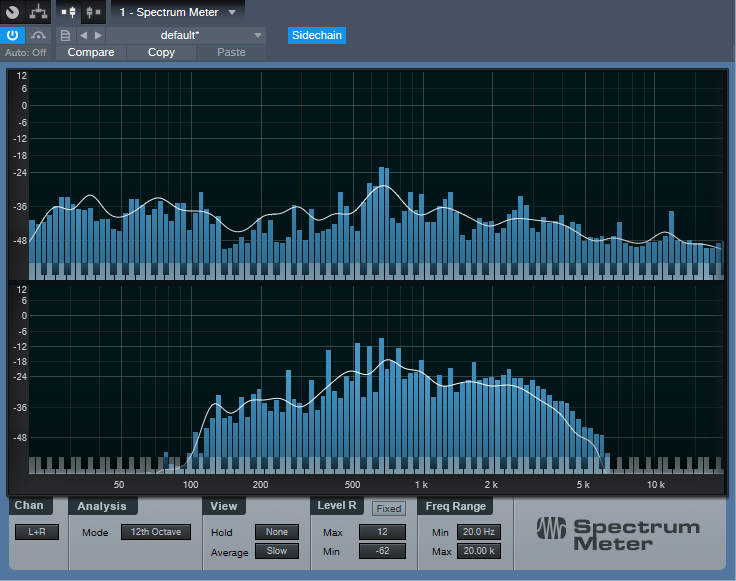
With sidechain enabled, the top view shows the spectrum of the track into which you’ve inserted the Spectrum Meter. The lower view shows the spectrum of the track feeding the sidechain. When sidechained, all the Spectrum Meter analysis modes are available except for Waterfall and Sonogram.
While useful for comparing individual tracks (as with the Pro EQ spectrum meter), another application is to help identify frequency ranges in a mix that sound overly prominent. Insert the Spectrum Meter in the master bus, and you’ll be able to see if a specific frequency range that sounds more prominent actually is more prominent (in the screen shot, the upper spectrum shows a bump around 600 Hz in the master bus). Now you can send individual tracks that may be causing an anomaly into the Spectrum Metre’s sidechain input to determine which one(s) are contributing the most energy in this region. In the lower part of the screen shot, the culprit turned out to be a guitar part with a wah that emphasized a particular frequency. Cutting the guitar EQ just a little bit around 600 Hz helped even out the mix’s overall sound.
Of course, the primary way to do EQ matching is by ear. However, taking advantage of Studio One’s analysis tools can help speed up the process by identifying specific areas that may need work, after which you can then do any needed tweaking based on what you hear. Although “mixing with your eyes” isn’t the best way to mix, supplementing what you hear with what you see can expedite the mixing process, and help you learn to correlate specific frequencies with what you hear—and there’s nothing wrong with that.