Filling the Pipeline
Plug-ins have changed my life, and probably yours. Yet some hardware effects have no software equivalent—like boutique guitar effects, or tube-based equalizers. And there are even unique digital effects, too, like Roger Linn’s AdrenaLinn.
I wanted to use these with Studio One’s Pipeline XT plug-in and the Studio 192 interface, but never got the combo working properly. There were feedback problems, leakage into other channels, and various issues. After hours of trying different mixer settings, and searching the net, I couldn’t find an answer.
Then it dawned on me: PreSonus support! They had the answer, so hopefully this tip will not only inspire people to take a look at Pipeline XT, but help those who haven’t quite figured out how to use it in the PreSonus mixer ecosystem.
PREPPING THE STUDIO 192
Universal Control allows using Studio 192 (with a computer and enough I/O) as a digital mixer, but that’s not necessarily what we want with Studio One. To optimize the Studio 192 for Pipeline XT:
- Open Universal Control, and choose the Scenes screen (Fig. 1)

Figure 1: How to reset Studio 192 to its default settings.
- Click on Studio 192 Default.
- Click on Recall. Now the Studio 192 has its default settings.
- Go to Universal Control’s System window, and choose Mixer Bypass (Fig. 2). Now, all the I/O is under Studio One’s control.
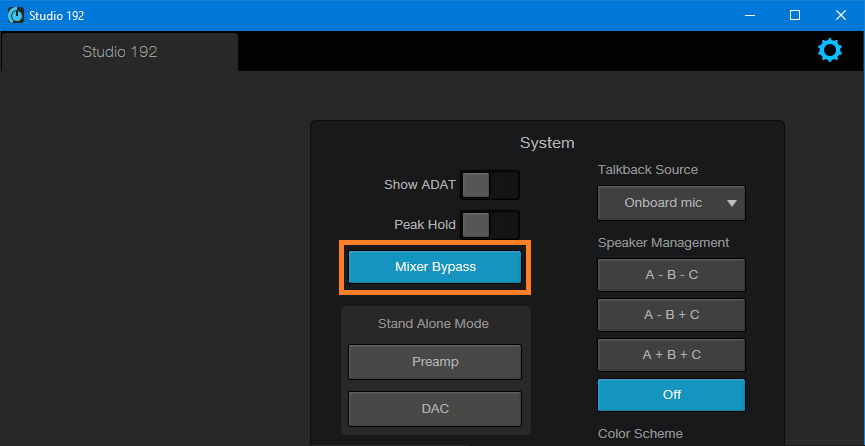
Figure 2: Universal Control’s mixer is now bypassed, so all the I/O is controlled from within Studio One instead of the mixer.
- When you open a project, remember to go into Song Setup and restore anything that’s not the default. For example, if the output usually goes to Headphones 1 for tracking instead of the Main out, make that assignment. Also consider saving this setup as the default.
PREPPING SONG SETUP FOR EXTERNAL HARDWARE
We’ll use the AdrenaLinn as the example. It’s a mono in/stereo out device, but you can choose a mono or stereo output to feed it (I chose stereo because AdrenaLinn isn’t the only hardware device I use with Pipeline XT).
- Assign outputs for the hardware. Go to Song Setup, Audio I/O Setup tab, choose Add Stereo, and then click on the desired outputs in the matrix (Fig. 3). I have patch cords connected semi-permanently to these output jacks so they’re available for any hardware I want to use.
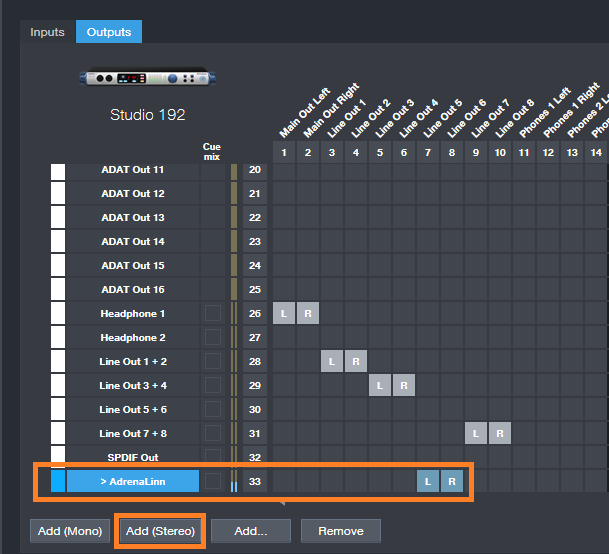
Figure 3: Interface outputs Line Out 5 and Line Out 6 are dedicated to external hardware devices.
- Now assign the inputs that will receive the outputs from the hardware (Fig. 4). I use inputs 1 and 2 because they’re on the front panel, so they’re easy to access—I don’t have to reach behind the rack.
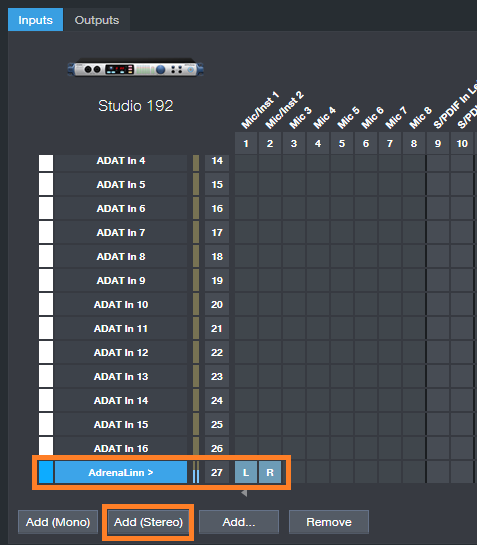
Figure 4: Studio 192 inputs for Mic/Inst 1 and 2 accept the outputs from the external hardware.
Note that you can name these inputs and outputs you just added. Save this Song Setup by clicking on Make Default if you plan to interface Studio One with this same setup hardware in the future. Otherwise, you’ll need to go through the assignment process again. If the setup is saved as a default, when you want to use a hardware effect, Studio One will know where to find it.
TIME FOR PIPELINE XT
This part’s pretty easy. Insert Pipeline Stereo as if it was a regular plug-in. Pipeline XT compensates automatically for the latency that accumulates from sending audio through the outputs, through an effect, then back into Studio One’s interface inputs. What’s more, it’s easy to assign the inputs and outputs in Pipeline XT, because you named them in Song Setup (Fig. 5). Pipeline XT will now divert the channel output to your hardware, and bring the hardware output back again into your channel.
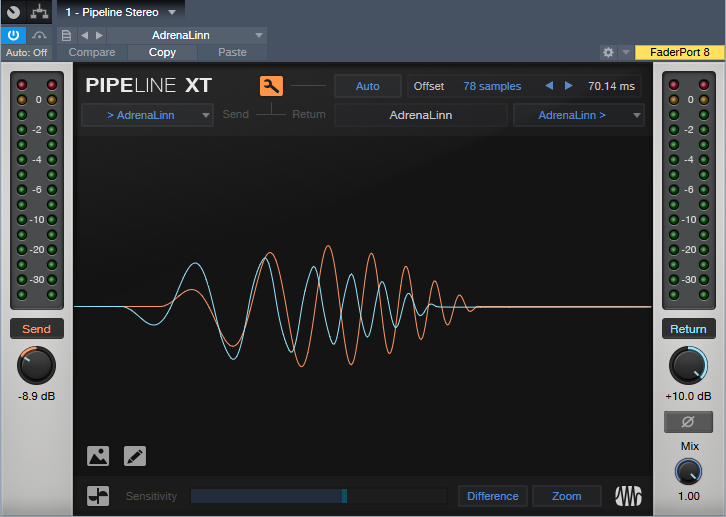
Figure 5: Pipeline XT is ready to go—its in and out have been assigned to the AdrenaLinn I/O, and the signal path has been compensated for latency.
In my experience, Pipeline XT compensates for latency without having to anything further. However, you can click on the wrench and have Pipeline XT compensate automatically, or do so manually. You can also tune out delays by ear. For example, load a drum loop, and copy it to the track with Pipeline XT. Listen to both tracks together, and adjust the Pipeline Offset parameter until the two tracks sound synched. (Note that if you try automatic compensation, it’s best to bypass the effect. With time-based effects, Pipeline XT won’t know which is the “real” signal for which it should compensate.)
Once Pipeline XT has been configured for a particular piece of hardware, you can store the setting as a preset for later recall—just like any effects preset. For me, 90% of the time I’m using external hardware for guitar effects. They operate similarly to AdrenaLinn, so I can just recall that preset.
There are a few other considerations unique to using external hardware.
- Most guitar effects are designed for low input levels. You’ll need to bring Pipeline’s Send control way down to avoid overloading the effect.
- Similarly, you may need to raise the Pipeline’s Return control to bring up the effect’s low-level output.
- You have to use real-time bounces when using external effects, because the audio is being processed in real time through the hardware.
- We’re spoiled by being able to use multiple instances of a single plug-in, but hardware doesn’t work that way—one piece of hardware works with one track. That said, you can insert multiple instances of the same effect in different channels using Pipeline XT, but I don’t recommend it because the channels sum together.
- You can take a picture of the external hardware’s front panel control settings, and include that image in a Pipeline plug-in preset. With AdrenaLinn that feature isn’t really relevant. But for boutique effects with knobs, this is a very useful feature.
Heartcast Media in Washington, DC and the StudioLive 16
 Heartcast Media is a dedicated full-service studio in Washington, D.C. that works with clients to create high quality, authentic podcast content that inspires, educates and connects. Molly Ruland and her team specialize in working with entrepreneurs, visionaries, and businesses of all sizes who have an impactful point-of-view.
Woman-owned Heartcast Media is the vision of Molly Ruland who is dedicated to helping individuals and organizations bring their authentic, original content to life through podcasts. A sister-company to One Love Massive, Heartcast Media clients range from go-go bands to conservative political commentators.
They’re also PreSonus users—and have recorded 85 bands and 150 podcasts in the past 11 months alone!
We think Molly’s business idea is genius, and of course we’re glad that they’ve chosen the StudioLive 16 for their time-sensitive workflow. From the Heartcast website:
We have fully embraced technology and have figured out how to eliminate post production with real time video editing and audio mastering. We deliver all files within 48 hours of recording, typically within 3-4.
We’re proud to be a part of their process, so we wanted to hear more about how this whole operation works. Read all about Molly and Heartcast Media….
Tell us about your background. How long have you been in the audio industry?
I have owned and operated a multimedia company for the last 20 years. I was primarily focused on artist bookings and events. Creating an aesthetic has always been my passion.
How has the audio industry changed since your early days?
Everything is so streamlined now, and the gatekeepers have been removed. I love the idea of accessibility and practicality. Information is readily available which has opened doors for people who weren’t always welcome at the table, and I think that’s great.
How did Heartcast Media come about?
After recording 85 bands and 150 podcasts in 11 months, I realized that my passion and vision align perfectly through podcast production. I love amplifying voices, I always have. I saw a need in the market for high-quality turnkey podcast production, so I created the business to solve that problem. We do things differently—we embrace technology, and by doing so we are able to eliminate the need for a lot of post-production. This saves people time and money and our clients love that.
What’s your favorite podcast right now? Are you allowed to have a favorite?
Tom Bilyeu’s Impact Theory. No question, hands down. Game changer for me.
Tell us about your podcast. Where did the idea for your podcast come from? How does your first podcast compare to your most recent?
I have just launched The Lower Third Podcast because I know so many amazing people whom I garner so much inspiration from, and I wanted to interview and talk to them about mindset and passion. It’s a work in progress. I am looking forward to producing more episodes. However, my passion is producing other people’s podcast and helping them be successful.
There are so many podcasts these days. How do you stand out?
Having a plan for your podcast is imperative. Every podcaster should examine how and if their podcast is providing value. If there isn’t a clear answer, you don’t have a podcast yet.
What challenges do you face recording a podcast?
I am positive that most people don’t understand how much work goes into creating and producing a podcast. It’s a lot of work. It’s not cheap either, and anyone who tells you can start a podcast for $100 is delusional. If you are going to start a podcast you have to have a lot of resilience and a strong sense of self, because it will be a heavy rock to push uphill until you get momentum. It will not happen overnight.
What advice do you have for someone who wants to start a podcast?
Have a plan, understand the workload, and always be open to being wrong.
How did you first hear of PreSonus?
I learned about PreSonus through Adam Levin at Chuck Levin’s Music Center in Wheaton, Maryland. It’s legendary.
 What PreSonus products do you use?
I have the StudioLive 16 in my studio, and we love it. It’s a little more than we need for podcasts, but we also produce live music events so it’s great to have a board that can do both. It’s a solid piece of equipment with really great features that fit our needs. It’s a beautiful board, what’s not to love?
Recent projects? What’s next for you?
My goal is to produce the best podcasts coming out of the East Coast by elevating and amplifying voices in my community that will make the world a better place, one conversation at a time. Every city should have a Heartcast Media.
Stay connected with Heartcast Media on Instagram!
Learn more about the StudioLive family here!
Mastering the low end with BASSROOM

Tom Frampton
This blog post will tell you how to get the perfect amount of bass when mastering audio using BASSROOM.
This is where so many potentially awesome tracks fail. Too much bass and your track will sound bloated and lack clarity. Not enough bass and your track will sound weak.
I have a process that helps me set the perfect amount of bass for my clients every time. Since I implemented this technique I can honestly say that my mastering business has dramatically improved (more than doubled!)
I hope that this technique helps you too, whether it’s growing your studio business or simply nailing the master of a track that will further your career as an artist.
Let’s start with why nailing the low-end is so difficult:
- Monitors with great low-end response are super expensive.
- Acoustic treatment is expensive BUT essential for any monitors (expensive or not) to be effective.
- Even when we have great monitors and acoustic treatment how can we be sure of what the perfect low-end level is?
So we’re up against a few hurdles here, but the technique I’ll explain will improve the low- end of your masters, even in the most basic studio set-ups.
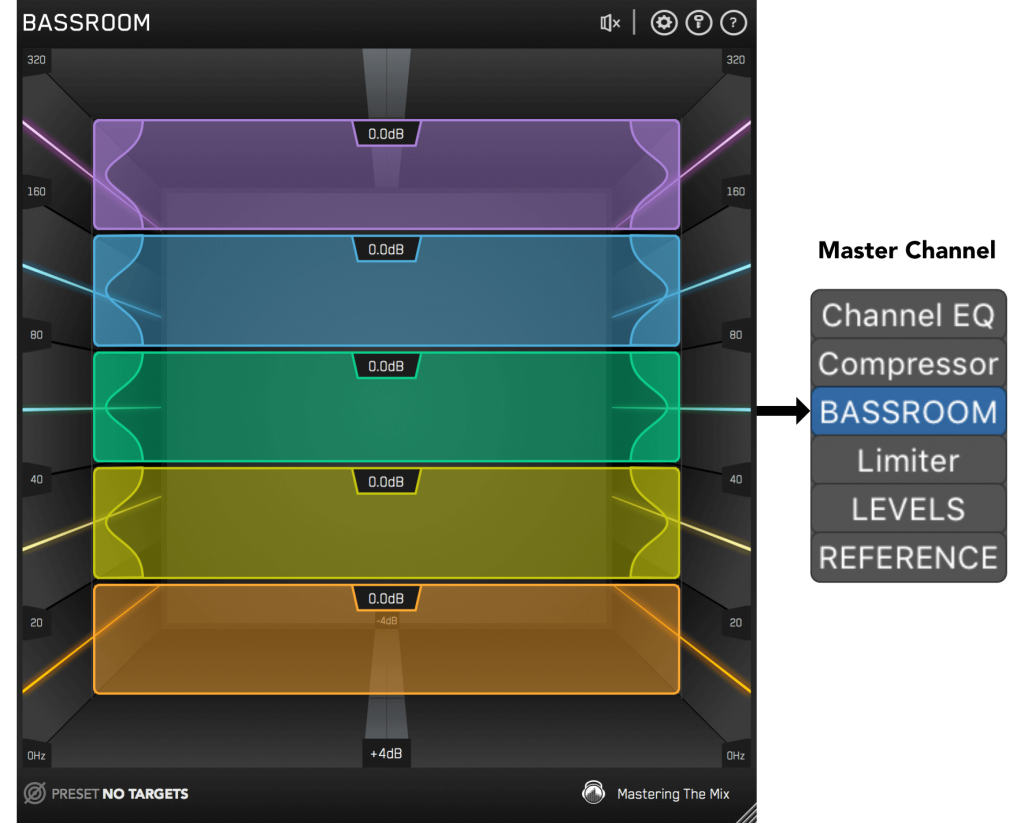
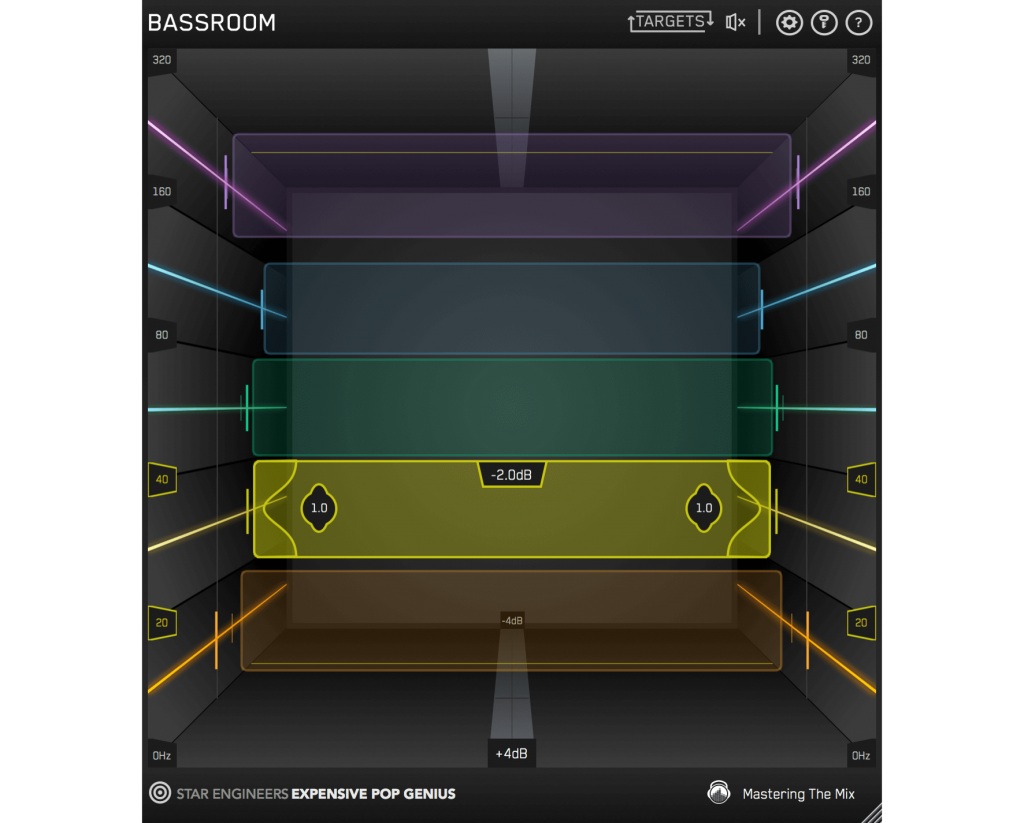
Step 1: Load Up Our Mixing and Mastering EQ BASSROOM on The Master Channel
BASSROOM uses complex algorithms that accurately identifies how the human ear perceives low-frequencies relative to the balance of the whole mix. For that reason it should be loaded on your master channel so it can analyse and be applied to your whole mix.
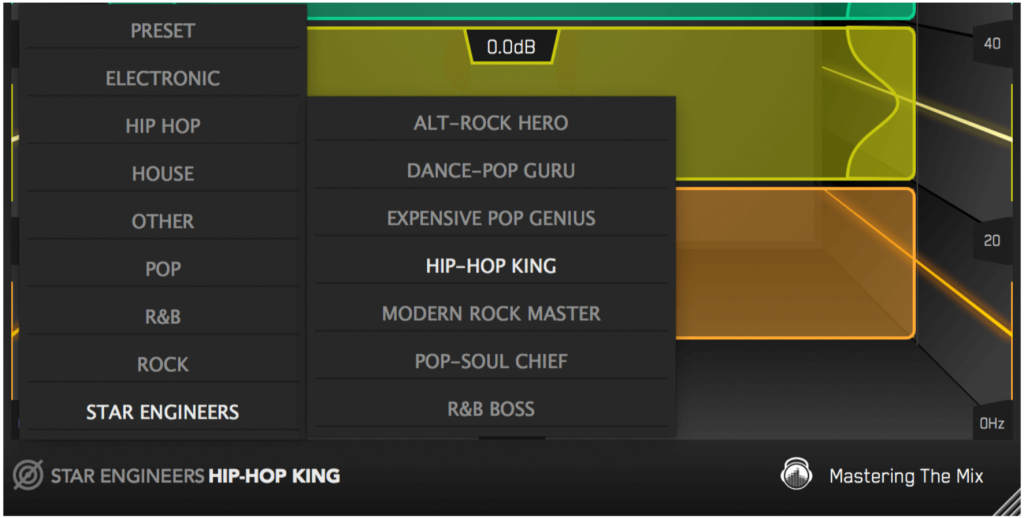
Step 2: Choose A Preset
To get the most value from BASSROOM, start by selecting a preset that best suits the material you’re working on.
Step 3: Create A Target
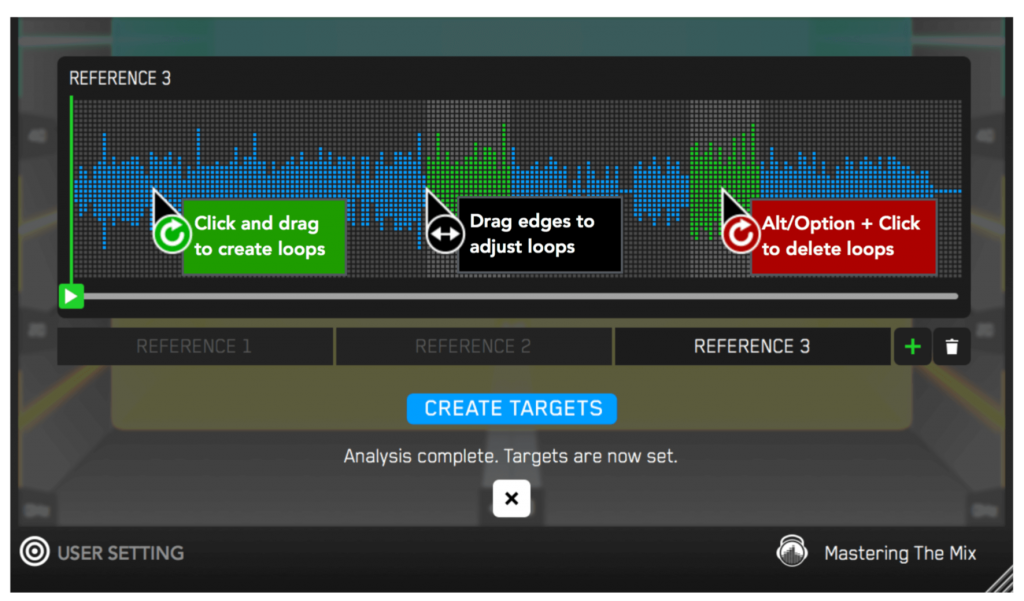
Rather than choosing a preset, you can create your own target values by clicking the target icon in the bottom left corner and importing reference tracks. If you’re creating targets, we recommend clicking and dragging on the waveform to select the drop or chorus for the analysis, as this is usually the material with the best representation of the bass in the track. BASSROOM will create targets based on all the tracks loaded into the analysis window.
Step 4: Shape Your Low End
Now monitor a bass heavy section of your production (i.e. the drop or chorus), and you’ll see the targets move to the suggested EQ positions based on the tonal balance of your mix compared to the tonal balance of your preset. Use the targets to get a great starting point, then adjust by ear to tweak your low-end to perfection. The algorithm accounts for differences in loudness, so the targets will be accurate and relevant whether you’re mixing or mastering.
Step 5: The Level Match
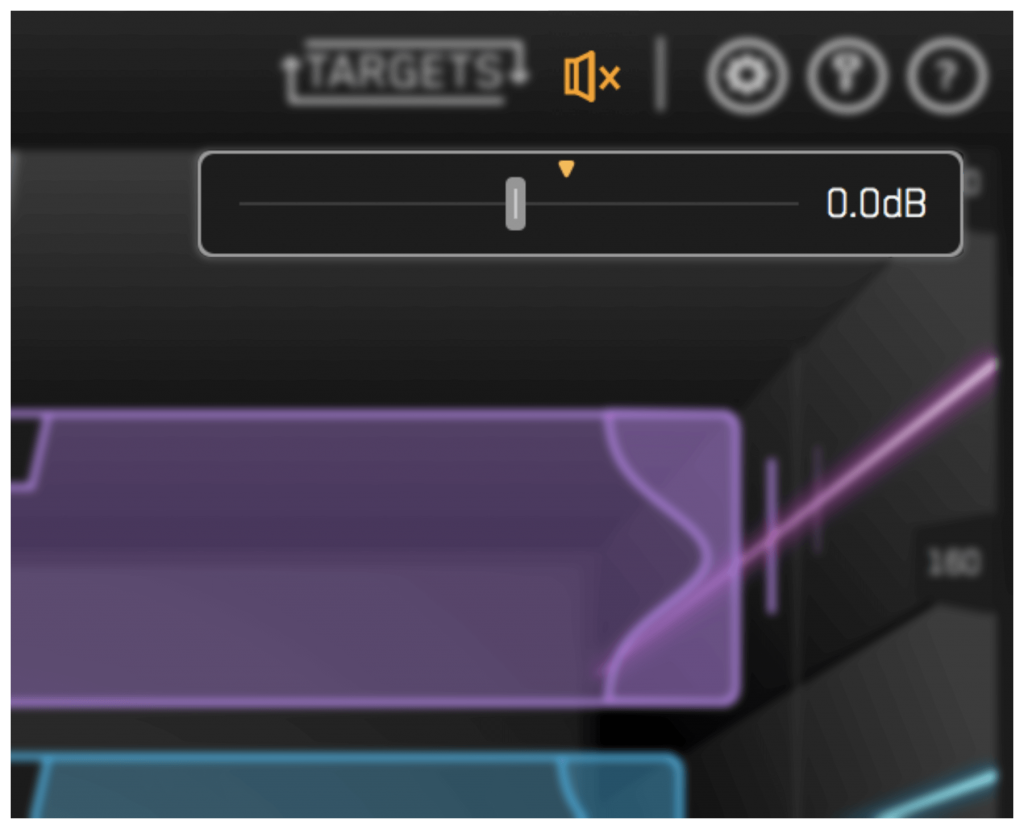
The EQ adjustments may have changed the overall gain of your audio. If the gain has changed by more than 2dB the speaker icon will turn orange. Hover your mouse over the bypass icon to open the output gain and level match pointer. Match the gain slider to the level match pointer to match the perceived loudness of your audio before it passed through BASSROOM.
HEAR THE DIFFERENCE!!
Not only will your low-end fall into place, but the level matching will give you a well-balanced sound across the whole frequency spectrum. Toggle bypass on and off to hear the difference.
Click here to get BASSROOM!
Friday Tip: Tempo Changes for Already Mixed Songs – Reloaded
The June 22, 2018 tip covered how to make mastered songs better with tempo changes, but there was some pushback because it wasn’t easy to make these kinds of changes in Studio One. Fortunately, it seems like the developers were listening, because it’s now far easier to change tempo. I’ve been refining various tempo-changing techniques over the past year (and had a chance to gauge reactions to songs using tempo changes compared to those that didn’t), so it seemed like the time is right to re-visit this topic.
WHY TEMPO CHANGES?
In the days before click tracks, music had tempo changes. However, with good musicians, these weren’t random. After analyzing dozens of songs, many (actually, most) of them would speed up slightly during the end of a chorus or verse, or during a solo, and then drop back down again.
For example, many people feel James Brown had one of the tightest rhythm sections ever—which is true, but not because they were a metronome. There were premeditated, conscious tempo changes throughout the song (e.g., speeding up during the run up to the phrase “papa’s got a brand new bag,” in the song of the same name, then dropping back down again—only to speed up to the next climax). Furthermore, the entire song sped up linearly over the course of the song.
Note that you didn’t hear these kinds of changes as something obvious, you felt them. They added to the “tension and release” inherent in any music, which is a key element (along with dynamics) in eliciting an emotional response from listeners.
THE PROBLEM WITH TEMPO CHANGES
It was easy to have natural tempo changes when musicians played together in a room. These days, it’s difficult for solo artists to plan out in advance when changes are going to happen. Also, if you use effects with tempo sync, not all of them follow tempo changes elegantly (and some can’t follow tempo changes at all). Let’s face it—it’s a lot easier to record to a click track, and have a constant tempo. However…
THE STUDIO ONE SOLUTION
Fortunately, Studio One makes it easy to add tempo changes to a finished mix—so you can complete your song, and then add subtle tempo changes where appropriate. This also lets you compare a version without tempo changes, and one with tempo changes. You may not hear a difference, but you’ll feel it.
As mentioned in last year’s tip, for the highest possible fidelity choose Options > Advanced > Audio, and check “Use cache for timestretched audio files.” Next, open a new project, and bring in the mixed file. Important: you need to embed a tempo, otherwise it’s not possible to change the tempo. So, open the Inspector, and enter a tempo under File Tempo. It doesn’t have to match the original song tempo because we’re making relative, not absolute, changes. Also choose Tempo = Timestretch, and Timestretch = Sound – Elastique Pro Formant.
MANIPULATING THE TEMPO TRACK
Working with the tempo track is now as easy as working with automation: click and drag to create ramps, and bend straight lines into curves if desired. You can set high and low tempo limits within the tempo track; the minimum difference between high and low Tempo Track values is 20 BPM, however you can change the tempo track height to increase the resolution. The bottom lines it that it’s possible to create very detailed tempo changes, quickly and easily.
So what does it sound like? Here are two examples. The first is a hard-rock cover version of “Walking on the Moon” (originally recorded by The Police, and written by Sting).
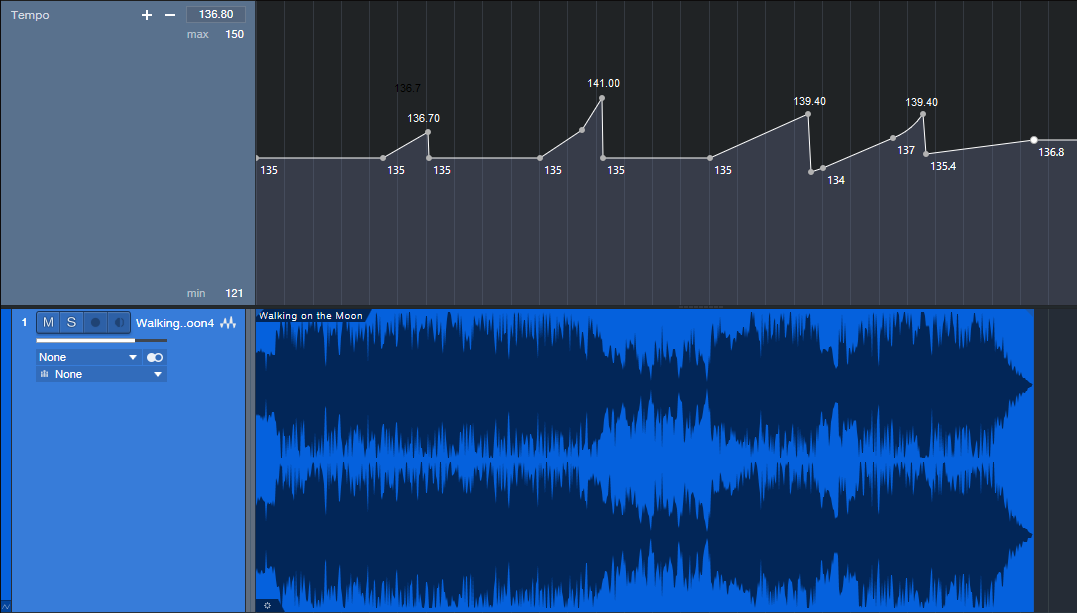
The differences are fairly significant, starting with a low of 135 BPM, going up to 141 BPM, and dropping down as low as 134 BPM.
Here’s another example, a slower song called “My Butterfly.” It covers an even greater relative range, because it goes from a low of 90 to a high of 96 BPM. You may be able to hear the speedup in the solo, not just feel it, now that you know it’s there.
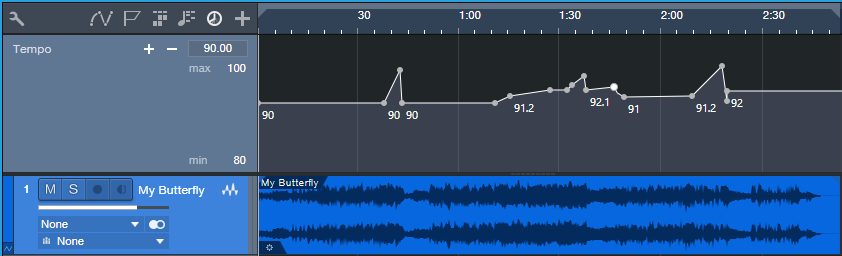
Note that when possible, there’s a constant tempo at the beginning and end. It doesn’t matter so much with songs, but with dance mixes, I can add tempo changes in the track as long as there’s a constant tempo on the intro and outro so DJs don’t go crazy when they’re trying to do beat-matching.
So is it worth making these kinds of changes? All I know is that the songs I do with tempo changes get a better response than songs without tempo changes. Maybe it’s coincidence…but I don’t think so.
Friday Tips – Why Mono Matters for Mixing
With the ideal mix, the balance among instruments is perfect, and you can hear every instrument (or instrument section) clearly and distinctly. However, getting there can take a while, with a lot of trial and error. Fortunately, there’s a simple trick you can use when setting up a mix to accelerate the process: Start your mix with all channel pan sliders set to center (Fig. 1).
Figure 1: All the pan sliders (outlined in white) are set to center for a reason.
With stereo tracks, changing the track interleave to mono isn’t adequate, because it will throw off the channel’s level in the mix. Instead, temporarily add a Dual Pan set for the -6dB Linear Pan Law, and center both the Left and Right panpots (fig. 2). Now your stereo track will appear in the mix as mono.

Figure 2: Use the Dual Pan, set to the -6dB Linear pan law, to convert stereo channels temporarily to mono when setting up for a mix.
Analysis Time
Now listen carefully to your mix. Are all the instruments distinct? Monitoring in mono will reveal places where one instrument might mask or interfere with another, like kick and bass, or piano and guitar (depending on the note range).
The solution is to use EQ to carve out each instrument’s rightful place in the frequency spectrum. For example, if you want to prioritize the guitar part, you may need to reduce some of the piano’s midrange, and boost the regions above and below the guitar. For the guitar, boost a bit in the region where you cut the piano. With those tweaks in place, you’ll find it easier to differentiate between the two.
For kick/bass issues, the usual solution is to increase treble on one of them—with kick, this brings out the beater sound and with bass, string “zings” and pick noises. Another option is to add saturation to the bass, while leaving the kick drum alone. If the bass is playing relatively high notes, then perhaps a boost to the kick around 50-70 Hz will help separate the two.
Keep carving away, and adjusting the EQ until all the instruments are clear and distinct. Now when you start doing stereo placement, the sound will be open, with a huge soundstage and a level of clarity you might not obtain otherwise—or which might take a lot of tweaking to achieve.
We’re Not Done with Mono Just Yet…
Okay, now you have a great stereo mix. But it’s also important to make sure your mix collapses well to mono, because you have no control over the playback system. It might play from someone’s smartphone, and sounds mostly mono…or play back over speakers that are close to each other, so there’s not real good stereo separation. Radio is another possibility where the stereo might not be wonderful.
Some processors, especially ones that control stereo imaging with mid-side processing, may have phase or other issues when collapsed to mono. Short, stereo delays can also have problems collapsing to mono, and produce comb-filtering-type effects. So, hop on over to the main bus, and click the Channel Mode button to convert the output to mono (Fig. 3).
Figure 3: The Channel Mode button (circled in yellow) can switch the output between mono and stereo.
Hopefully, everything will sound correct—just collapsed to mono. But if not, start soloing channels and comparing what they sound like with the Channel Mode button in stereo and mono, until you chase down the culprit. Make the appropriate tweaks (which may be as simple as tweaking the delay time in one channel of a stereo delay processor), make sure the mix still sounds good in stereo, and you’re done.
Friday Tip – Make Impact XT Drums More Expressive
A sampled drum sound can get pretty boring. There’s even a name for triggering the same sound repeatedly—“the machine gun effect.” Sometimes you want this, but often, it’s preferable to have a sound that responds to velocity and is more expressive.
There are two ways to address this with Impact XT, depending on whether you have multiple samples recorded at different intensities (i.e., softer and harder hits), or only one sample, which then means you have to “fake” it sounds like it was recorded with different intensities.
Multiple Drum Samples
This is the most common way to create expressive drum parts. Drum sample libraries often include multiple versions of the same drum sound—like soft, medium, and hard hits. The technique we’ll describe here works for more than three samples, but limiting it to three is helpful for the sake of illustration.
Impact XT makes it super-simple to take advantage of sounds recorded at different intensities because you can load multiple samples on a single pad. However, note that if a pad already contains a sample and you drag a new sample to a pad, it will replace, not supplement, the existing sample. So, you need to use a different approach.
- Drag the first (soft) sample on to an empty pad.
- Click the + sign to the lower left of the pad sample’s waveform display, navigate to the medium sample, and load it (Fig. 1).
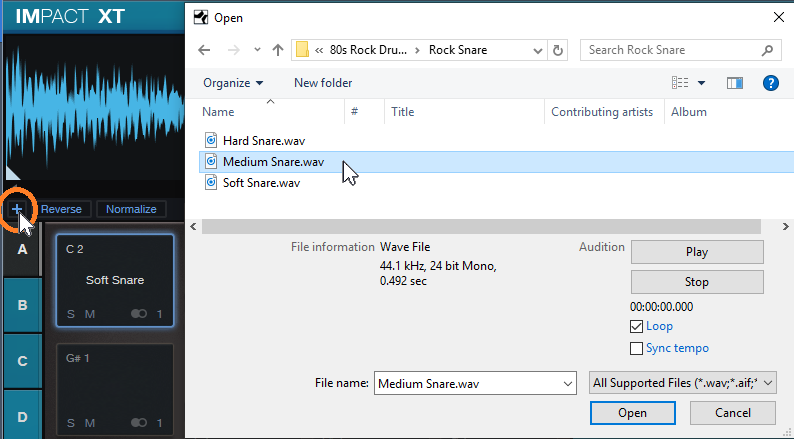
Figure 1: Click on the + sign to load another sample on to a pad.
- Click the + sign again, navigate to the hard sample, and load it.
- Above the pad’s waveform view, you’ll now see three numbers—one for each sample. Impact XT splits the velocity range into an equal number of smaller ranges based on the number of drums you’ve loaded, and automatically assigns the drums to the ranges. 1 is the first sample (soft) you dragged in, 2 is the second (medium) sample, and 3 is the last (hard) sample. Although Impact XT does automatic velocity assignment, you can drag the splitter bar between the numbered sections to vary the velocity ranges (Fig. 2).
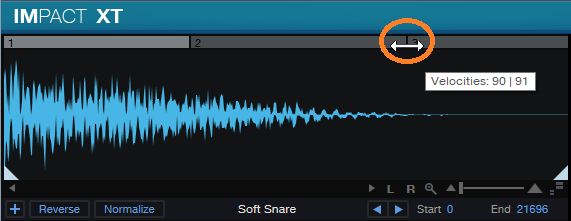
Figure 2: The splitter bar between samples can alter the velocity range to which a sample responds.
Now you’ll trigger different drum samples, depending on the velocity.
How to Fake Multiple Drum Samples
If you have a single drum sample with a hard hit, then you can use Impact XT’s sample start parameter to fake softer hits by changing the sample start time. (Starting sample playback later in the sample cuts off part of the attack, which sounds like a drum that’s hit softer.)
- Do all the steps above, but keep loading the single, hard hit. This loads multiple versions of the same sample on the same pad, split into different velocities.
- Click on the number 1 in the bar above the waveform to select the first sample.
- Drag the sample start time further into the sample to create the softest hit (Fig. 3).
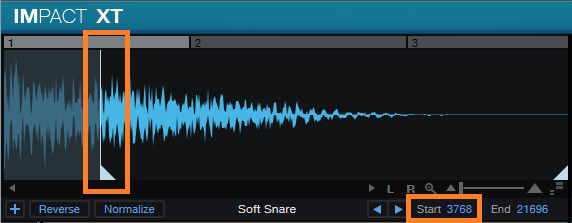
Figure 3: Click on the sample start line, and drag right to start sample playback past the initial attack. The readout toward the lower right shows the amount of offset, in samples.
- Click on the number 2 in the bar above the waveform to select the second sample.
- Move the sample start time halfway between the sample start and the altered sample start time in step 3.
Play the drum at different velocities. Tweak sample start times, and/or velocities, to obtain a smooth change from lower to higher velocities.
But Wait…There’s More!
Let’s add two more elements to emphasize the dynamics. These parameters affect all samples loaded on the pad, and are also effective with pads that have only a single sample.
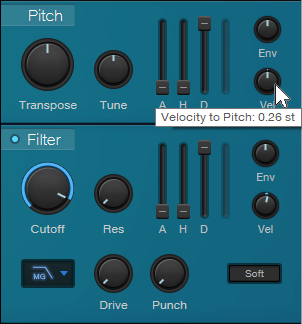
Figure 4: Assigning velocity to Pitch and Filter Cutoff can enhance dynamics even further.
At the Pitch module, turn up the Velocity to Pitch parameter by around 0.26 semitones (Fig. 4). This raises the pitch slightly when you hit the drum harder, which emulates acoustic drums (the initial strike raises the tension on the head, which increases pitch slightly, depending on how hard you hit the drum).
Similarly, back off on the Filter Cutoff slightly, and turn up the Filter’s Vel parameter a little bit (e.g., 10%). This will make the sound brighter with higher velocities.
Done! Now go forth, and give your music more expressive drum sounds.
Friday Tip – Create “Virtual Mics” with EQ
I sometimes record acoustic rhythm guitars with one mic for two main reasons: no issues with phase cancellations among multiple mics, and faster setup time. Besides, rhythm guitar parts often sit in the background, so some ambiance with electronic delay and reverb can give a somewhat bigger sound. However, on an album project with the late classical guitarist Linda Cohen, the solo guitar needed to be upfront, and the lack of a stereo image due to using a single mic was problematic.
Rather than experiment with multiple mics and deal with phase issues, I decided to go for the most accurate sound possible from one high-quality, condenser mic. This was successful, in the sense that moving from the control room to the studio sounded virtually identical; but the sound lacked realism. Thinking about what you hear when sitting close to a classical guitar provided clues on how to obtain the desired sound.
If you’re facing a guitarist, your right ear picks up on some of the finger squeaks and string noise from the guitarist’s fretting hand. Meanwhile, your left ear picks up some of the body’s “bass boom.” Although not as directional as the high-frequency finger noise, it still shifts the lower part of the frequency spectrum somewhat to the left. Meanwhile, the main guitar sound fills the room, providing the acoustic equivalent of a center channel.
Sending the guitar track into two additional buses solved the imaging problem by giving one bus a drastic treble cut and panning it somewhat left. The other bus had a drastic bass cut and was panned toward the right (Fig. 1).
Figure 1: The main track (toward the left) splits into three pre-fader buses, each with its own EQ.
One send goes to bus 1. The EQ is set to around 400 Hz (but also try lower frequencies), with a 24 dB/octave slope to focus on the guitar body’s “boom.” Another send goes to bus 2, which emphasizes finger noises and high frequencies. Its EQ has a highpass filter response with a 24dB/octave slope and frequency around 1 kHz. Pan bus 1 toward the left and bus 2 toward the right, because if you’re facing a guitarist the body boom will be toward the listener’s left, and the finger and neck noises will be toward the listener’s right.
The send to bus 3 goes to the main guitar sound bus. Offset its highpass and lowpass filters a little more than an octave from the other two buses, e.g., 160 Hz for the highpass and 2.4 kHz for the lowpass (Fig. 2). This isn’t “technically correct,” but I felt it gave the best sound.
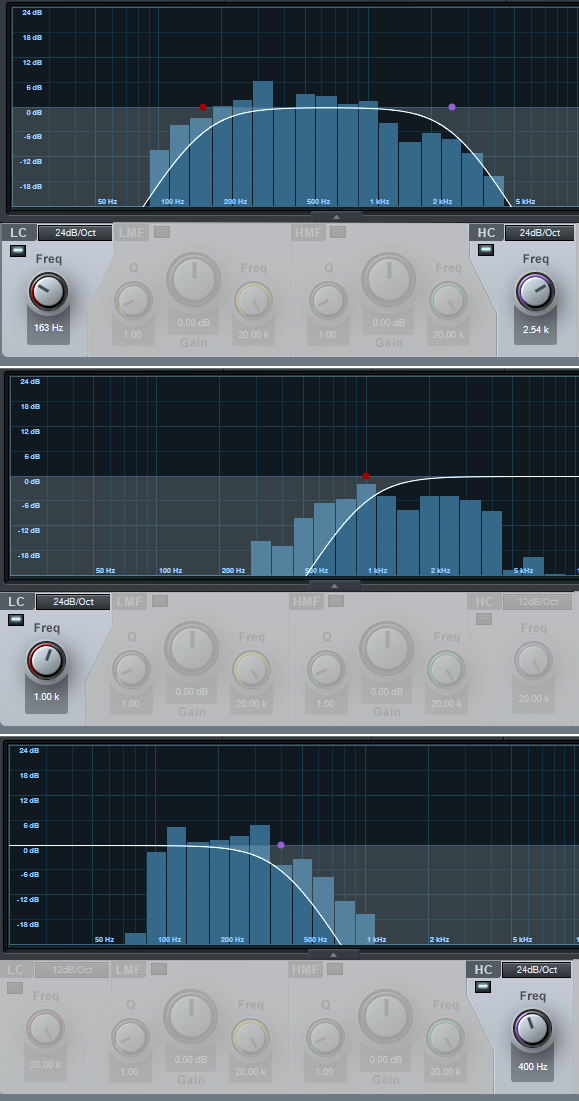
Figure 2: The top curve trims the response of the main guitar sound, the middle curve isolates the high frequencies, and the lower curve isolates the low frequencies. EQ controls that aren’t relevant are grayed out.
Monitor the first two buses, and set a good balance of the low and high frequencies. Then bring up the third send’s level, with its pan centered. The result should be a big guitar sound with a stereo image, but we’re not done quite yet.
The balance of the three tracks is crucial to obtaining the most realistic sound, as are the EQ frequencies. Experiment with the EQ settings, and consider reducing the frequency range of the bus with the main guitar sound. If the image is too wide, pan the low and high-frequency buses more to center. It helps to monitor the output in mono as well as stereo for a reality check.
Once you nail the right settings, you may be taken aback to hear the sound of a stereo acoustic guitar with no phase issues. The sound is stronger, more consistent, and the stereo image is rock-solid.
Rich Mahan Discusses Podcasting and the Quantum
We recently had the opportunity to hear from Rich Mahan who is a guitarist, singer-songwriter, podcaster, and a PreSonus user! If you’re not familiar with Rhino, we’re excited to introduce you to it. It is important and very well-respected reissue label, the label home of Warner Music’s legendary catalog. Currently living in Nashville, Rich where he records his podcast titled the Rhino Podcast. This biweekly podcast dives into classic artist and albums, interviews with musicians and lots of behind the scenes stories about some of the most legendary music. Their latest episode discusses Prince and it’s very entertaining! Read all about his thoughts on the growing a creating a podcast, the industry, gear and the Quantum 2!
Tell us about your background. How long have you been in the audio industry?
I started recording in the mid 90’s on a Vestax 4 track cassette recorder, moved up to a Tascam 388 reel to reel, and then to computer-based recording around 2003, starting originally using Vegas. I’ve been working in Pro Tools now for about 15 years.
How has the Audio industry changed since your early days?
The gear keeps getting better and better. The quality you can capture in a home studio or out in the field is unreal, and digital editing has changed everything. You can repair audio problems now that you simply couldn’t before, problems that would necessitate re-recording a part.
 What’s your favorite podcast right now?
I love Cocaine & Rhinestones, by Tyler Mahan Coe (No relation). It’s about 20th-century country music, it’s really well researched and produced, and I’ve learned a ton listening to it.
Tell us about your podcast. Where did the idea for your podcast come from? How does your first podcast compare to your most recent?
The idea for the Rhino Podcast came from both Rhino and me and my co-host Dennis Scheyer. We pitched the idea to them and they said, “We’ve been wanting to do a podcast…” so it came together pretty easily. The format since the 1st episode has changed here and there, but basically, it’s still the same. Every once in awhile Rhino will want to add or take something out, so it is a living, breathing thing that progresses as it goes.
There are so many podcasts these days. How do you stand out?
There are a number of reasons why the Rhino Podcast stands out. First and foremost, we are fortunate to be working with the greatest musicians and artists of our time. Rhino Entertainment is the catalog arm of Warner Music Group, so we cover any classic recordings from Atlantic, Warner Brothers, Reprise, Elektra, Sire… there’s a wealth of musical riches to explore, and it’s been thrilling to interview the artists who have created the soundtracks of our lives. On the production side of things, we hold ourselves to a high standard of audio quality; we fight hard to avoid using telephone audio for production purposes. If we can’t interview an artist in person, then we get them into a studio or send a recordist to them to capture high-quality audio for production, and just use the phone to talk with each other, everyone wearing a microphone headset or phone earbuds so there’s no monitor bleed into the mics. I spend a lot of time removing background noise and cleaning things up, removing lip smacks, getting fades perfect, and generally being a perfectionist. I don’t let anything go. If I hear an issue, I fix it.
What advice do you have for someone who wants to start a podcast?
Really learn how to record and edit well to make a professional sounding product. Record and edit as often as you can, and practice, practice, practice. Record your friends’ bands or your own music, interview your parents or grandparents and clean up the audio by removing ums, uhs, stutters and stammers, click and pops. Learn how the room you’re recording in affects the sound of your recording. Experiment with different microphones, and buy the best gear for the job that you can afford. Garbage in, garbage out. There’s a saying that you need to get 10,000 hours of experience to really start cooking, and there’s something to that.
How did you first hear of PreSonus?
I first heard of PreSonus when I was building my first ProTools rig. I wanted better preamps than my Digi002 offered, and I scored a PreSonus Eureka channel strip on the recommendation of a friend. It was great to get a good clean preamp, compression, and EQ all in a one-rack space unit. I liked the sound of it so much that I then bought two PreSonus MP20’s for tracking drums. That improved my recordings at that time dramatically.
What PreSonus products do you use?
Currently, I’m using a Quantum 2.
Why did you decide to go with Quantum?
There are a few reasons I went with the Quantum. Firstly because it has 4 mic inputs, along with a ton of other I/O options, which I need when interviewing multiple subjects simultaneously. Another huge feature is that the Quantum has 2 Thunderbolt ports which allow me to plug in my bus-powered thunderbolt drive into the Quantum, and then the Quantum into my Macbook Pro. Thirdly, I love the smaller footprint, its’ not as wide as a piece of rack gear, so it fits easily into my messenger bag making it really easy to carry onto an airplane. And last but certainly not least, it is dead quiet, and there’s plenty of gain in the preamps to drive a Shure SM7B, which is my VO microphone of choice. The Quantum sounds awesome.
What do you like about PreSonus? What caught your eye?
The folks at PreSonus really are the best to work with. If you have an issue or need to figure something out, you can get help and get back up and running quickly. But another great thing is their gear is intuitive and easy to use. It’s easy to get great tones with their gear.
Recent projects? What’s next for you?
I just released a new album entitled, “Hot Chicken Wisdom.” I was able to put the Quantum to use while tracking parts, especially when I was traveling and wanted to have friends lay down parts away from my studio. I think if you listen to the record you’ll hear that we got some great tones, besides it’s the perfect summer soundtrack!
Next up for me is some touring to support Hot Chicken Wisdom, and I have a second Podcast in pre-production that I can’t announce quite yet, but I’m really excited about it. Anyone who wants to keep up with me can check me out at richmahan.com.
Follow Rich on Facebook Here!
Video Using VocALign in Studio One Pro!
In this video, producer Paul Drew shows how VocALign seamlessly works inside Presonus Studio One Professional and almost instantly aligns the timing of multiple vocal tracks to a lead using ARA2, potentially saving hours of painstaking editing time.
ARA (Audio Random Access) is a pioneering extension for audio plug-in interfaces. Co-developed by Celemony and PreSonus, ARA technology enhances the communication between plug-in and DAW, and gives the plug-in and host instant access to the audio data. This video shows Studio One but the workflow is very similar in Cubase Pro & Nuendo, Cakewalk by Bandlab and Reaper.
Purchase VocALign today right out of the PreSonus Shop!
Friday Tip – Mid-Side Processing Made Easy
Mid-side (M-S) processing encodes a standard stereo track into a different type of stereo track with two separate components: the left channel contains the center of the stereo spread, or mid component, while the right channel contains the sides of the stereo spread—the difference between the original stereo file’s right and left channels (i.e., what the two channels don’t have in common). You can then process these components separately, and after processing, decode the separated components back into conventional stereo.
Is that cool, or what? It lets you get “inside the file,” sometimes to where you can almost remix a mixed stereo file. Need more kick and bass? Add some low end to the center, and it will leave the rest of the audio alone. Or bring up the level of only the sides to make the stereo image wider.
The key to M-S processing is the Mixtool plug-in, and its MS Transform button. The easiest way to get started with M-S processing is with the MS-Transform FX Chain (Fig. 1), found in the Browser’s FX Chains Mixing folder.
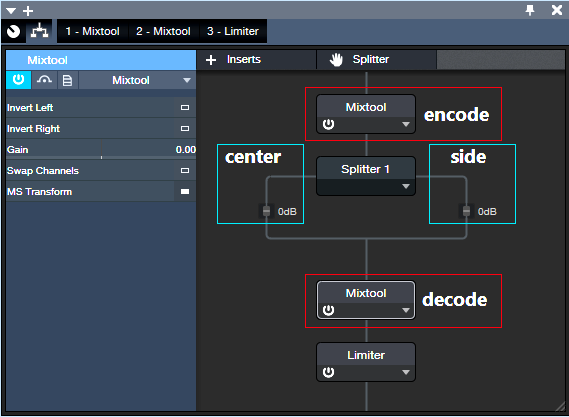
Figure 1: The MS-Transform FX Chain included with Studio One.
The upper Mixtool encodes the signal so that the left channel contains a stereo file’s center component, while the right channel contains the stereo file’s side components. This stereo signal goes to the Splitter, which separates the channels into the side and center paths. These then feed into the lower Mixtool, which decodes the M-S signal back into stereo. (The Limiter isn’t an essential part of this process, but is added for convenience.)
Even this simple implementation is useful. Turn up the post-Splitter gain slider in the Center path to boost the bass, kick, vocals, and other center components. Or, turn up the gain slider in the post-SplitterSide path to bring up the sides, for the wider stereo image we mentioned.
Fig. 2 shows a somewhat more developed FX Chain, where a Pro EQ boosts the highs on the sides. Boosting the highs adds a sense of air, which enhances the stereo image because highs are more directional.
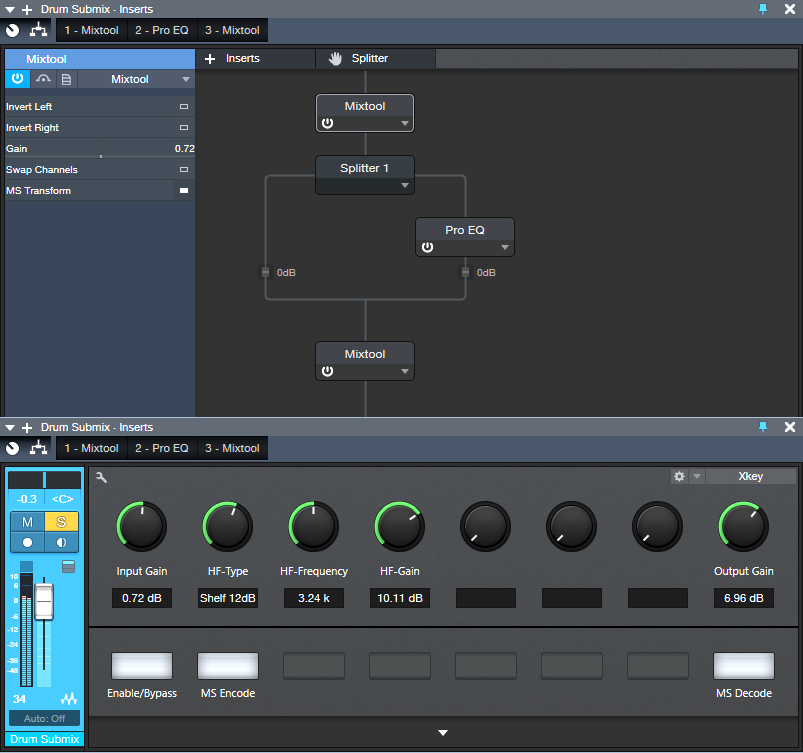
Figure 2: The Image Enhancer FX Chain.
In addition to decoding the signal back to stereo, the second Mixtool has its Output Gain control accessible to compensate for any level differences when the FX Chain is bypass/enabled. Also, you can disable the MS Decoder (last button, lower right) to prevent converting the signal back into stereo, which makes it easy to hear what’s happening in the center and sides.
And of course…you can take this concept much further. Add a second EQ in the center channel, or a compressor if you want to squash the kick/snare/vocals a bit while leaving the sides alone. Try adding reverb to the sides but not the center, to avoid muddying what’s happening in the center. Or, add some short delays to the sides to give more of a room sound….the mind boggles at the possibilities, eh?
Download the Image Enhancer FX Chain here!