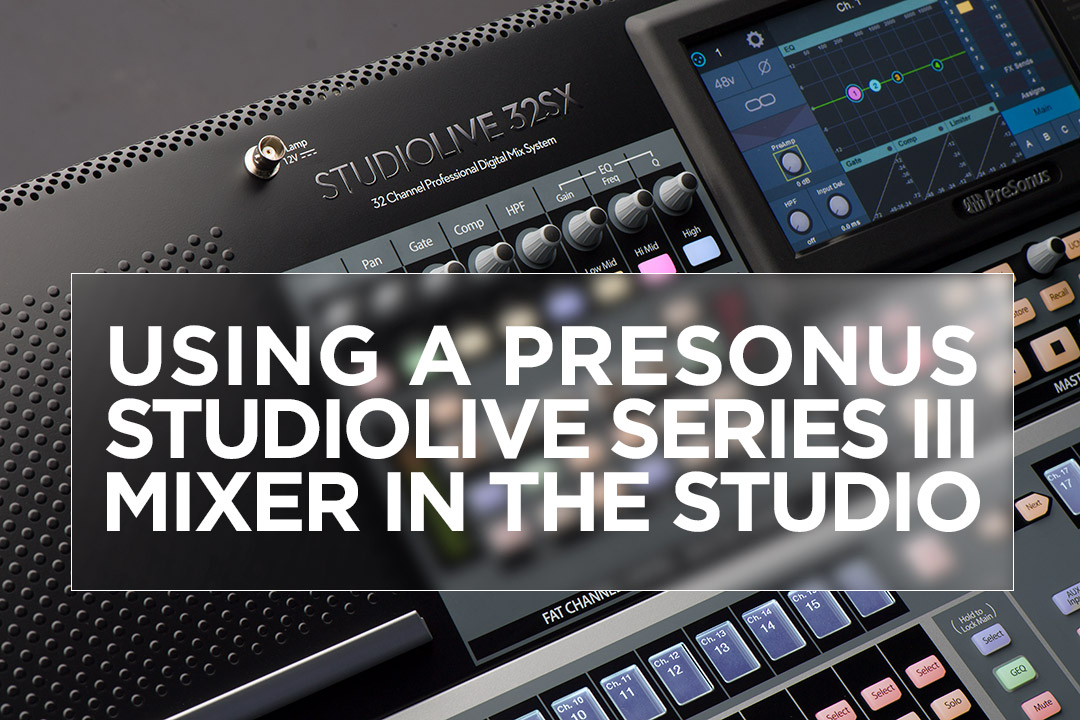
Using StudioLive Series III in the Studio
Let’s take a closer look at the “Studio” in “StudioLive,” with special guest host Matt Osgood! In this six-video series, Matt covers everything from basic setup to recording with effects and remote control. Later in the series we get a look at StudioLive DAW Mode and automation writing in Studio One.
This is good stuff.
Welcome Joe Gilder to the PreSonus Fam!
Please join us in welcoming the esteemed Joe Gilder to the PreSonus family! He has a new Studio One playlist full of tips started… with more episodes to come! Check it out below.
How to Play Faster—By Playing Slower
In the comments for last week’s tip on varipseed-type formant changes, reader Randy Hayes asked if it was possible to change the tempo similarly so that you could play along with something at a slower tempo, then speed it back up (while still being the correct key). This was a common technique with tape, but because pitch and speed were locked together, there would be formant changes—whether you wanted them or not—when you returned the slowed-down track to pitch.
One of the MIDI’s great features is that you can sloooooooow down the tempo, play along with the slowed-down track, then speed it up to make it seem like you have lightning-fast technique. The good news is that with audio, you can slow down Studio One’s tempo without changing pitch, which sounds great in theory. The bad news is that this isn’t always a painless solution, because Events recorded at a slower tempo will likely need to be time-stretched when you return to the original tempo, and you may also need to call up the Inspector for Events or Tracks to specify how the Events should relate to tempo. Also, if there’s a Tempo Track with tempo changes, then you have to offset all the tempo data, as well as make sure you restore it to the proper tempo when you’re done.
Fortunately, there’s an easy way to record along with a song at a slowed-down tempo, and have the correct timing for the recorded part when you restore the song to its original tempo. This complements last week’s formant-changing trick; the technique starts off similarly but ends up quite differently.
- Create a premix of your existing tracks with the Export Mixdown function. In the dialog box, check Import to Track and Close after Export (Fig. 1; outlined in white).
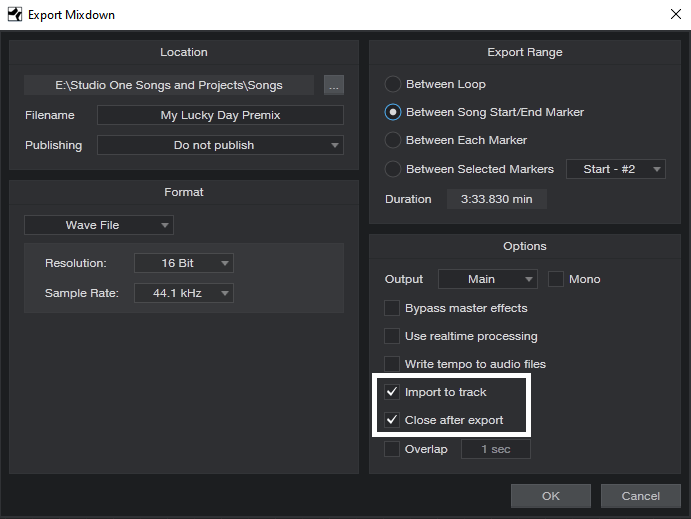
Figure 1: Use the Export Mixdown function to create a premix.
- After the premix is imported, mute all other tracks except for the Imported premix track.
- Select the premixed track, and right-click on it (Fig. 2), or open its Inspector (F4), to access the Speedup parameter. Note that this parameter can also slow down the speed, by entering a value less than 1.00.
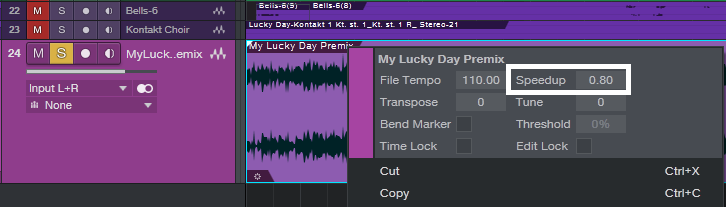
Figure 2: Access the Speedup parameter by right-clicking on the premix.
- Slow down the premix to the desired tempo with the Speedup parameter. For example, a Speedup reading of 0.80 means the song’s tempo is 80% as fast as it had been previously. Bear in mind that you can’t do a ridiculous amount of slowing down without affecting the audio quality of the track you’re recording, but overall, Studio One is quite forgiving.
- Record the new track as you listen to the premix’s slowed-down tempo.
- Before restoring the original tempo, the track you recorded has to start at the song’s beginning. If that’s where you started recording, fine. Otherwise, use the Paint tool to draw an Event between the start of the song and the start of your part, select them both, and type Ctrl+B to merge them together (Fig. 3).
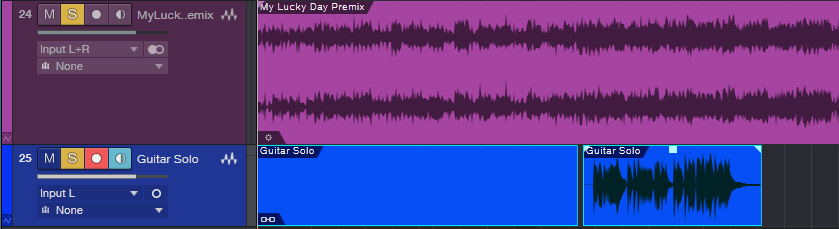
Figure 3: The recorded guitar solo, with an added “dummy” Event that starts at the beginning of the song, prior to merging them together.
- Now, right-click on the overdub you recorded so you can access its Speedup parameter.
- Open up your calculator to determine how much you need to speed up the overdub. Divide 1 by the slowdown amount to obtain the correct Speedup amount. For example, if you slowed down to 0.80, then 1/0.80 = 1.25. So, set the recorded track’s Speedup parameter to 1.25 (Fig. 4).
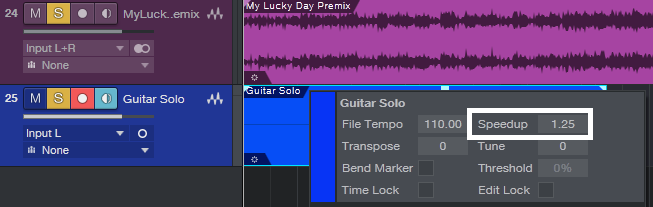
Figure 4: Once the newly recorded track goes to the start of the song, change the Speedup parameter to compensate for the slowdown.
- Delete the premix (or mute it if you plan to do more recording at the slower tempo), and unmute the other tracks. The part you recorded should now match the Song’s overall tempo, even if there are tempo changes.
Note that any vibrato will be sped up when you restore the new part to the original tempo. This may be something you want, but if not, just remember to apply a slower vibrato than usual. Also, the timing will be tighter—a note that’s off the beat by a bit will hit closer to the beat when sped up.
Sure, some people might think this is cheating. But back when recording studios started adding EQ or reverb to vocalists, that was considered cheating too. The technique is the skill with which we use our tools, and having “Studio One technique” can be just as important—and valid—as having technique on your chosen instrument.
Just remember, all that matters about music is the emotional impact on the listener. They don’t care what you did to produce that emotional impact!
Varispeed-Type Formant Changes
Back in the days of tape, when dinosaurs ruled the earth and gas station attendants checked your oil, variable-speed tape recorders allowed changing the pitch of all the tracks with a single control. This was useful for many applications. The most common were speeding up masters a bit to make them a little brighter and tighter, doing tape flanging, and perhaps the most popular, changing vocal formants. If you transposed the recorder’s pitch down a little bit, recorded a vocal as you sang along with the lower pitch, and then transposed back up again on playback, the vocal formant would be higher and brighter. Similarly, for a darker, warmer sound, you could transpose up, sing along with that, and transpose back down again. The same principle worked with other instruments, but vocals were the most popular candidates for this technique.
The main limitation (although it could also be an advantage in some situations) is that the tempo and pitch were interdependent—a higher pitch meant a faster speed, and a lower pitch, a slower speed. This was useful for masters, because you could speed up and brighten a track by upping the speed by 2% or so. The Friday tip for June 8, 2018 covered how to emulate true, variable speed tape effects when working on a final stereo mix.
A major advantage of today’s digital audio technology is that pitch and tempo can be independent, and one of Studio One’s attributes is that the audio engine retains its sound quality with reasonable pitch changes (e.g., a few semitones). This makes it very easy to do the old tape trick of changing vocal formants; here’s how.
- First, create a premix of your existing tracks with the Export Mixdown function. In the dialog box, check Import to Track and Close after Export (Fig. 1).
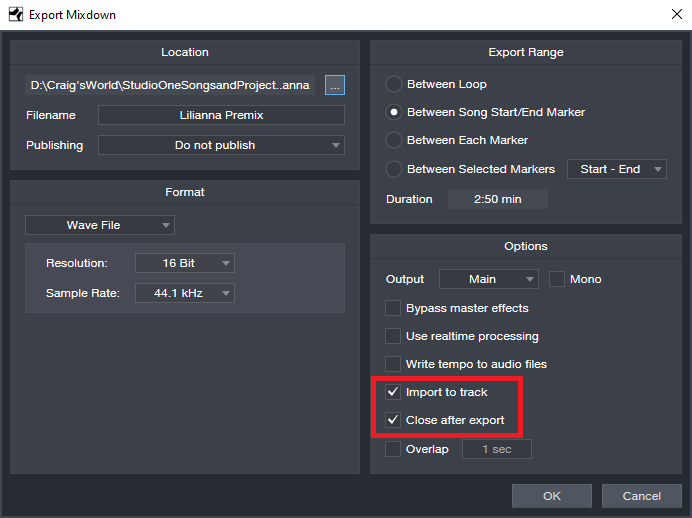
Figure 1: Use the Export Mixdown function to create a premix.
- After the premix is imported, mute all other tracks except for the Imported premix track.
- Select the premixed track, and right-click on it (Fig. 2), or open its Inspector (F4), to access the Transpose and Tune parameters.
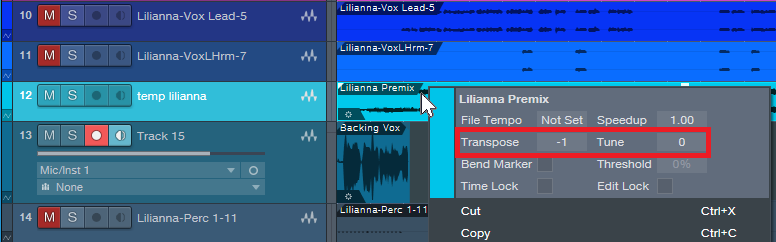
Figure 2: You can access the Transpose and Tune parameters by right-clicking on the premix.
- To brighten the vocal formant, use the Tune and/or Transpose function to lower the pitch.
- Record the vocal track as you listen to the premix.
- After recording the vocal track, right-click on the vocal Event, or open its Inspector, and tune it up by as much as you tuned the premix track down. For example, if you tuned the premix down a semitone, tune the vocal track up a semitone.
- Delete the premix (or mute it if you plan to do more formant-shifted tracks), unmute the other tracks, and enjoy your formant-shifted vocal.
This is especially useful when doubling parts, because the double can have a slightly different timbre. And with background vocals, shift some formants up, and some formants down, for a bigger, more interesting sound. And of course, if you just can’t quite hit that high note…you’re covered. I promise I won’t tell.
I also like using this with guitar and other instruments. I’ve gotten away with pitching guitar up 7 semitones for a bright sound that splits the difference between a standard guitar sound, and one that’s more like “Nashville” tuning (as described in the Friday Tip for December 1, 2019). At the other end of the tonal spectrum, playing along with the premix tuned up, and pitching back down, is like using a low tuning on a guitar—great for those massive metal guitar sounds.
—————————————
As we enter 2020, thank you very much for your support of these blog posts, and your comments. Also, thank you for supporting the Studio One book series that I’m writing. When I wrote the first book, I wondered if there would be any demand for it, or whether I was just wasting my time. Well, you’ve answered that question… so now I’m working on book #5 of the series, about how to record great guitar sounds with Studio One. It won’t be done for a while, but it wouldn’t have been done at all without your support (or the great-sounding new amp sims, for that matter).
Finally, let’s all thank Ryan Roullard and Chad Schoonmaker, who wrangle the blog and social media each week to get this blog posted and promoted. It’s not like they don’t already have enough to do at PreSonus, which makes their involvement just that much more appreciated. Thanks guys!
Bi-Amping the Ampire
I’m still wrapping my head around PreSonus giving us amp sims that are light years beyond the original Ampire in a free update…and also making them available for use in other programs. But now that they’re here, let’s take advantage of them before PreSonus’s accounting department changes its mind.
The new amp sims do not supplement the old Ampire, but replace it. New Studio One owners will have only the new amps; existing users will find that the legacy presets were removed. If you need to get the older presets back because you used them in pre-4.6 projects, simply install the Ampire XT Classics extension—but I’d recommend redoing any presets with the new amps, because they sound so much better. (The Ampire XT Metal Pack works with the new Ampire, but you may need to re-install it.) The PreSonus Knowledge Base has an article with everything you need to know about making the conversion from the old Ampire to the shiny new Ampire XT.
Why Bi-Amp?
Bi-amping a guitar amp is useful for the same reason that most studio monitors are bi-amped—just as you can optimize the speakers for high and low frequencies, you can optimize the amps for high and low frequencies. For example, with heavily-distorted chords, the high strings will be equally distorted and relatively indistinct. With bi-amping, the lower notes can have a big, beefy distortion sound, while the high notes ring out on top—which is the subject of this Friday tip.
Let’s take a bi-amped preset apart to find out how it works. This preset is available on the PreSonus Exchange, so if you just want a cool, crunchy rhythm sound, go ahead and download it. But the real value here is learning how to make your own presets, because this preset was made using my guitar, pickups, strings, playing style, pick, and follows my musical tastes. It’s unlikely you play guitar in exactly the same way, so it’s worth tailoring any amp sim preset—not just this one—to your own playing style and gear.
Recording the Guitar
Guitars are mono, but to play stereo games, we need to convert a mono track to dual mono. This allows using processors like the Binaural Pan.
- Record a mono guitar track with Channel Mode set to Mono.
- Change Channel Mode to Stereo.
- Select what you recorded.
- Choose Bounce Selection (ctrl+B). Now your guitar part is dual mono (e.g., the same part in both the left and right channels), so Studio One recognizes it as stereo.
The FX Chain Multipreset
Fig. 1 shows the FX Chain “block diagram.” The Splitter is doing a Frequency split; frequencies below 924.7 Hz go to the left split, while frequencies above that go to the right split.

Figure 1: Bi-amp Multipreset block diagram.
Next up is choosing the amps, and setting their parameters (Fig. 2). The left split uses the MCM 800, a revered British amp that can marshall its resources to give big, beefy sounds. The right split’s VC30 amp is known amongst the vox populi for its bright, ringing high end, so the two amps are ideal for delivering the desired result.
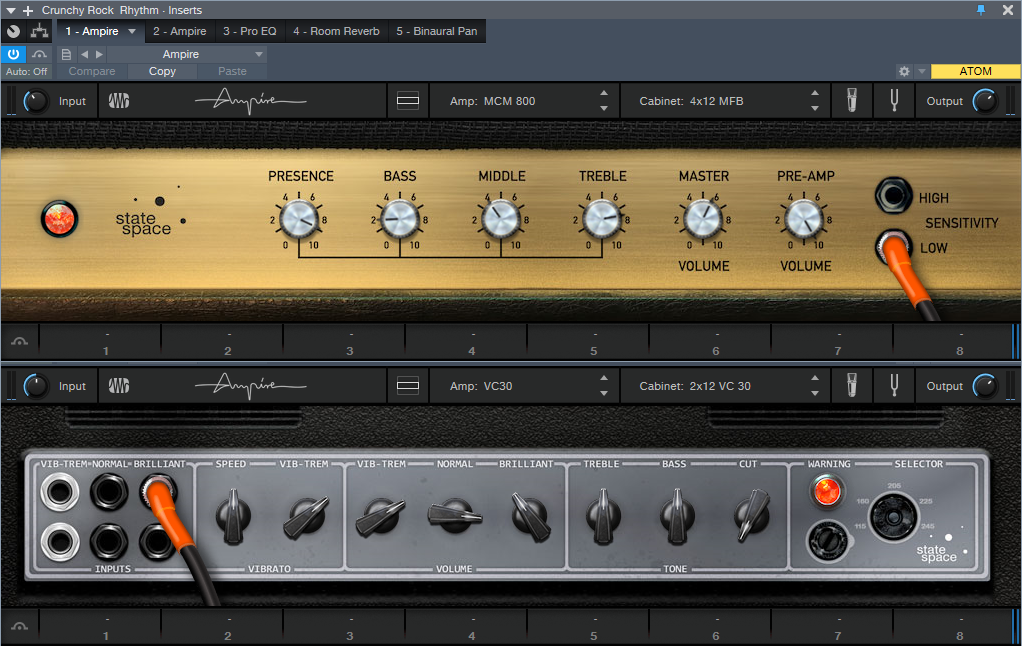
Figure 2: Left split (on top), right split (below).
Now let’s enhance the amp sound with some EQ, reverb, and stereo imaging to spread out the reverb a bit more (Fig. 3).
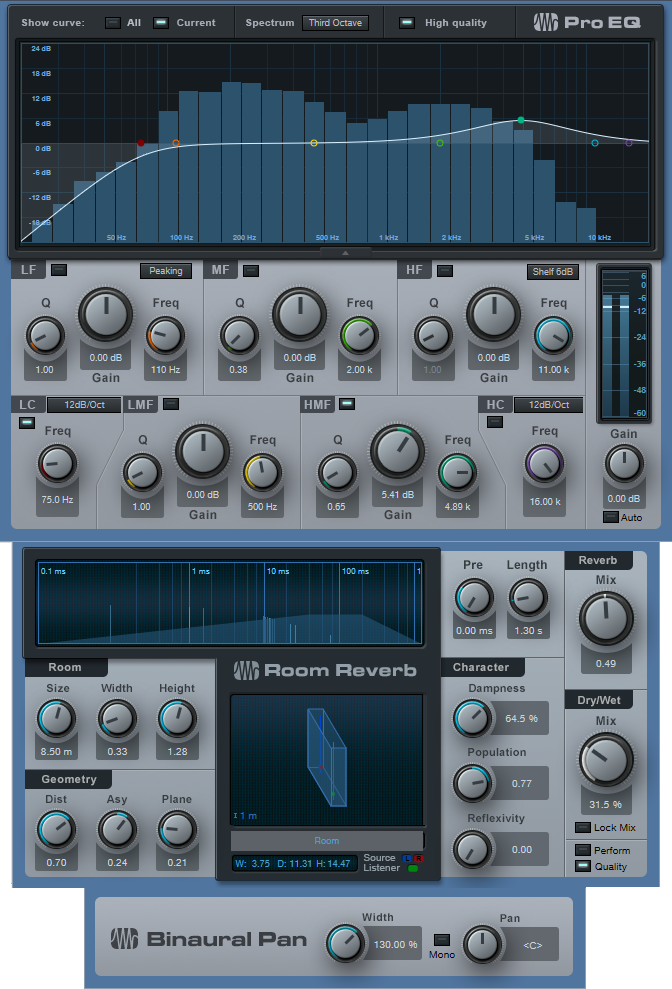
Figure 3: Final touches for the bi-amp multipreset.
The EQ adds the equivalent of an amp’s “bright” switch. With a non-bi-amped preset, you have to be very careful about adding brightness because it can emphasize any artifacts caused by intermodulation distortion. But that’s not an issue here, because of the VC30’s a clean high end. The gentle low-frequency roll off simulates more of an open-back cabinet sound. The reverb is sort of a cross between a spring and room sound, while the Binaural Pan spreads out the reverb signal for a wider stereo image. The pan setting is fairly conservative; feel free to widen things further.
This multipreset makes an excellent template for further adventures with bi-amplification. Of course, this just scratches the surface of what’s possible with these new amps—so stay tuned to the Friday Tip of the Week for more applications.
Download the Crunchy Rock Rhythm preset here!
Notion WINS KVR Readers’ Choice Award!
We’re honored to close out the decade with a win from KVR Audio for Favorite Notation Software voted on by their readers! Thanks to everyone who voted. Cheers to 2020!
Read more about Notion’s win here.
Read the full list of winners here.
Shop Notion here!
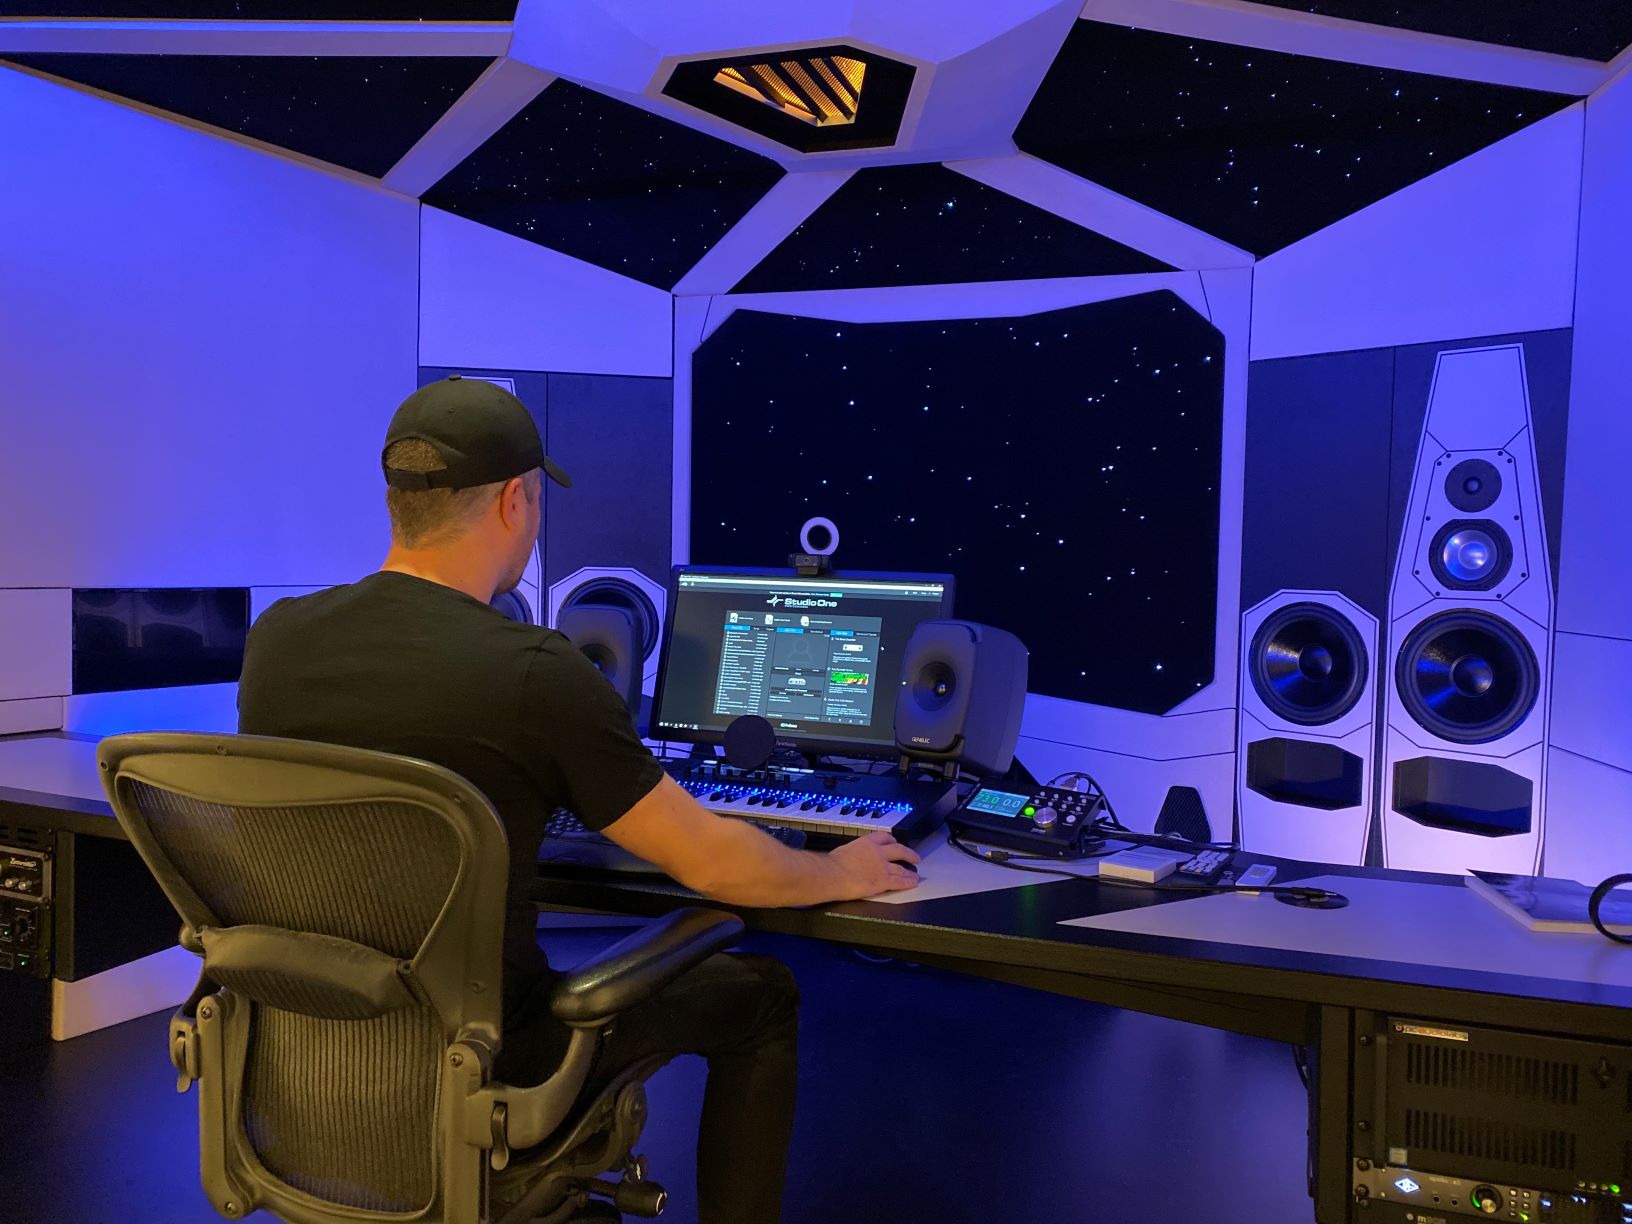
The Force Is (Studio) One With Maarten Vorwerk

We had the recent opportunity to talk with Maarten Vorwerk about how he’s been using Studio One for his studio work and he was kind enough to share these insights with us. Read more from Maarten himself here.
During the early 2000s, I had some success in The Netherlands and Europe with Hard and Jumpstyle productions, including a Number 1 and several Top 10 hits. Back then I was awarded for being the best dance act in the Netherlands under the pseudonym Jekyll & Hyde. Later on, I veered more into the commercial side of dance music as a ‘ghost’ producer for other artists for whom I’ve produced lots of tracks.
After releasing official remixes for artists like Will.I.Am, Jennifer Lopez, Pitbull, Major Lazor, Deadmau5 and Shakira among others, I started dedicating some more time towards educating the new generation of producers in 2017 and released a best-selling book full of practical studio tips, with a second book on the way.

Maarten piloting Studio VRWRK
So I’ve been currently using Studio One as my main production DAW… and purely for Electronic Dance Music production in my home studio. I don’t do much live recording anymore.
I was a Cubase user for all my production career, but I got fed up with the workflow speed. Then I saw a demonstration of Studio One back in 2014. The ease of use and the speed of the workflow really made me want to try it out and I have used it ever since. The transition was easier than I’d expected!
Every DAW has certain features that make them unique. But for me personally, Studio One has the most to offer. It looks good in the sense that you can have everything on 1 screen: Arrangement, Mixer, Browser, Inspector, and it’s still easy to work. So it gives me speed in an easy view space, which means I can fully focus on being creative!
- “Drag and Drop” workflow is a clear winner: you want to save a mixed bass line? Just grab and drag it to the side and it saves everything (Inserts, Melody, Instrument).
- Audio: transposing pitch, time-stretching is right there, withing the Inspector options. Melodyne integration is built-into the engine. Right-click on an Audio clip and send to Sample One XT or Impact XT. All that kind of stuff makes my life a lot easier.
- Automation: you click on a parameter and you’re already editing automation right away.
- The Arranger track view is brilliant. Copying and re-arranging sections including all the automation have never been more easy for me.
There’s one particular feature I really love. Sometimes in the begin stages of the track, my project looks like a mess. So finding a specific track in a mixer can prove to be difficult. In Studio One I just double-click on the track and the mixer pops open with that track highlighted and I can make adjustments right away.
Also, the fact that you can analyze a groove from a specific loop. And then apply that same groove to all your other stuff.

Design and Build by Mischa Jacobi
One important feature that is a bit hidden is the use of ‘ghost notes’. Let’s say I made a chord progression that I want to use as a non-editable overlay for reference, while I’m making the melody. I would go in the piano roll, click on the 4 horizontal lines in the left upper corner and then click on the reference track, making sure to click the pencil tool OFF so it can not be edited but only used as a reference. I know this is a feature that is loved by a lot of dance producers. But I didn’t know Studio One had that until recently!
All in all, I think Studio One has done a great job creating a solid DAW. Looking forward to future versions!!!
Instagram: @maartenvorwerk
Facebook: vorwerkmaarten
Official Website
The Vinyliser FX Chain
Nostalgic for vinyl? Miss the glorious sound of dragging a rock through yards of plastic, the wild frequency response gyrations of analog RIAA curve filters, the surface noise from recycled vinyl, scratches and pops from dust particles, inner groove distortion, sound quality deterioration over time, and warpage from records not being stored properly?
Well, I don’t miss it at all. But, recently I needed to sample a loop from a song that had been recorded with (of course) pristine quality in Studio One, and apply a trashification process to make it sound like the loop was taken from an old, abused, and never cleaned vinyl record. The object was not to come up with an FX Chain like the existing plug-ins that aim to emulate vinyl’s better qualities, but instead, something that could emulate some of vinyl’s worst qualities.
Now, you might think it would be easy-peasy to take something good and make it sound bad, but it’s not—because vinyl is/was a very specialized form of bad, and reproducing that inside of Studio One is a challenge. But we tackle the tough gigs here in the Friday Tip! Here’s what I learned.
Hissy that Fits

Figure 1: The Tone Generator’s white noise output is pretty much all we need for hiss, whether tape hiss or preamp hiss.
The really old vinyl stuff was pre-noise reduction, so we need some hiss. That’s easy: use Studio One’s Tone Generator (Fig. 1), set it for white noise, and keep the level down in the final routing.
Distortion
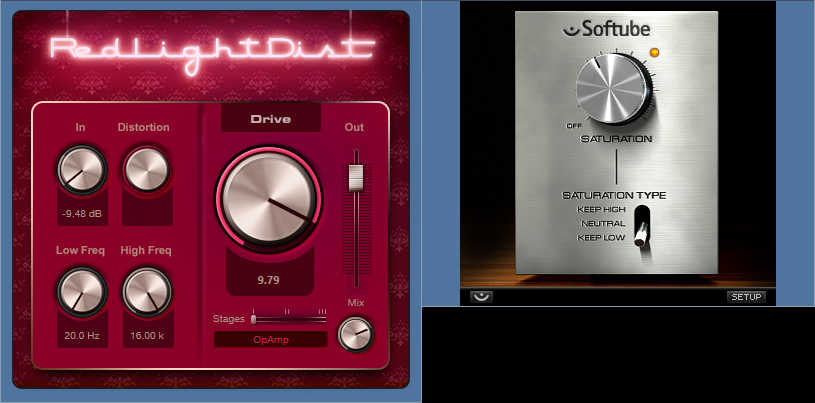
Figure 2: Each of these distortion processors gives a different kind of dirt flavor…try them both.
Simulating inner groove distortion isn’t necessarily easy, but we have a couple options (Fig. 2). The Softube Saturation Knob, set for Keep Low and a fair amount of distortion, will do the job when you’re in a hurry. If you have time to tweak, RedlightDist has much to offer. I like one stage of OpAmp distortion as shown, but you can also increase the distortion, or try different flavors. Some timbres even come close to tape-based distortion.
Warp that Record!

Figure 3: Setting the Analog Delay for vibrato, with no dry signal, emulates the pitch variations caused by a warped record.
The Analog Delay (Fig. 3) is ideal for warpage, because of its ability to do a slow vibrato. Choose a Sine wave speed of 1.33 Hz for a 33-1/3 LP, or 1.80 Hz for a 45 RPM single. Set Feedback to 0.0%, Width to Mono, and 100% for the Mix.
With 1.75 ms of initial delay (a/k/a Time), pushing the Mod amount up to 50% seems like enough warpage for most rational people. However, if you left your record out in the sun, in a car, with the windows closed, while you were at the beach, you can warp the virtual vinyl even further by increasing the initial delay time.
The Analog Delay has a couple of extras that help our cause. Turning up Low Cut and turning down High Cut can give a more lo-fi effect, like the sound is playing back from a portable record player or the like. Turn up saturation as well, because for nasty vinyl sounds, you can never have enough distortion.
Vinyl Surface Noise
I tried, I really did, to do this exclusively within Studio One. The closest I came was following white noise from the Tone Generator with the Gate, setting its Attack/Release/Hold controls to minimum, and editing the Threshold to let through only the very highest, occasional noise peaks. Adding a little high-end shelving EQ helped, as did using X-Trem in pan mode to move the clicks and pops across the stereo field, but ultimately it sounded more like cooking mini digital popcorn than funky scratches.
Admitting defeat, I went to 99Sounds.org (a fine source for unusual, 100% royalty-free samples), and found a section with vinyl noise SFX recorded by Chia. There are 37 samples, a few of which are over-the-top scratchy, but samples #12 and #29 were good for what I needed.
Routing
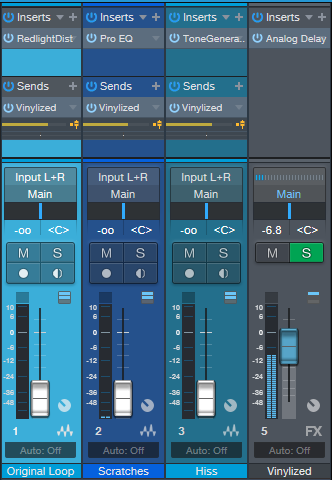
Figure 4: Routing for the Vinyliser effect.
For setup, the three different elements feed into a single FX Channel (Fig. 4), all through pre-fader sends. The original loop has the RedlightDist inserted to create the distortion; the vinyl surface noise samples have their own track (with a Pro EQ to boost the highs a bit); and the hiss has its own track as well. The Analog Delay in the FX Channel warps everything.
So does it sound any good? Of course not! But that’s the whole point…check out the audio examples, with before-and-after for a drum loop, and another for program material (with a more drastic effect than the drums).
Häzel Talks Studio One

Häzel is a Grammy-nominated producer, sound designer and mixer based in Melbourne, Australia who has been in the music industry for about 15 years and have worked with people such as Gallant, Drake, The Beatchild, Mad Clown, Joanna Borromeo, TFOX and was part of a duo called Zebrahim with my friend Ebrahim (eebsofresh). He has also composed music for commercials and worked on sound designing for filmmaker Mikael Colombu for a little, along with producing content for The Weeknd and Cee-lo Green among others.
Currently armed with Studio One Professional Version 4 in tandem with a Studio 192 interface, a pair of Eris 8 monitors and an ATOM controller, this is the setup Hazel uses on a daily basis for anything that has to do with music and sound.
Words from the man himself:
“I compose, record and arrange with it, I mix with it and use it for sound designing. I have it on my laptop as well as my workstation in my home studio and I take it with me when working in bigger studios… I actually find that it is becoming more and more common to find it in well-established studios. Cant’ wait until it becomes the industry standard!
Some of my fellow musician friends recommended it to me a while ago and like everyone else at first I was a little skeptical in making the change until the day I felt limited by the functionalities of some other DAW’s, in terms of the cluttered workflow they bring and just how power-hungry most of them are.
At some points as my ideas were getting more complex, I was forced to use multiple software applications for the different things I was trying to achieve. I needed something new and decided to try Studio One Pro Version 3. I’ve always trusted PreSonus as a brand because I already had a Firebox which served me well for many years. It took me literally one day to make the decision to do the switch. Studio One had everything I needed in one place, it sounded great (if not better) and was very stable ( which I wasn’t used to!), capable of running on anything I could get my hands on and without the need of a dongle. I remember having to bounce or “freeze” tracks before to save CPU, i can’t think of one time I had to do that ever since, even on my bootcamp 12″ MacBook Air.
With every update I get inspired by some new function I didn’t think I needed and then it finds its way into my workflow. You can basically create something or make anything sound good just with the built-in Add-On’s straight out of the box. I love the sound of the Console Shaper, the genius and simple way to sidechain on the latest update, the waveform slip editing and one of the functions I use the most is the event stretching by holding the ALT modifier key.
Fast editing is really key. For me it really just comes to creativity always, I like to test things, sounds, FX, anything really. I like to keep moving and Studio One allows me to do just that. I don’t feel limited or obstructed by the software I’m using. It just feels natural to me.
Anyone who has ever worked in this industry or has ever used a DAW at some point will find it familiar to start with. And when you have an idea of how a function should work, well there’s a big chance that that’s exactly how it works on Studio One, always the most logical and intuitive way in my opinion. Dragging and dropping anything, anywhere or converting file formats with two clicks. I found myself to be a lot more creative with this workflow, I can continuously be doing things, adding/removing sounds and rarely even pause or stop whatever I’m working on. I haven’t found myself missing a function from what I was using before apart from scrubbing which I only used when working to a video, but I can’t think of anything else really.
The only function I can think of that I wish it had so I didn’t have to use anything else would be a manual sample slicing option directly from the Sample One XT virtual instrument (wink, wink!) But there has been so much improvement compared to when I first started within Version 3 so hopefully, that will be coming at some point.
ONE THING: there is a function that I haven’t heard many people talk about which is the waveform slip editing I mentioned previously. When editing an event if you hold ALT and CTRL keys you can slide the waveform left and right. It is an AMAZING tool to make corrections on the fly or simply just to create swing on your drum tracks on. I use all the time and others probably would too, once they discover this feature!

PreSonus has really been setting a new standard with their Studio One DAW and it surpasses everything else with every update. I think that what people like me appreciate the most as a user, is to feel like the company you’re investing yourself on is listening to your opinion and is always working towards improving its products based on your feedback and experience, and it shows.
Every update in the last year only has fulfilled almost every request I can think of and they did it for free. That’s just exemplary to me. And I know that there’s more good stuff coming. Long live PreSonus and Studio One.”
Instagram : @hazeldizzy
Soundcloud: hazeldizzy
Twitter: @hazeldizzy
Gallant – Miyazaki (Prod.Häzel )

Thank you, Häzel… we wish you continued success in all of your creative audio endeavors, bro.
Resonator FX Chain
This FX Chain complements the Tightener FX Chain presented in the October 25, 2019 Friday Tip. Whereas the Tightener reduces the presence of the key center in a piece of audio, the Resonator enhances the key center by adding resonance. The download at the end includes twelve Resonators—one for each key.
The heart of each Resonator FX Chain is two delay lines whose period correlates to a particular key, and are tuned an octave apart from each other. Mixing the delayed, resonant sound with the dry sound imparts a sense of pitch, which can be useful with unpitched instruments (such as percussion) to blend in better with melodic instruments. It can also help create a sense of pitch for drums that aren’t tuned properly, as well as emphasize any instrument’s key center.
For example, suppose it’s hard to get a shaker part to fit in a mix because its level is either too high and stands out, or is too low and sinks into the track. Adding a feeling of pitch may allow mixing the part a bit higher, while also having it blend into a mix more seamlessly. If taken to an extreme (and the FX Chain allows for that!), the Resonator has special effects potential for sounds like “cylon” voices, or tuning reverb.
The Controls
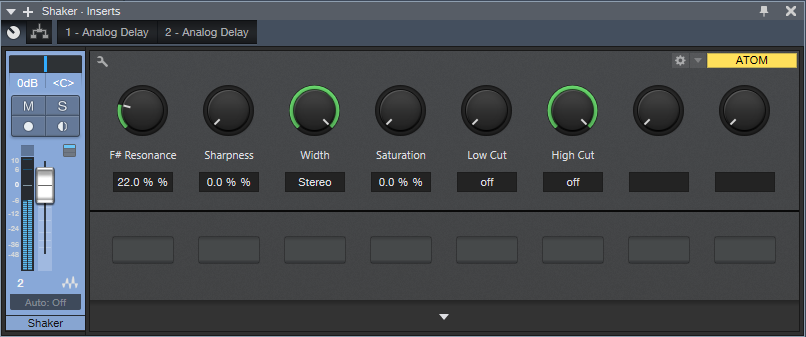
Figure 1: Each Resonator has six controls; the Resonance control is the most important one.
The controls (Fig. 1) are pretty straightforward, and cover the full travel of the Analog Delay controls. There’s no need to tweak any Transform curves.
- [key name] Resonance varies the mix of the resonant and dry sounds. Most of the time, mixing in even a bit of resonance may be all you need.
- Sharpness adds feedback to create more intense resonance.
- Width determines whether the resonance is stereo or mono. Most of the time, you’ll probably want to leave this control fully clockwise.
- Saturation, Low Cut, and High Cut controls are “because we can” controls. You may not use them much, but hey, an FX Chain allows for eight controls…so why not?
Striking the Right Chord
You can also use the Resonators to impart the sense of a chord by sending a sound to FX Channels, loaded with appropriate Resonators. Fig. 2 shows a shaker part acquiring a more melodic vibe via resonators for the keys of D, F#, and A. This produces a D major chord tonality.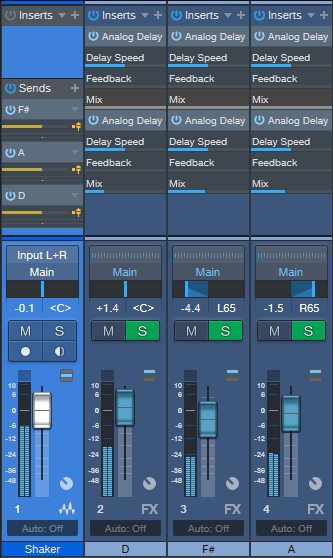
Figure 2: Sending the audio from a shaker to three FX Channels “tunes” the shaker to a D major chord.
Although I came up with this mostly to process unpitched sounds, I’ve found it has other uses as well. For example, with an acoustic guitar part, a Resonator can add a vibe that’s not unlike the drone strings on a sitar. The best implementation I’ve found for this is putting the Resonator in an FX Channel, and automating a send so that the resonance is added only in certain strategic parts. And of course, if you want to get crazee, you can always turn up the resonance and sharpness, and do cylon voices. Fun stuff!
Download the 12 Resonator FX Chains Here.