Co-Founder Jim Odom Talks 25 Years of PreSonus
Whether you’re new to the PreSonus family or you’ve been around since the 90s, you owe a huge thank you to THE Jim Odom, Founder and Chief Strategy Officer at PreSonus. Jim is a member of the Recording Academy Producers & Engineers Wing, AES, NARAS, NAMM, and other industry associations. Jim holds a B.S. Degree in Computer Engineering from LSU right here in Baton Rouge, LA and has a graduate studies degree at the Investment Banking Institute – NY, and the Venture Capital Institute. He also studied Jazz Composition at Berklee College of Music. He has received dozens of product awards, INC 5,000 Growth Award, and is the recipient of gold and platinum sales awards for various music and film projects. Pretty impressive, right??
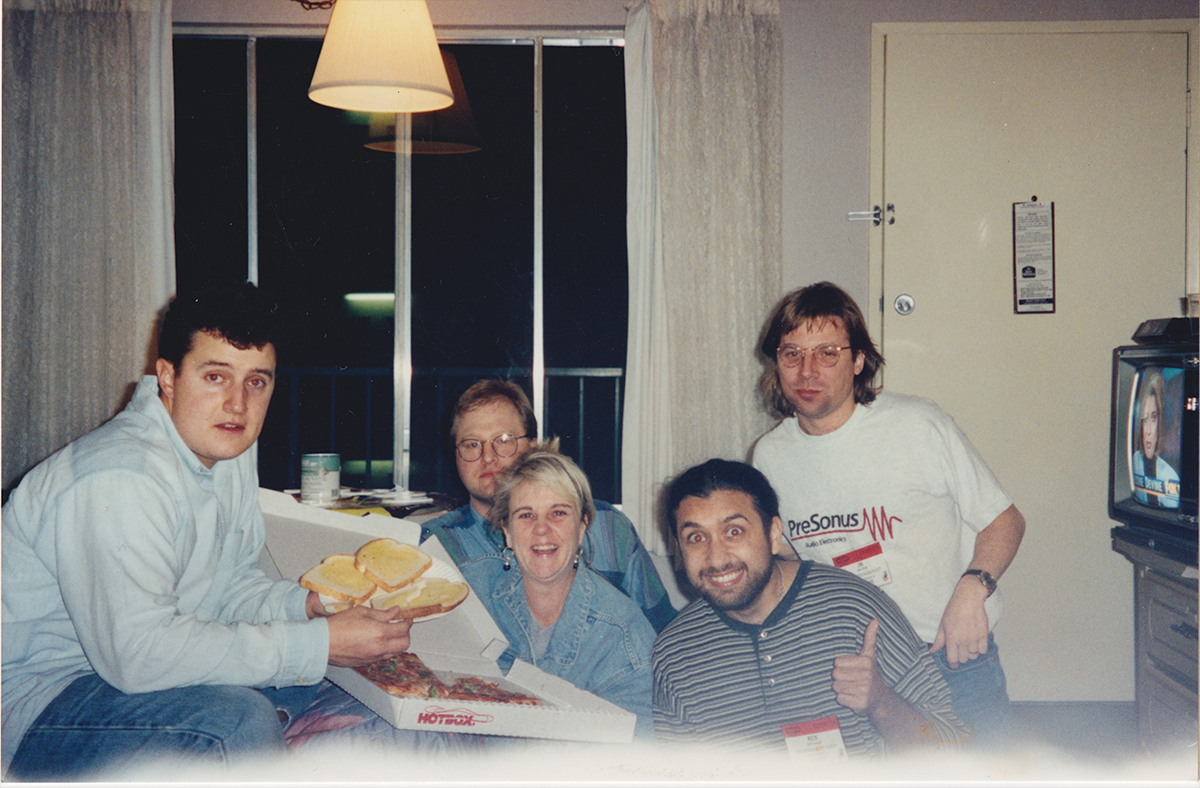
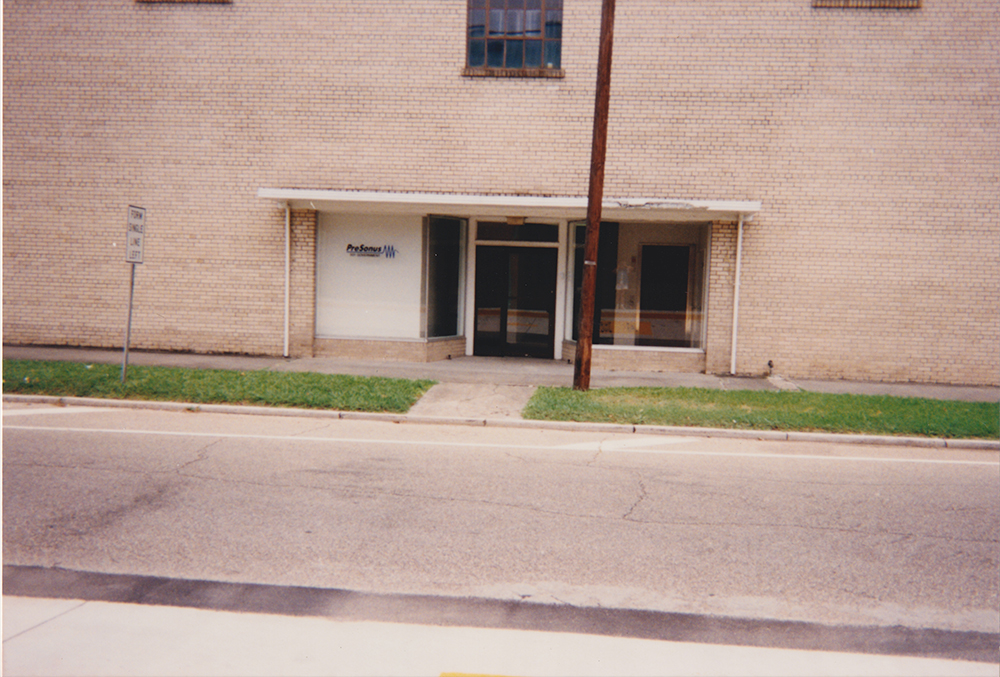
To say the least, Jim has rallied together a group of employees who have accomplished a lot of the last 25 years. We thought it would be cool to highlight his story from the beginning and some of the products that helped shape who we are today!
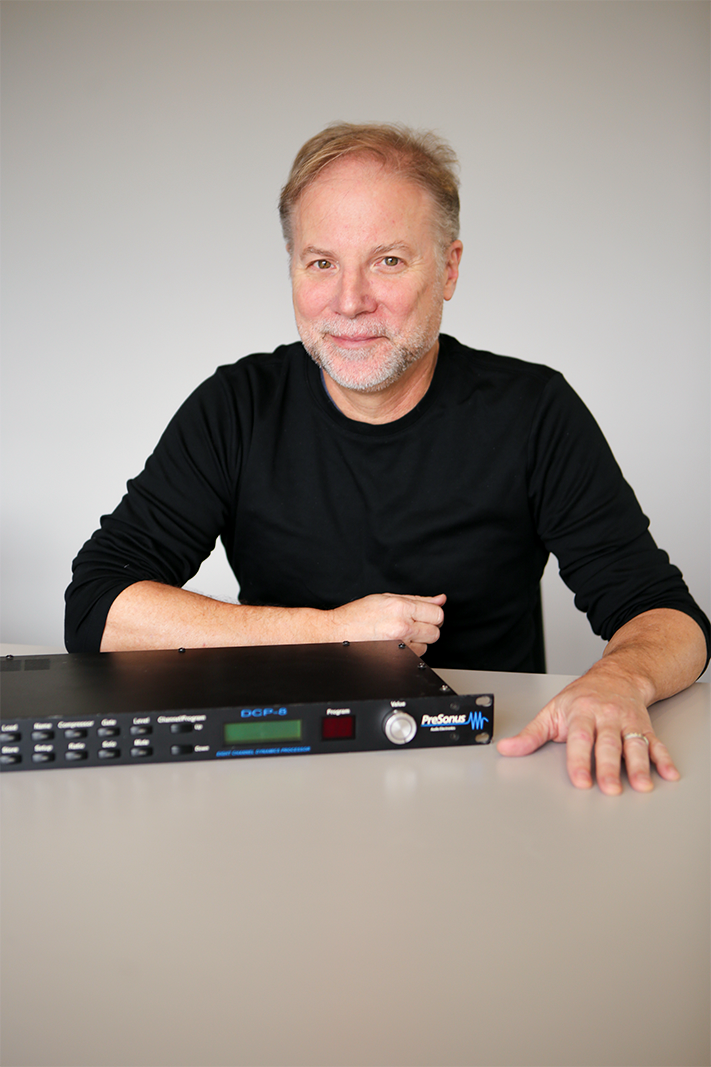
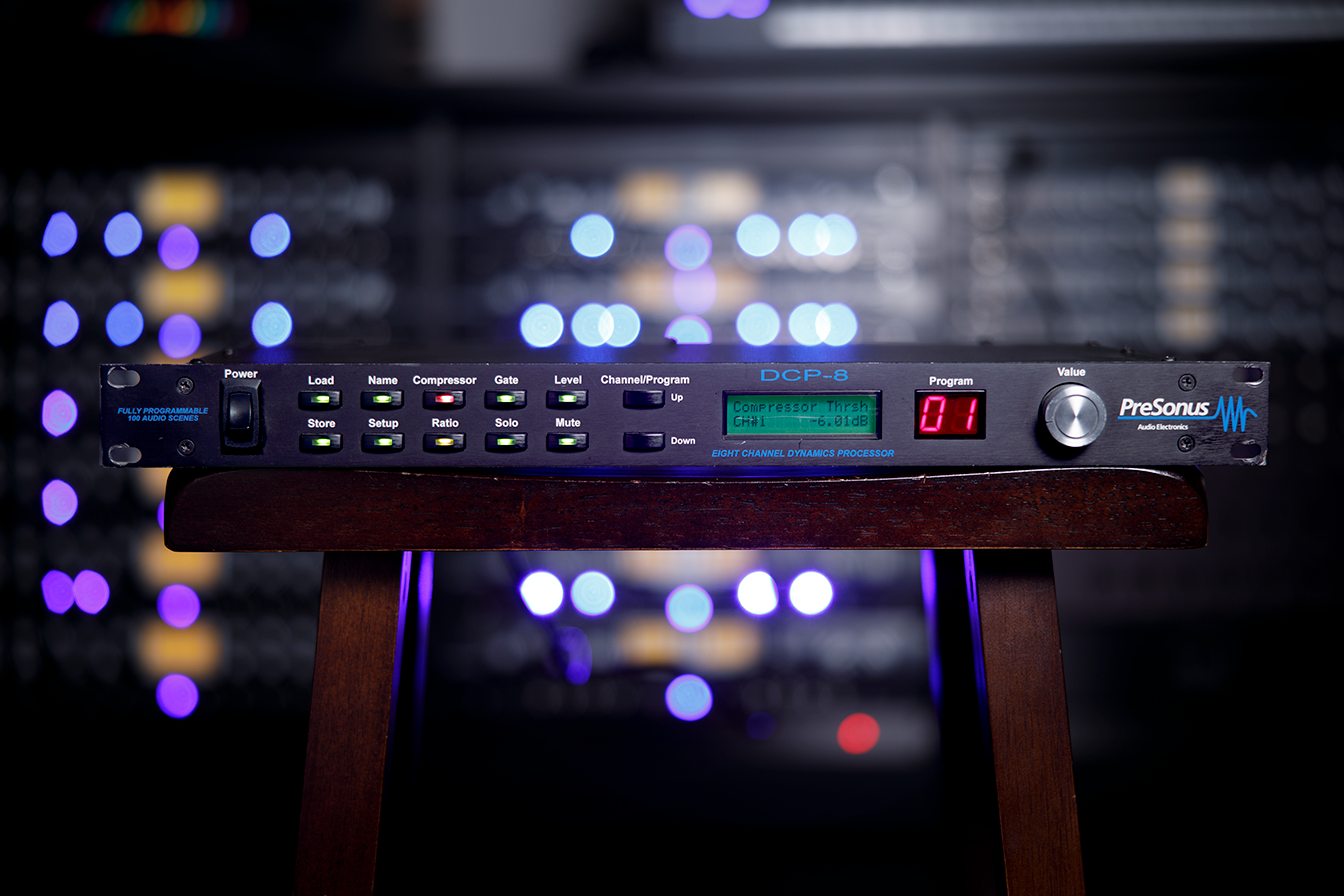
Jim Odom with the DCP-8
So what were you doing before PreSonus?
- I started recording music in my late teens and built a studio in the hayloft of a barn. I started off with just an 80-8 TASCAM eight-track recorder, which turned out to be a great place to begin, because it forced me to think about the sounds, the parts, the blend, the timbre, the tone, etc. of each instrument. I received an invitation to join a local band and sign with RCA Records when I was 21. After five years of recording and touring, I went back to full-time audio engineering and session work. I decided to get more involved in the technical design of products, so I spent four years earning my Computer Engineering Degree, primarily to understand how to design the products I had in my head. I began designing the DCP-8 digital automation processor to solve some issues I was having in smaller recording studios, which required the formation of PreSonus to manufacture and sell that product.
Was owning a business something you dreamed of doing or did you just fall into it as the products came along?
- I’m an entrepreneur at heart, but I think that all musicians are entrepreneurs at heart. We make products, we promote, we sell, and we do it again. Our goal is to please large groups of people. Making products is very similar, but with the addition of technology-based creations. A company is just a vehicle to organize this effort, so having a structure that allows investors, creators, marketers, and consumers to all connect is really cool.
What’s the process for having a great idea to getting it out the door?
- We follow a well-defined process called Stage-Gate development, where we identify or imagine the product idea, then document what that will be and what position in the market the product is required to hold. This is different for each type of product, but the work is basically the same. Product ideas can come from two sources—market-driven or technology-driven. That said, the best products come from a meeting of both. You first have to understand the technology you plan to use, then use your best instincts to create the embodiment of that technology; like what knobs should it have, how many inputs/outputs, buttons, etc. After that, you need to design the product to that specification, build it, test it, then work with a factory to manufacture and deliver it. Simple!
What need was the DCP-8 supposed to meet?
- The DCP-8, Digitally Controlled Processor, was an eight-channel, digitally controlled analog processor that offered eight compressors, eight noise gates, eight VCA based automation stages, and 128 recallable scenes. It was designed to insert in an analog mixing console’s insert point and controlled via MIDI by a DAW, or external MIDI controller. It was used by Broadway theaters to automate scene changes during a play, for example. It was also used to automate mixes in the recording studio.
At the time, did you have any data supporting the need for this product?
- I needed it and my friends needed it and that was enough for me.
What was the biggest challenge? Major roadblocks?
- Having spent years in major recording studios, I was hypercritical of the sound of the compressor and noise gate. I spent a year choosing those circuits and perfecting the performance of the system. The next challenge was manufacturing—with over 1000 components, the circuit boards took a long time to build. We eventually built a factory in an old furniture store, converted the circuit boards to surface mount technology, and leased some robots to place all of the components. Our secondary challenge was to write the software that controlled the system, which at the time was bare metal, assembly language programming. We also built software drivers for MAC and PC based digital audio workstations—basically MIDI control maps and system state information.
 In 1995, how did you define success?
- At first, we were satisfied that our product was accepted in the professional audio community, having won several awards and placement in high-profile environments. That quickly changed to sales, however as the need to build a sustainable company overwhelmed our small staff.
How did you guys come together to build it?
- I had some experience with manufacturing from my previous job, but not on the scale of the professional audio industry. We (Brian Smith and myself) built a small factory with local employees that built PreSonus products until 2002. We were lucky to have some great partners in the early days that taught us how to use the machinery; that being said, it was a pretty steep learning curve!
How did you feel when it was complete?
- I was nervous! What if it failed in the middle of a Broadway show? It’s always the feeling you get when you see your product being used in a major broadcast, performance, or recording session. I’m still nervous today! With all things considered, it’s an amazing feeling when you get a compliment from anyone using your product!
When you think about the last 25 years, how does it make you feel seeing how far PreSonus has come?
- One of my weaknesses is being obsessed with what we do—it doesn’t allow me to stop and take in the successes we’ve had over the years; I wish I could! Technology is in perpetual motion, and there is always something new to consider, so I’m looking forward to the next 25 years!
Remembering Skip Jones, 1953-2020

Skip’s Guitars
One of our dear friends, Skip Jones, passed away recently. He was 66. Skip was not only one of our biggest supporters, but he was also one of our longest-running forum mods. Skip helped countless people with their PreSonus stuff starting way back in the early days of the PreSonus forum, and most recently via the StudioLive and Studio One groups on Facebook. Skip was the guy that originally came up with the idea for PreSonuSphere and pitched it to Rick… who then pitched it to PreSonus. Skip even named it.
Skip is survived by his daughter, Lindsey Jones, and his siblings: Tammy Jones, Sandy Jones, and Larry Jones. His ashes will be spread in the Gulf, the same place his wife was laid to rest in 2015.
We’ve been able to collect a few nice words about Skip that you’ll find below. And if you’d like to share your own, feel welcome and encouraged to do so in the comments.
Godspeed, Skip. We’re better for having had you around.
“I met Skip Jones about 12 years ago. He was an early supporter of Studio One and PreSonus hardware and instantly started spreading his enthusiasm across the PreSonus community. He was not only one of PreSonus’ biggest supporters, but he was also one of the longest-standing forum moderators, and has helped literally thousands of our customers. Skip was constantly coming up with ideas on how to serve our customers better. It’s a humongous loss for our user community. Our prayers are with his family and friends at this time.”
– Rick Naqvi, SVP of Global Sales
“Skip was the first person who reached out to me when I joined the PreSonus forum many years ago. His kindness and knowledge were infectious. He is one of the main reasons I am even here. Over the years we became very good friends through conversations about everything from Apple operating systems to the best way to house train a terrier. I was there to talk when his wife passed and he was there when I was trying to be a single parent. He was a great friend. I remember discussing what turned out to become PreSonusphere with him. Can you believe it all started as a simple hangout at one guy’s farm in Southern California? The world lost a good man, and a good friend.”
– Jon M. Taylor, Technical Sales Lead – Live Sound
Forum Moderator and Friend

To my good friend Skip Jones:
I met Skip Jones on the PreSonus Forums back in 2009 and we were friends instantly. Sharing what we knew of Studio One and supporting hundreds of people on the PreSonus Forums. When I lost my voice in 2011, I was ready to chuck everything and stop doing music, but Skip wouldn’t let me. He was one of the major driving forces who pushed me to create Home Studio Trainer. He supported me like no other. He was also the conscience for the MOD group and hated when we talked about beta stuff… lol. We will have nothing to fill this hole but our memories. Live long and prosper where ever you are, Skip. You deserve peace.
Johnny Geib
Producer\Engineer\Instructor
Skip and I first made contact in the Studio One Facebook group. He was always friendly, engaging, helpful and full of fun. He and I persuaded Johnny Geib to start his own Facebook group for His site Home Studio Trainer, and we helped him moderate the group. One group quickly became two, and later three groups. In late 2014, as I, under encouragement from Skip and Johnny, began to make Studio One tutorial videos, I found Skip to be a wonderfully loyal supporter, and a fierce advocate for my content. He would spread the word about my videos, and then about my livestreams as I started them.
When I joined the PreSonus Forum Mod Squad, Skip again helped build a “Community University” in the Forum, where he would post my videos and links to my livestreams, as well as johnny Geib’s content and others as well. I learned a lot from Skip. He was a very fine mentor, teacher and encourager. And he was a great friend.
PreSonus, and its user community, has been very greatly enriched by Skip Jones, and the scale of the loss we now feel in his death is very great indeed. He will be very greatly missed. We all have a Skip shaped hole in our hearts. May the impact of his legacy among us forever grow deeper and wider.
Jonny Lipsham
Komplete Kontrol Integration, Part 3: Controlling Non-NKS Plug-Ins
Our prep work is in order: in part 1 we integrated the Komplete keyboard as a DAW navigation control surface, and in part 2, explored how to create general-purpose MIDI control surface templates. In the thrilling conclusion of this trilogy (soon to be a major motion picture!), we’ll now find out how to control non-NKS instruments and effects, running within Studio One, from the Komplete keyboard hardware control surface.
BUT FIRST: FOCUS VS. GLOBAL MAPPING
Because we’ll be mapping hardware controls to software parameters, it’s important to understand the difference between Studio One’s Focus and Global control mapping functions. When you program a controller in Global mode, it affects aspects common to all songs, like faders, pan, etc. In Focus mode, you program a controller for a specific instrument or effect. Focus mode has two wonderful attributes: You can program different settings on the same instrument or effect in the same project, and Studio One remembers this assignment for other songs. For example, I made a Komplete keyboard Mojito template so whenever I call up Mojito in any song or any instance in a single song, it has a hardware control surface.
To choose Focus mode (Fig. 1), click the gear button toward an instrument or effect’s upper right. From the drop-down menu to the right of the gear symbol, choose MIDI-OX (the MIDI utility we installed back in Part 1 of the series because it lets the Komplete keyboard talk to non-NKS plug-ins). You’ll also need to choose Focus mode for an instrument or effect when you want to use a previously created template.
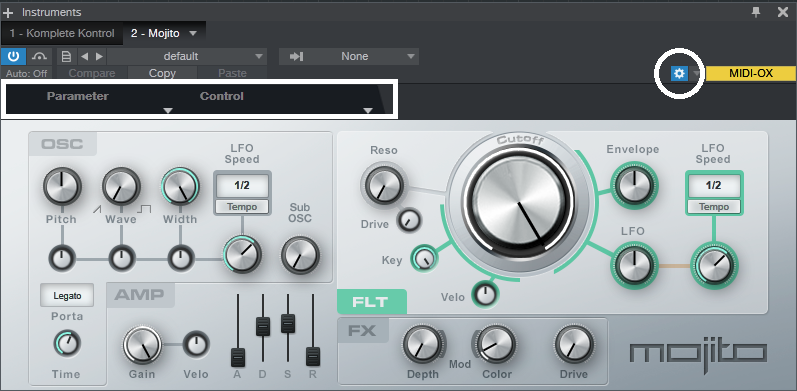
Figure 1: The Gear button (circled in white, upper right) opens the Focus mode Control Link functionality (outlined in white rectangle).
After entering Focus mapping mode, parameter and Control fields appear between the header and plug-in. This is where we do our hardware-control-to-parameter Control Link assignments. To complete a Control Link assignment, click on the arrow that points from a control to a parameter. This causes the arrow to flash yellow in Focus mode, or blue in Global mode.
Okay, let’s return to creating our control surface. To start with a clean slate, close MIDI-OX and Studio One if open, and turn off the Komplete Kontrol keyboard.
- Turn on the Komplete Kontrol keyboard. After it “boots,” open MIDI-OX, and verify that it shows the correct MIDI devices (see Fig. 1 in Part 2). Leave MIDI-OX open, although it can be minimized.
- Open the Komplete Kontrol stand-alone application. Click the application’s MIDI button in the upper-right corner, verify that you’ve chosen the desired template, and then click the MIDI button again to de-select the MIDI mode.
- Open Studio One, and Create a new song. Press the Komplete keyboard’s MIDI button so that it’s lit brightly (if it isn’t already).
- Click on Studio One’s Mix tab, and then on the External button toward the left. A column with External Devices appears.
- Click the MIDI-OX arrow under External Devices. Choose Setup, and verify that it’s sending to and receiving from the correct Komplete Kontrol ports, as described in Part 2 (Receive From = Komplete Kontrol -1, Send To = Komplete Kontrol Ext-1). Click OK.
- Now click on the MIDI-OX arrow again, and choose Edit. Click MIDI Learn, and prepare for an orgy of knob twiddling.
- Turn your attention to the Komplete Kontrol keyboard, whose MIDI button should be brightly lit. Choose the control surface’s Page 1 with the left/right arrow buttons (if it isn’t already selected; check the keyboard’s right display, in the lower right, to confirm that it shows 1/4).
- Turn all 8 keyboard knobs, below the display. Studio One’s External Devices window will sprout 8 controls. Widen the External Devices window so the 8 take up exactly one row, then choose page 2 with the keyboard’s right arrow button. Again, turn all 8 controls.
- Similarly, choose page 3 and turn all 8 controls, then page 4. You’re now populating the External Devices window with all the available controls.
- Similarly, do the same for the four pages of switches.
- Fig. 2 shows our masterpiece of total control. The Komplete keyboard’s controls, switches, and pages are now recognized as a control surface for Studio One.
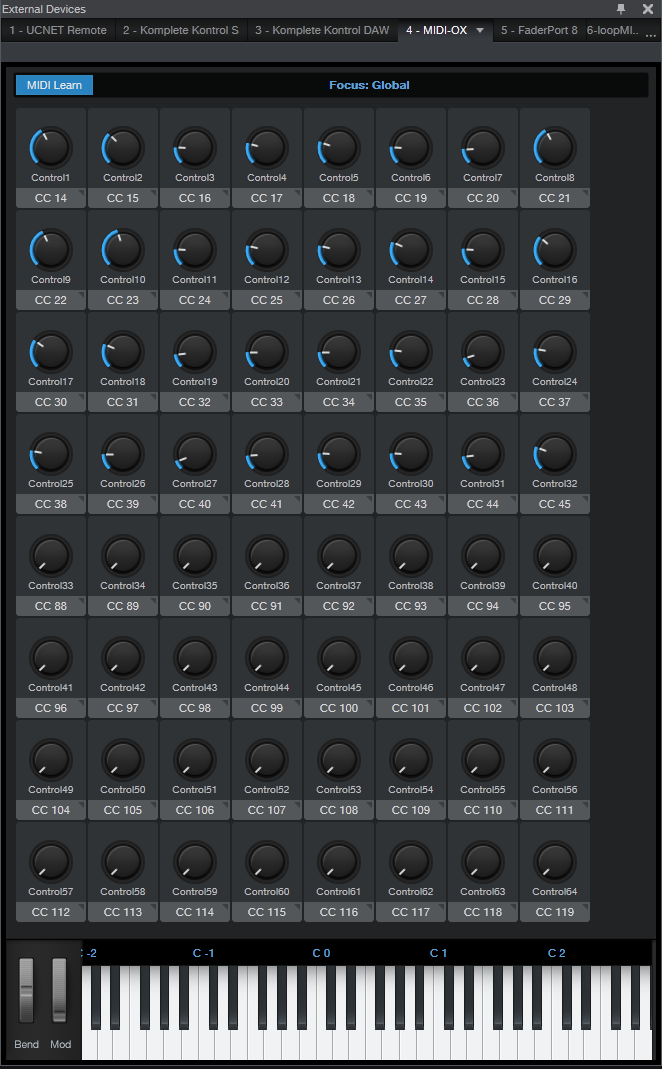
Figure 2: Studio One now recognizes the Komplete keyboard controls and switches as a control surface.
- While in MIDI Learn mode, you can change the control graphic to (for example) a switch instead of a knob. To do so, click on the arrow in the CC label below the knob, and choose the desired graphic.
- After setting up the control surface, turn off MIDI Learn (so you don’t brush up against a control and change something accidentally).
- We’ll use Mojito as an example. Bring Mojito into an Instrument track, and strategize what control layout would be best for each page. Fig. 3 shows what I chose; in the labels, the first number is the page, the second the physical control or switch.
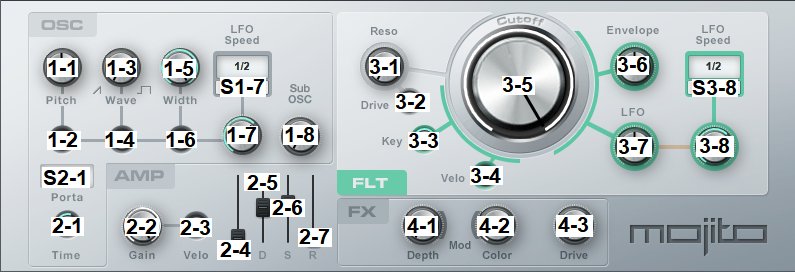
Figure 3. Komplete keyboard hardware assignments for Mojito.
- Next, use Control Link to link the control surface knobs with the Mojito parameters. With Mojito in Focus mode as described above, move Control 1 on the keyboard or the external devices page, click on (or move) the Mojito Pitch control, and then click on the Arrow between them. The arrow turns yellow to confirm the link. Proceed similarly through all the controls and switches until they’re all assigned. (It’s a little complicated with the LFO Speed, because when you switch between the two LFO Sync options, you would actually need two knobs – one to vary frequency, the other to vary beats. I figured I’d use beats 99% of the time, so I used the hardware to control the LFO when in beats mode. For frequency, you can use your mouse to move the knob, or program a couple of the spare knobs that will be available on page 4.)
- After programming your knobs, return to the Komplete Kontrol stand-alone app, click the MIDI button, and label the template’s knobs (Fig. 4). Now, when you choose the template, the knobs on the Komplete keyboard will show the parameters they affect. Done!
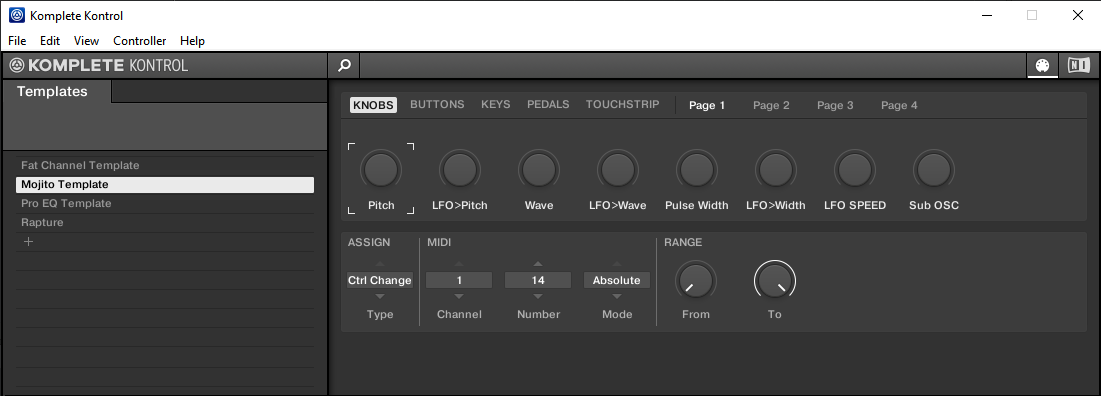
Figure 4: Labeling the template’s controls adds labels to the keyboard’s control surface.
After creating these templates, you won’t want to lose them—which you will if your hard drive crashes. Or maybe you’re going to do a re-install, or want your templates on a different computer. For more information, a helpful document on the NI web site tells where to find the Komplete Kontrol MK2 settings.dat file so you can copy it, or back it up.
NATIVE INSTRUMENTS/STUDIO ONE SYNERGY
If you have multiple templates and want to switch among them to control various instruments and effects while you work in a song, here’s the procedure.
- Make sure the stand-alone Komplete Kontrol application is open (a Komplete Kontrol instrument can be open at the same time in Studio One, there will be no conflicts).
- Enable the stand-alone Komplete Kontrol application’s MIDI button, choose the template, and then disable the MIDI button. (I usually minimize the Komplete Kontrol app after this, but it’s not necessary.)
- Open the instrument or track you want to tweak, and press the keyboard’s MIDI button to enable communication. The keyboard’s MIDI button must be shining brightly to control instruments or effects in Studio One.
You can switch between controlling an instrument loaded in Komplete Kontrol, and a Studio One instrument that uses the currently selected template. This is pretty much automatic; when you select a track with Komplete Kontrol, the PLUG-IN button toward the keyboard’s upper right lights. When you select a non-NKS track, the MIDI button lights. However, you do need to change templates if you switch to an instrument or effect that doesn’t use the currently selected template.
Note that when you want to use the Komplete keyboard as a hardware controller, or to test your programming, the stand-alone app’s MIDI button must be turned off. Then you can press the keyboard’s MIDI button to communicate with the instrument or effect.
GETTING CREATIVE WITH YOUR TEMPLATES
If you’re tweaking one parameter at a time, arguably just grabbing the mouse, clicking on a parameter, and dragging is easier. But where hardware control really comes into its own is being able to adjust multiple parameters at the same time, like varying filter gain and frequency, envelope parameters, or compressor controls that interact, like threshold and ratio.
Also note that knobs can control drop-down menus. For example, in the Pro EQ, you can choose the LC and HC slopes, or the LF and HF filter types, with knobs. Another trick is redundancy. With my Pro EQ template, the filter parameters are spread over different pages. However, the 7 active/bypass switches for the filter stages are available on every page. That way, no matter which filter stage I’m adjusting, it’s possible to bypass or enable any other stage for diagnostic or comparative purposes.
Yes, it takes a bit of effort to program templates for everything you might want to control. While this may seem arduous at first, you need to create a template only once (although of course you can edit it if needed). After a while it becomes second-nature to switch over to the Komplete Kontrol stand-alone application, choose the desired template, minimize Komplete Kontrol, and carry on tweaking parameters. And, a particularly outstanding feature is that you don’t need to switch templates when controlling the same plug-in. A good use case is adjusting EQ during the mixing process. Call up your Pro EQ template, and it can apply to whichever EQ you select.
So now we can use the Komplete keyboard’s control surface not only to tweak NKS-format plug-ins, but virtually any plug-ins from any manufacturer—it even works with prehistoric wrapped DX and DXi plug-ins. Pretty cool!
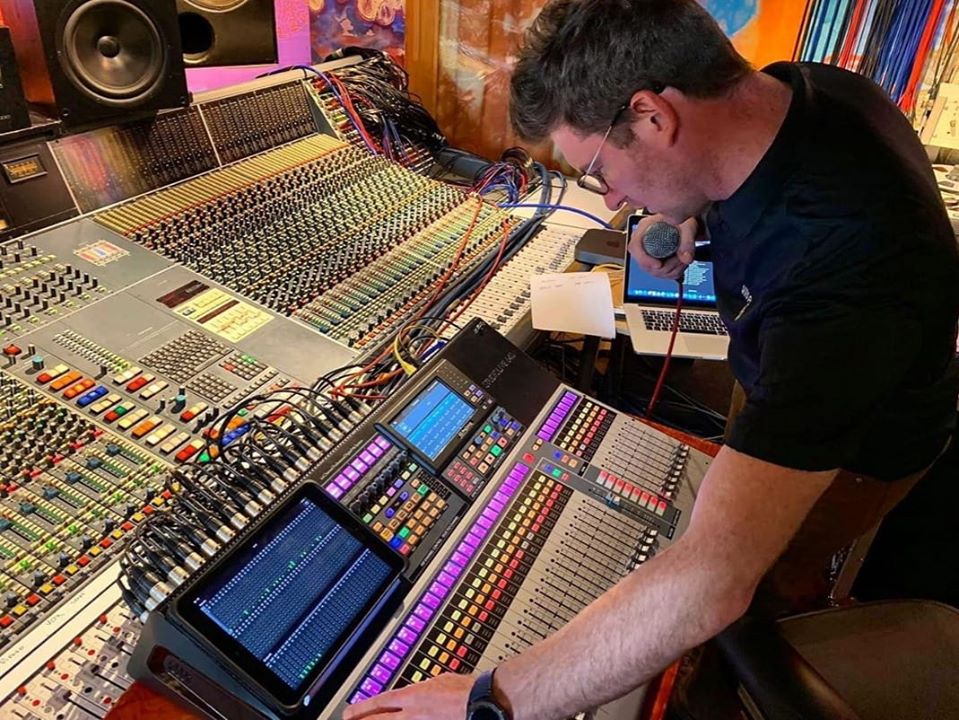
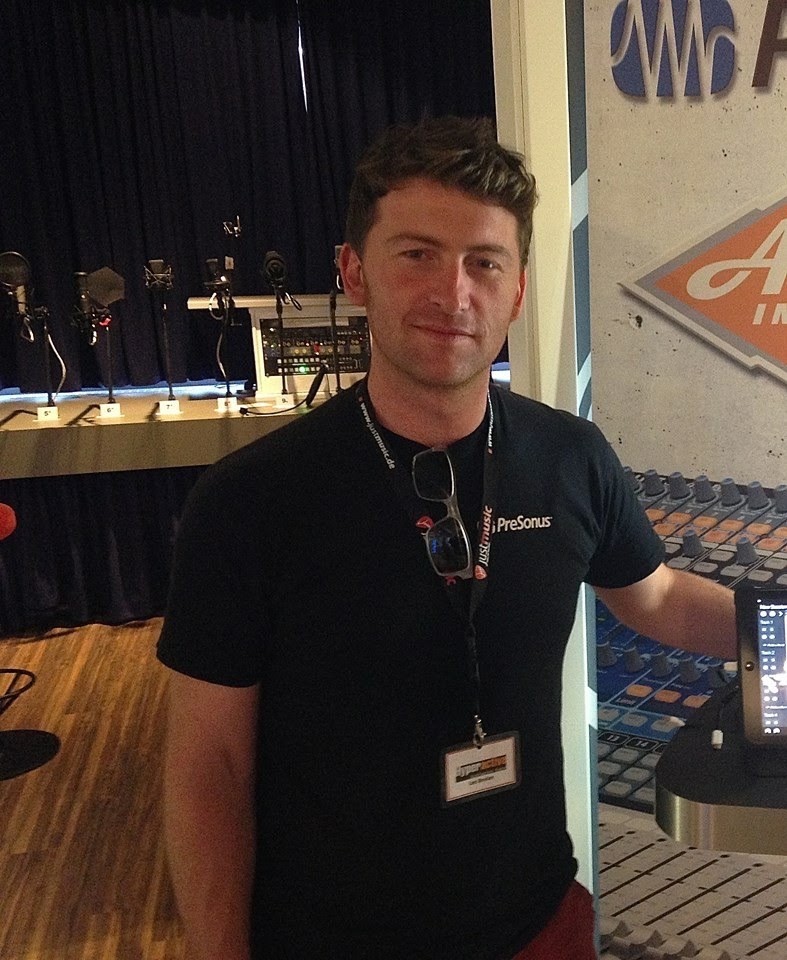
PreSonus Fam Friday with Lee Boylan!
We’re excited to bring back the PreSonus Fam Friday blog series. This round we will introduce you to our team across the pond in Europe! First up is our Product Specialist Lee Boylan!

How long have you worked for PreSonus?
6 years
What’s your official job title?
Product Specialist.
What’s your favorite thing about your job? Why did you choose to work here?
Meeting creative people from around the world who love music/audio production. / Because it is a company that listens to the users needs and makes really cool tools, that I get to show.
What was the first 8-track, cassette, CD or digital download you purchased?
Appetite for destruction G&R.
Who’s your go-to band or artist when you can’t decide on something to listen to?
Joe Jackson
What’s your go-to Karaoke song?
Everyone has a side gig, what’s yours? OR when you’re not at PreSonus, what are you up to?
Live sound-mixing, Recording / Producing projects. Playing Drums. I’m also renovating a really old cottage in Dublin which demands a lot of my spare time at the moment. “Forever home” type of thing.
What instruments do you play?
Mainly drums, some guitar bass, Keys, etc. I can make a somewhat musical noise on a Trumpet too. I usually play by ear. I have learned to read music in the past I rarely used it.
Tell us about a successful event you worked with PreSonus products. InfoComm, NAMM, Install somewhere….
The latest cool event I did was Studio One 4.6 release party at Redbull Studios in London. Steve Winwood was there!!! I really enjoyed Synthfest UK in 2019 too. Looking forward to more cool events for 2020.
Got any tips for working with Studio One?
Try to drag n drop everything! Spend time setting up your shortcut keys.
What are you currently working on at PreSonus? What’s next for you?
Starting to work more closely with companies in the Middle East and Africa. Long flights…
 Rapid Fire Questions:
What’s the strangest talent you have?
- Effortlessly touch nose with my tongue.
Is cereal soup? Why or why not?
- It depends if milk is heated. Yes if that’s the case.
What’s invisible but you wish people could see?
- WIFI
What’s the best Wi-Fi name you’ve seen?
- FBIVan
What’s the most ridiculous fact you know?
- Joe Pesci has a hip-hop record. It’s true…
In 40 years, what will people be nostalgic for?
- Devices that you don’t speak to.
What’s the weirdest thing a guest has done at your house?
- Look in the window before knocking.
What movie would be greatly improved if it was made into a musical?
- Terminator
If someone asked to be your apprentice and learn all that you know, what would you teach them?
- All that I know.
What would some fairy tales be like if they took place in the present and included modern technology and culture?
- Snow White and her 7 friends.
What is something that is really popular now, but in 5 years everyone will look back on and be embarrassed by?
- Country Rap.
What ridiculous and untrue, yet slightly plausible, theories can you come up with for the cause of common ailments like headaches or cavities?
- Cat hair.
Anything else you want to share?
- My crisps.
Follow Lee on Instagram!
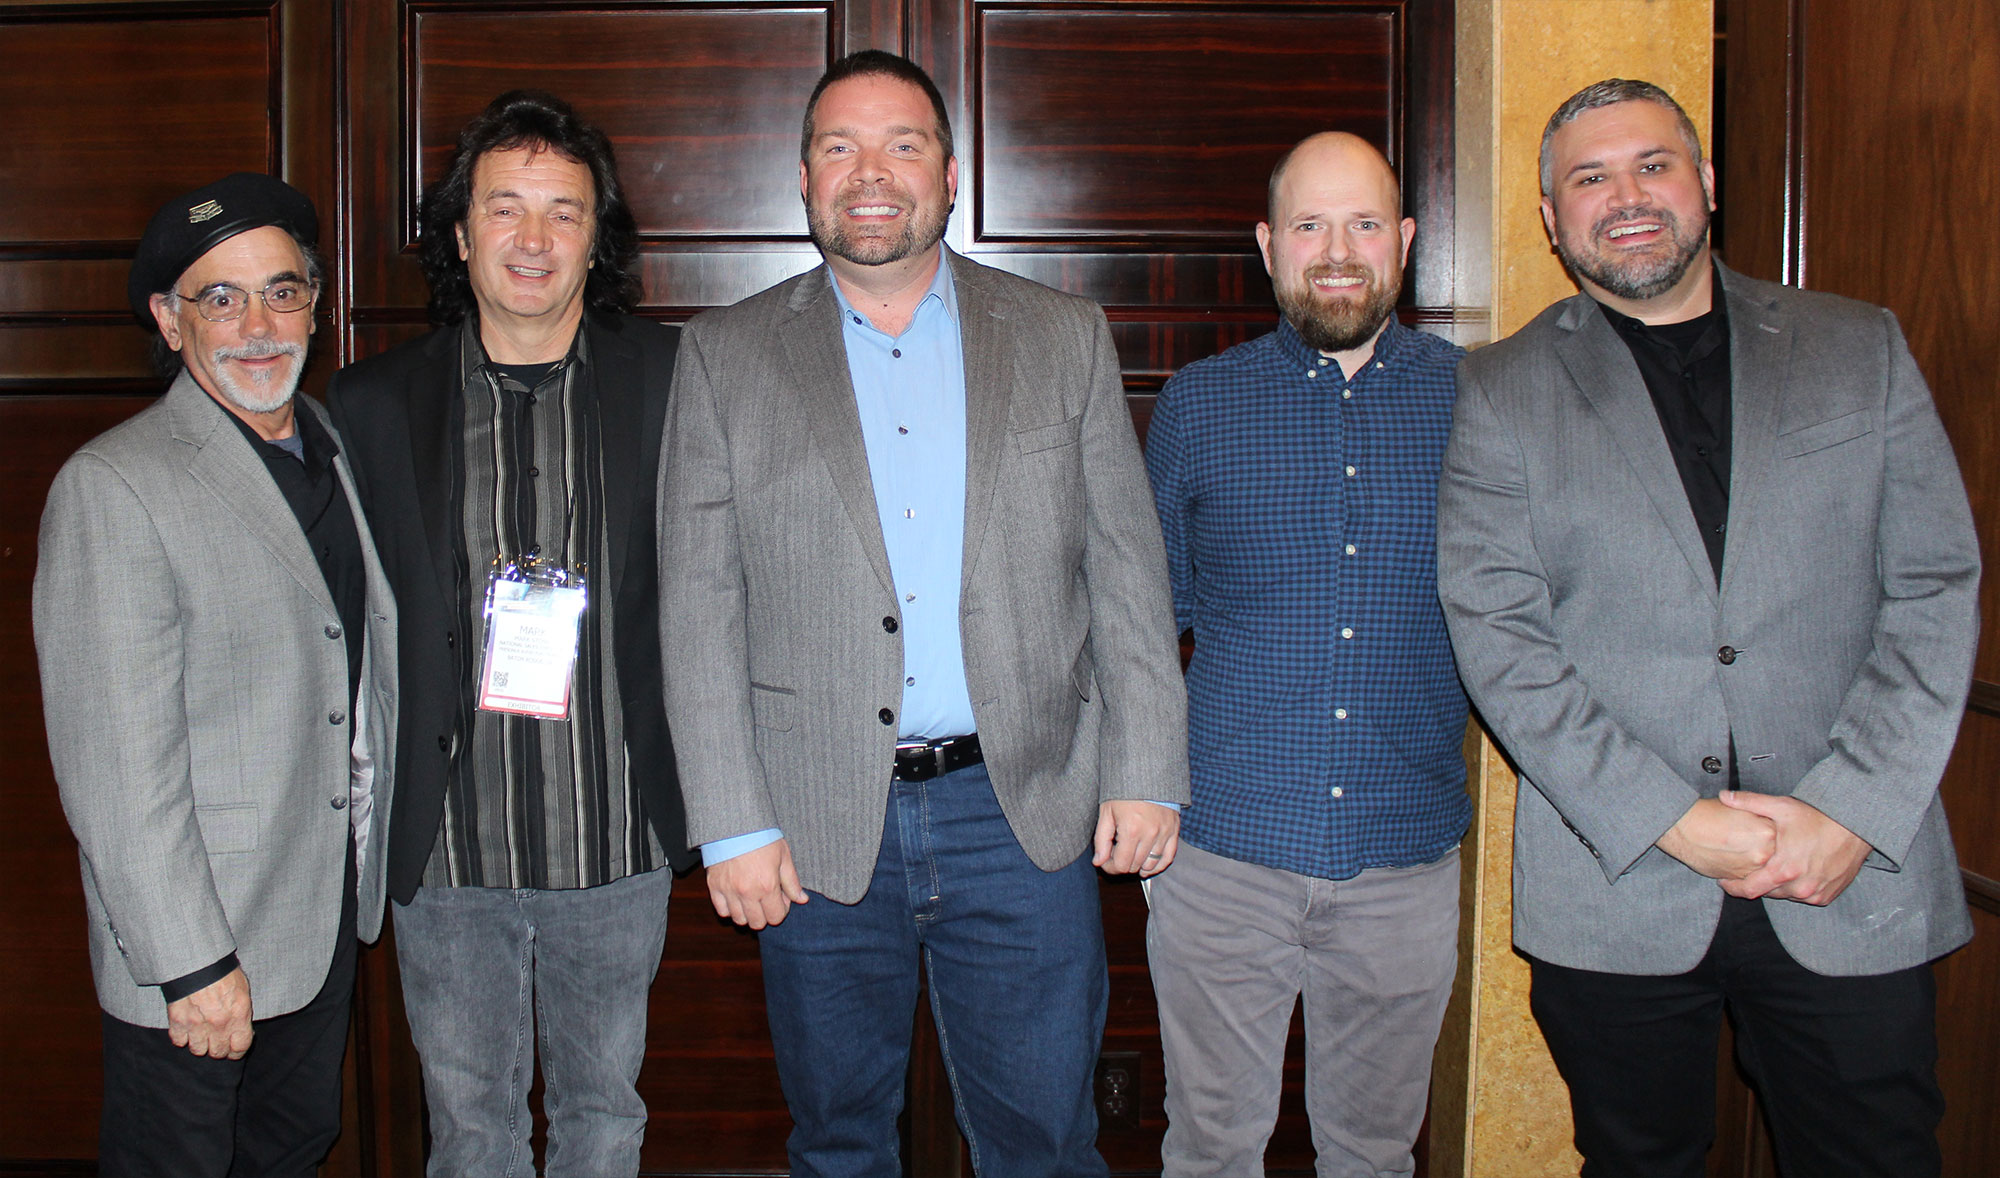
2019 Rep and Distributor Awards from NAMM
In preparation for the Winter NAMM show, PreSonus hosted our sales reps and international distributors for a series of very exciting kick-off meetings. In the US, our sales reps play a big part in interfacing with our dealers and customers to help them reach their creative goals.

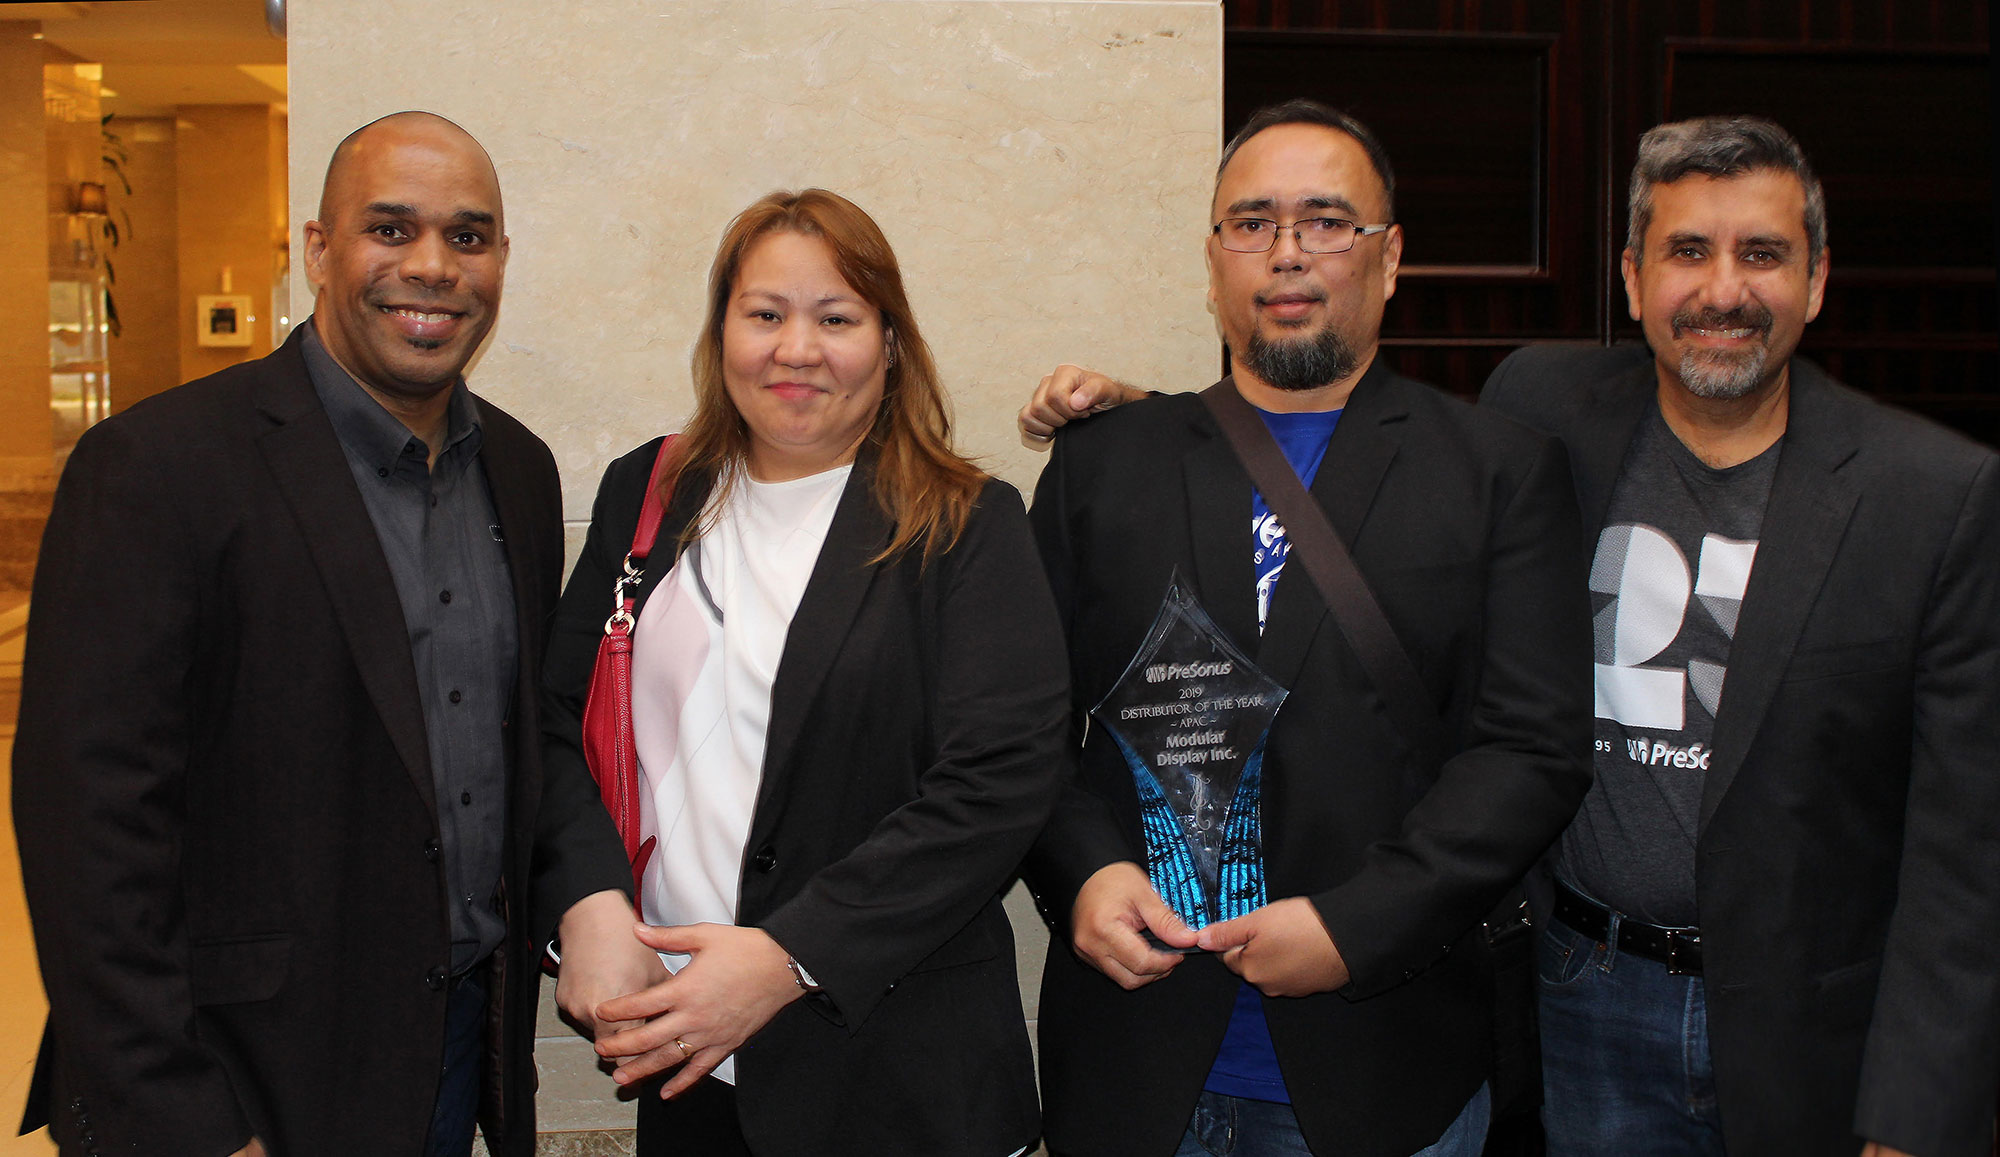

In recognition of outstanding performance during the year awards were presented to the following reps for their achievement:
- The Rep Firm of The Year was presented to Sonic Sales, which serves the Northern California, Northern Nevada Hawaii, Washington, Oregon, Montana, and Alaska Territory.
- The Individual Rep of the Year award was presented to Tim Dykes of Bencsik associates in Florida.
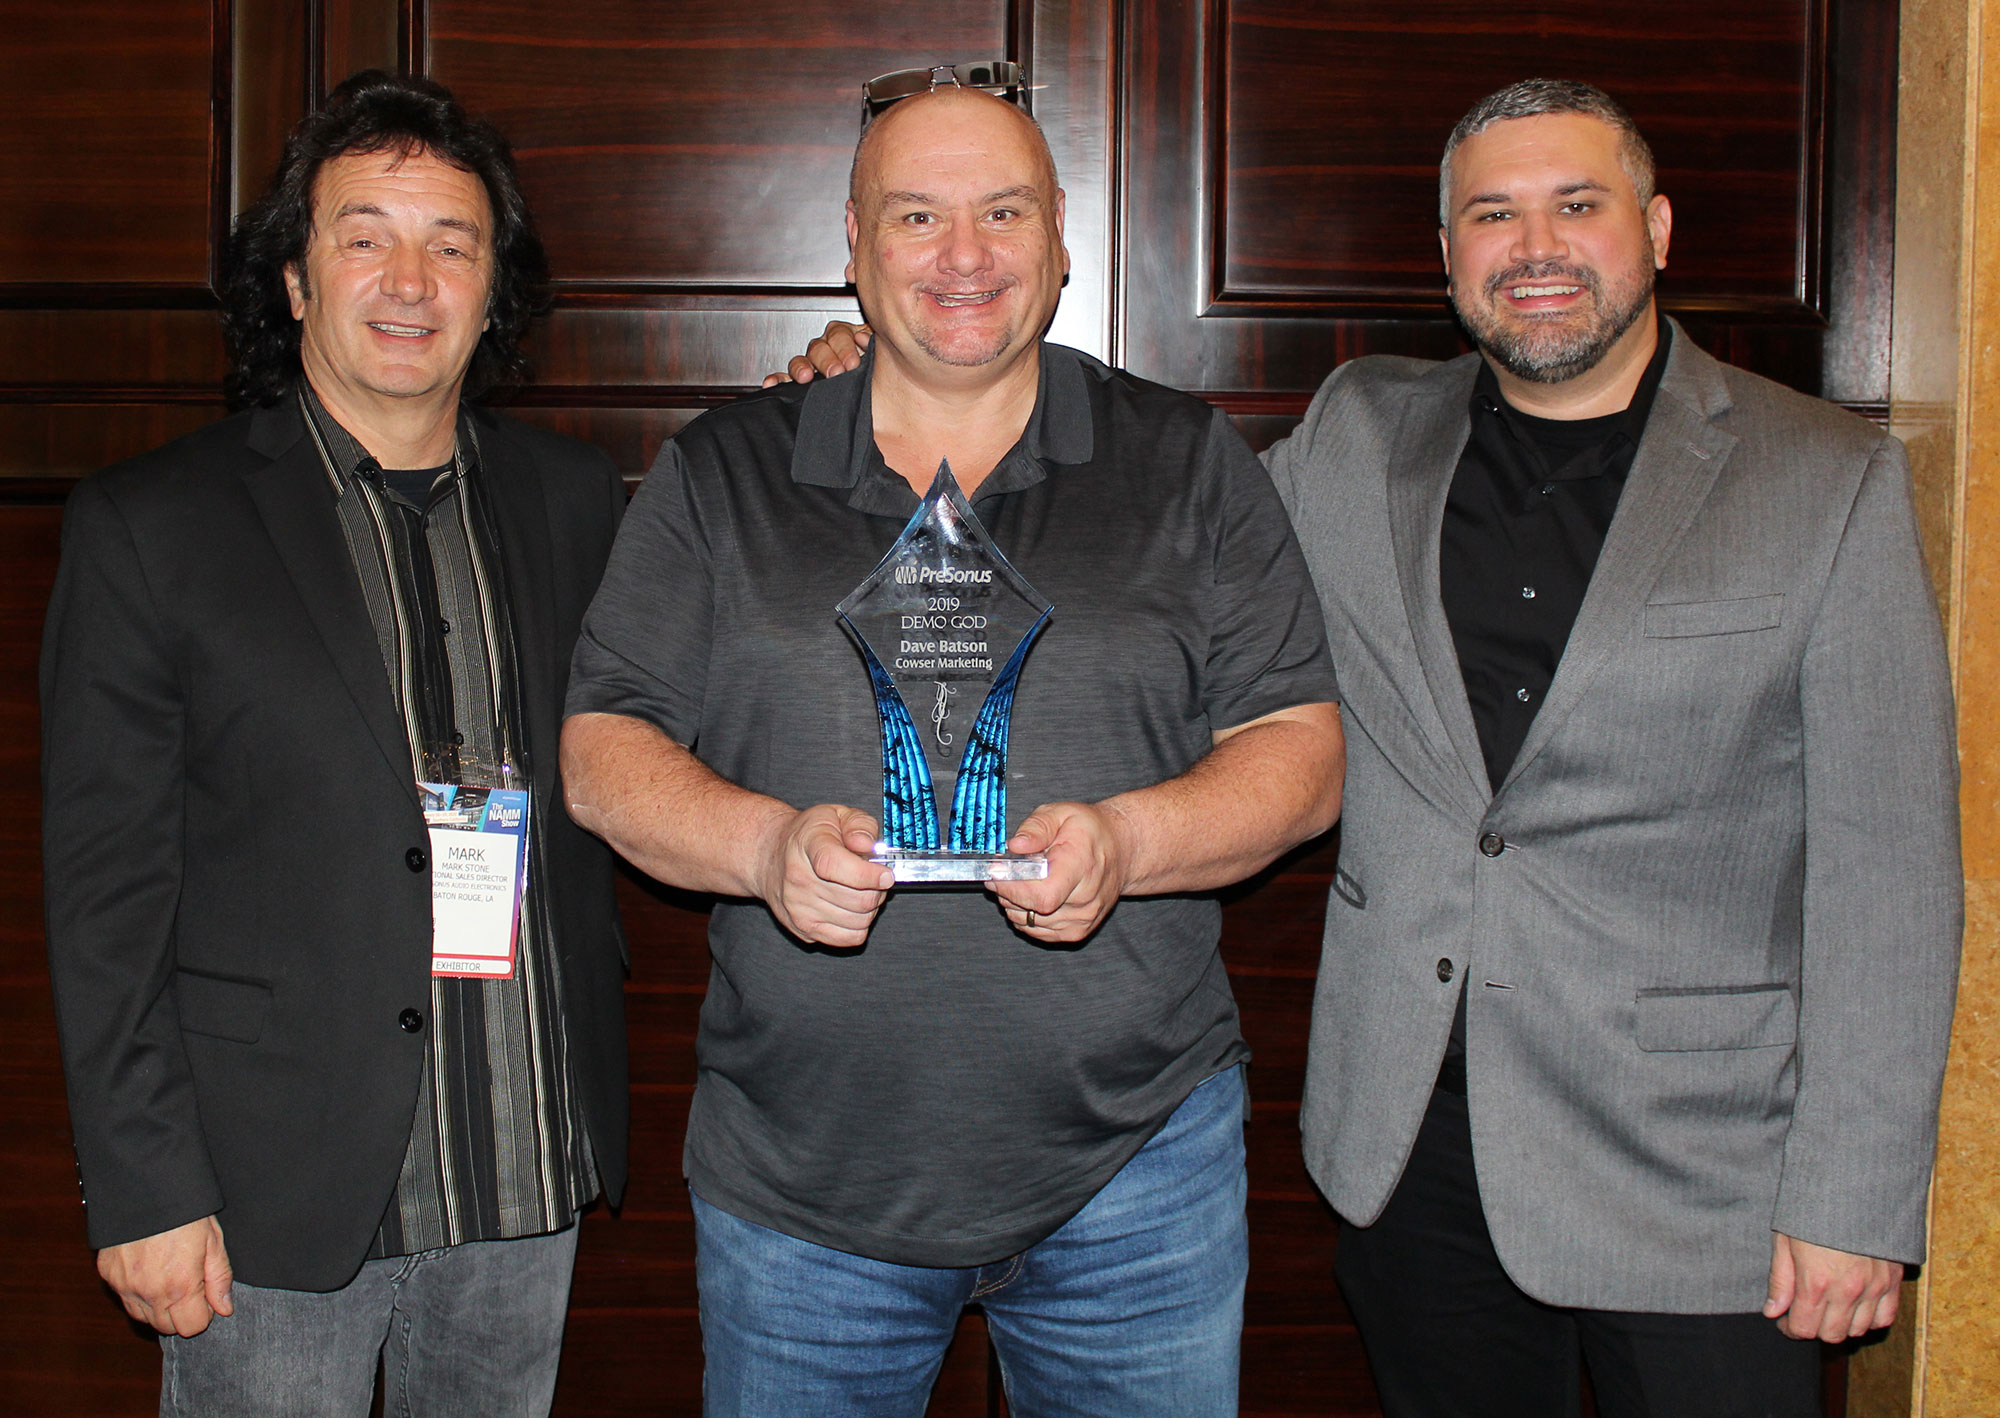
- The Demo God award went to Dave Batson of Cowser Marketing for his work in Arkansas, Oklahoma, and Eastern Texas.
- The E-Commerce Excellence award went to Chris Hutnick and Lienau AV, in Metro New York and New Jersey.
- Cadon Technical Sales was presented with the Studio One Champions award for their hard work and inspiration in Iowa, Missouri, Kansas, Nebraska and Southern Illinois.


Komplete Kontrol Integration in Studio One, Part 2/3: General-Purpose MIDI Control
In Part 1 (“A New Hope”) of the NI Kontroller trilogy, we covered how to integrate the DAW functions from Native Instruments’ Komplete Kontrol keyboards with Studio One. Let’s take this another step further.
In theory, Komplete Kontrol’s MIDI control surface application is only for stand-alone use, and requires using both an external power supply and the keyboard’s 5-pin DIN MIDI connectors for I/O. With a live rig, this makes sense; for use with a DAW, you have the NKS spec communicating over USB. But wouldn’t it be great to be able to use the Komplete keyboard’s control surface with non-NKS instruments, and even effects, in Studio One over USB? Well, you can.
GETTING STARTED
For Windows, install MIDI-OX. This utility is key to letting us re-direct the MIDI messages at the Komplete keyboard’s external output to Studio One.
For Macs running Catalina, I currently don’t know of any way to use the MIDI Patchbay utility. This is similar to MIDI-OX, but hasn’t been updated since 2008, and system requirements stop at Mac OS X 10.14. You can try using it with pre-Catalina systems; if Apple’s Gatekeeper blocks the installation, you’ll need to allow it under Security & Privacy. Once you get it installed, it should work similarly to MIDI-OX if you choose Komplete Kontrol S-Series Port 1 for the MIDI input option (and consider that equivalent to Komplete Kontrol -1 in the following description), and choose Komplete Kontrol S-Series Port 2 for the MIDI output option (it should work similarly to Komplete Kontrol EXT-1, below). Mac users, please feel free to comment below about what does and does not work with the Mac.
Back to Windows…
- Turn on the Komplete keyboard.
- After the keyboard boots, open MIDI-OX. Under MIDI-OX’s Options > MIDI Devices, choose Komplete Kontrol – 1 for MIDI Input and Komplete Kontrol EXT-1 for MIDI output (Fig. 1). Click OK to close the MIDI Devices screen.
- Open Studio One, but leave MIDI-OX open while Studio One is open.
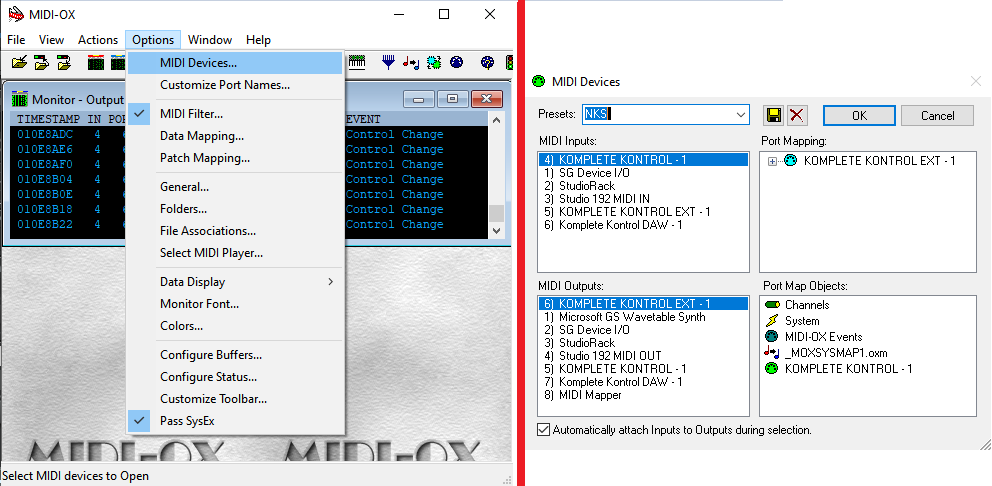
Figure 1: How to set up the MIDI-OX utility so that NI keyboards can control non-NKS instruments over USB.
- Now we need to tell Studio One that MIDI-OX is a new keyboard, even though it isn’t really. Choose Studio One > Options > External Devices, click Add, and choose New Keyboard (Fig. 2).

Figure 2: How to add MIDI-OX as a pseudo-keyboard.
- For Receive From, choose Komplete Kontrol – 1. Studio One will warn you not to do this, but just ignore the warning. For Send To, choose Komplete Kontrol Ext – 1. You’ll have another warning to ignore—but I promise you, no harm will come to Studio One.
- Click OK, then click OK again to get out of the options screen. We’ll cover when/how to use MIDI-OX later.
A WORD OF CAUTION
At the moment, the Komplete Kontrol application’s template management is somewhat primitive. Any changes you make are saved when you close the MIDI controller application; there’s no “Save” or “Save as” command, nor can you manage individual templates—they’re all saved in a single .dat file.
However, if saving-by-closing doesn’t work for you, and you can’t seem to save new templates, there may be an esoteric Windows problem. This is particularly likely for those who upgraded to Windows 10 from an earlier version, because the folder holding the templates may be write-protected due to inheriting permissions. Here’s the fix.
- Open the C: ProgramData folder. (This is a hidden folder, so if you don’t see it, type Windows key+R, and then type Control Panel in the Open box. In the Control Panel, click on Appearance and Personalization, then choose File Explorer Options. Click on View, and then select Show Hidden Files, Folders, and Drives.)
- In ProgramData, locate the Native Instruments folder, and right-click on it.
- Click on the Security tab, then click Edit.
- Choose Users, check all the Allow boxes, and click Apply. Also, do this for any other Group or User names that let you click the Allow boxes (Creator Owner may not…no worries). After applying everything, click OK.
Okay, now that’s out of the way. Hey!! Don’t blame me! It’s a Windows thing.
CREATING A STUDIO ONE-FRIENDLY TEMPLATE
You access the MIDI control surface when you push the Komplete keyboard’s MIDI button, which also defaults to opening if the Komplete keyboard doesn’t see an NKS instrument. The following procedure describes how to create the kind of template we want for Studio One’s plug-ins.
- Open the Komplete Kontrol application (Komplete Kontrol.exe) in stand-alone mode, not as a plug-in. This is the only mode that lets you do MIDI assignments. Then, click on the MIDI 5-pin DIN symbol in the upper right (Fig. 3).
- Create a new template by clicking on the + button under templates. Right-click on it to rename it.
- The template will default to two pages of controls (16 knobs total), but of course, we want more! Click on the + sign to the right of a page, and you can add up to two more pages.

Figure 3: The important items needed to create and customize a template are circled in white. From right to left: MIDI button that opens the MIDI assignment editor, + sign for adding more pages, and + sign for adding more templates (in this case, it’s adding one for the Fat Channel).
- Now comes the tedious part. Each knob and button needs to have a unique MIDI continuous controller (CC) number, so that each one can control a unique parameter. Page 1 defaults to CC14-CC21, and page 2 covers CC22-CC29. However, pages 3 and 4 just duplicate the assignments for page 1, and all the buttons default to CC112-CC119. So it’s time to program some additional controls.
- Click on one of the virtual knobs, and you’ll see its number assignment in the MIDI field toward the lower middle. Change this number to the desired controller number. The label will still reflect the old number, but that’s okay—we’ll be re-naming the labels anyway for specific synth and effects parameters. Here’s how I assigned the controllers.
Knobs
- Page 1: 14-21 (the default)
- Page 2: 22-29 (the default)
- Page 3: 30-37
- Page 4: 38-45
Switches
- Page 1: 88-95
- Page 2: 96-103
- Page 3: 104-111
- Page 4: 112-119 (the default)
Note that you can choose whether the knobs cover an absolute range, as specified by the Range From and To controls, a Relative Range, or a Relative Offset. Since I don’t like my head to explode any more than necessary, I left this option on Absolute to start, knowing that I could change it later. You can also program keyboard parameters, pedals, the touchstrip, and the keyboard key colors—16 color choices in all. So, different templates can color the keys differently for visual confirmation that you’ve chosen the desired template (of course, I chose the color “mint” for the Mojito template).
So to recap, we’ve set up a general-purpose template, with a separate controller for each knob and switch, that we can use to create a custom control surface for non-NKS instruments and effects… as we’ll find out in part 3 of the NKS trilogy, Rise of the Controller.
Paul Drew + The Studio (One) Rats
The Studio Rats
The Studio Rats are a band hailing from the UK, led by none other than our good friend Mr. Paul Drew; a longtime Studio One user.
About the man and the project: 
Starting off as a session guitar player with a small recording setup at home, Paul quickly got the bug for recording in a more serious way and moved on to having a commercial studio for artists to come in and record. While he was in the process of developing this, he got asked to write some songs for some pop acts. One of the bands were then taken on by a record company, and Paul was asked to be their in-house producer. There he met his business partners and formed DWB Music, Limited. DWB has sold songs all over the world and currently are at about 40 million sales and 100 million streams.
About a year ago, Paul got a bit tired of just working on programmed pop music and wanted to take a break to just work with live musicians. He now gets to do this with his current project The Studio Rats.
The core members are:
- Paul Drew on guitars/production and mixing
- James Ivey on drums
- Dan Hawkins on bass
Having worked with many great singers and co-writers over the years, Paul invited a few of them to perform and co-write the songs. He also wanted to find a way to provide free content for music production, mixing and guitar playing online, so The Studio Rats YouTube Channel was created.
About the PreSonus audio tools that he employs:
Paul has been using Studio One DAW since version 2 for composing, recording and mixing, along with the Faderport controller and a Quantum audio interface that he uses for any sessions away from his home studio in Surrey, UK. Prior to adopting Studio One, he had a Pro Tools HDX System.
Studio One features that Paul enjoys:
- The ability to change tempo to the audio while still sounding great means that he can be in a writing session and record audio parts without having to worry about the tempo being fixed before a recording session begins—super important when working with live musicians.
- The AAF Import and Export is also a big time-saver for when working on film and TV projects.
- Customizable Keyboard Shortcuts.
- The Arranger track feature, coupled with Scratchpad (independent and alternate timelines) within the primary Song makes for a breezy writing session.
A closing thought from the leader of The Studio Rats:
“PreSonus has been amazing with user feature requests. You don’t get this from the other DAW companies. I wholeheartedly recommend that people give Studio One a trial, you won’t look back.”
[Official Website] | [Podcast]
Komplete Kontrol Integration in Studio One, Part 1/3
Studio One 4.53 introduced integration with Native Instruments’ Komplete series of keyboards, which is a big deal. Although these keyboards are theoretically dedicated to NKS-compatible plug-ins and mixer/transport hands-on control, with Windows systems (Mac fans, there’s more on this later) you can use the keyboard as a general-purpose, hands-on MIDI controller for non-NKS plug-ins, including all bundled PreSonus effects and instruments (as well as plug-ins from other manufacturers). Also, unlike standard NKS, you’ll be able to control effects, regardless of whether or not they’re inserted in an instrument track.
There’s a lot to cover, and since this is more like a tutorial than a tip, it’s split into three parts: DAW control with Studio One, creating custom templates for plug-ins, and how to apply the templates in your workflow.
INTEGRATING THE KEYBOARD
Choose Studio One > Options > External Devices, and click Add. Scroll to the entry for Native Instruments, unfold it, and select either your A/M or S series keyboard for Receive From and Send To. I’m using an S49 (Fig. 1).
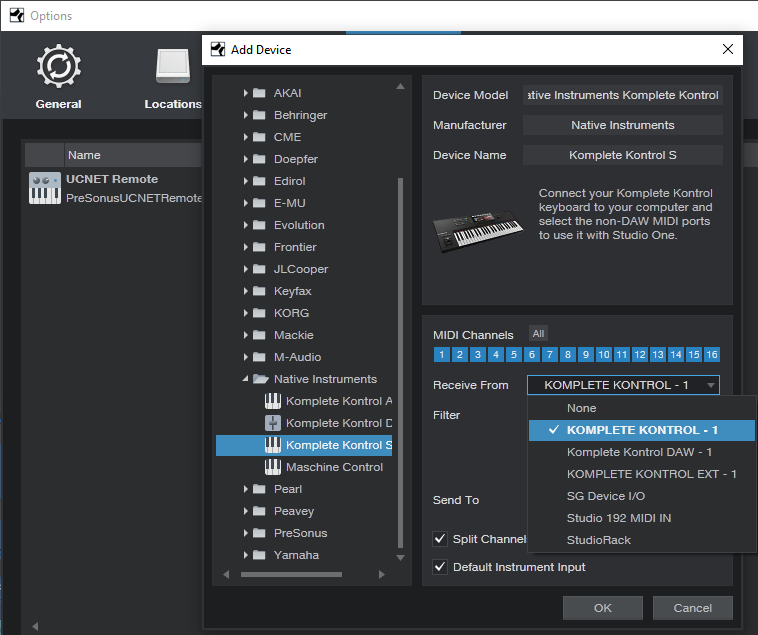
Figure 1: Komplete is selected as the keyboard, with Split Channel selected for more convenient use with multitimbral instruments, like IK Multimedia’s Syntronik.
INTEGRATING THE CONTROL SURFACE
Now let’s set up the Komplete keyboard as a new control surface. Again, choose Studio One > Options > External Devices, click Add, and scroll down to the entry for Native Instruments. Unfold it, and select Komplete Kontrol DAW – 1 for both Receive From and Send To (Fig. 2).
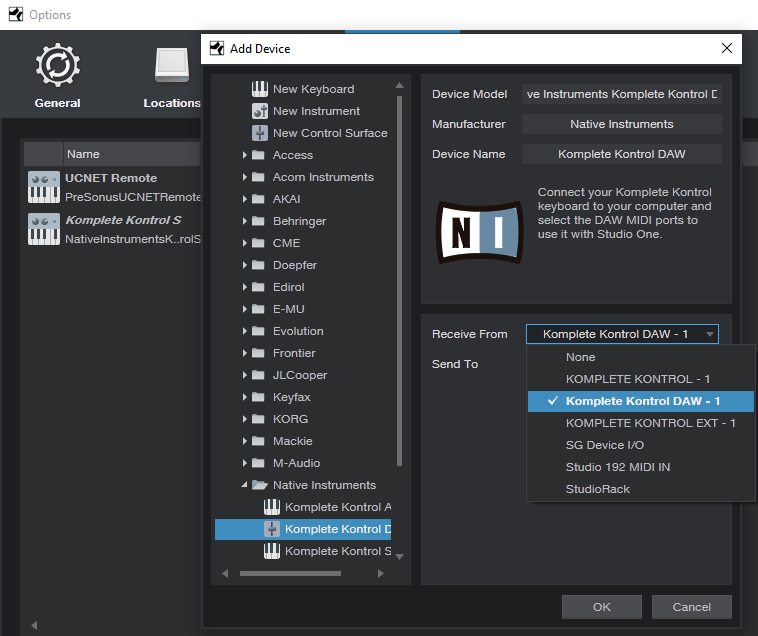
Figure 2: How to add the Komplete keyboard as a control surface for DAW integration.
CHOOSING THE MODE OF OPERATION
To edit NKS plug-ins, press the PLUG-IN mode button in the keyboard’s cluster of six buttons, toward the upper right. Controls that don’t relate to a synth or effect, such as the Transport, Metronome, Tape Tempo, and the like remain active. When it’s time to mix and you want full integration with Studio One’s mixer, press the MIXER button.
The following describes how the control surface for the current S-series Mk2 keyboards integrates currently with Studio One; click here for information from PreSonus on suitability with other NI keyboards, and updates.
Transport. The Play, Rec, and Stop buttons do what you’d expect, but there’s more to the story than that—there are several nuanced options. The following assumes you’re starting from a stopped transport.
- Press Play to begin from the Play Start marker. If there’s no Play Start marker, playback starts from the cursor’s current position. If you stop and re-initiate playback, playback re-starts from the cursor’s original position.
- Return to zero: When the transport is stopped, press Stop again to return to zero.
- Pushing on the big navigation knob toward the right initiates playback from the Play Start marker. (Note that this involves pushing downward into the knob, not left/right or up/down.) If there’s no Play Start marker, playback begins from the Loop Start, whether the loop is active or not.
- Push downward on the navigation knob during playback to jump to the Loop Start, which resumes playback automatically from there.
- Pressing Shift+Play operates the same way as using the navigation knob for playback control.
- With any scenarios involving the Play Start marker, it doesn’t matter if it’s before or after the Loop Start, or within the loop itself.
- Press Rec to initiate or punch-in recording. Press again to end or punch out recording. If you don’t record audio or MIDI while recording is active, there’s no blank event—it’s like nothing ever happened.
- Shift+Rec toggles the count-in between on and off. When you press Shift and count-in is enabled, the Rec button letters light bright red. Otherwise, the rec button letters are dimmed.
- Loop toggles the loop between on and off. To move the loop (whether enabled or not), hold the Loop button down, and rotate the navigation knob. For example, if the loop extends for four measures, moving the knob 1 click clockwise moves the loop forward to the next four measures. Moving the knob 1 click counter-clockwise moves the loop backward to the previous four measures.
- Metronome toggles between on and off.
Mixer
- The display for each visible channel shows the channel’s name, fader level, pan, metering (but not overloads), and status of a channel’s Record, Solo, and Mute buttons.
- Track select buttons. The eight buttons above the display select a track, however, moving the navigation dial left or right moves from one track to the adjacent track (left or right respectively).
- Hold Mute, and then select a channel with its track select button, to mute/unmute. The keyboard’s corresponding select button glows yellow.
- Hold Solo, and then select a channel with its track select button, to solo/unsolo. The keyboard’s corresponding select button glows blue.
- Shift+navigation knob move down (not push inward) selects level for the selected track. This mode remains selected until changed. Both the associated track knob, and the navigation knob, alter the selected track’s level. Holding Shift while moving either knob provides finer resolution. The individual track knobs provide the finest resolution.
- Shift+navigation knob move up (not push inward) selects pan for the selected track. This mode remains selected until changed. Similarly to level selection, both the track knob and navigation knob alter the selected track’s pan, and holding Shift while moving either knob provides finer resolution. The individual track knobs provide the finest resolution. Note: The Pan control for the Main channel is always shown panned full left. You can ignore this, because the Main channel doesn’t have a pan control anyway. The pan is centered properly.
- Auto toggles between Read and Touch (write) automation for the selected track. Be aware that you can’t choose automation off with Auto.
- Left/right arrow buttons select channels in groups of 8. However, if the last bank of eight has fewer than eight channels, the display will fill with the last eight channels. For example, if you expect the last bank to be channels 17-24 but only 22 channels are in use, the keyboard will display channels 15-22. This is by design, because it makes sure there aren’t any blank channels—you can always see eight channels at a time. If you hit the left arrow button, it won’t go back to channel 9, but be offset by the same amount as the previous bank. To “reset” the banks, hit the left arrow button until you’re back at the beginning.
Miscellaneous Functions
- Undo and Redo. For Redo, hold Shift and press Undo.
- Quantize. This quantizes whatever is selected, at the current quantize value.
- Tap this, even if not lit, for tap tempo. I love this feature when starting a song.
This takes care of the mixer and transport functions. Next week, we’ll cover how to create custom MIDI control setups using the Komplete Kontrol application, and that will prepare us for Part 3, which describes how to create “faux NKS” control surface capabilities for PreSonus instruments and effects. Yes, it really is possible…
Introducing ioStation24c
ioStation24c: The collaborative partner for the solo artist.
When you’re a solo artist, you have to be more than just creative to realize your vision—you must also be a producer and an audio engineer. The ioStation 24c audio interface and production controller provides the tools needed for all of these diverse roles in a compact, ergonomic desktop design that will fit into any home studio.
Celebrating 25 years of PreSonus
Let’s take a minute to look at all the firsts PreSonus has had in our first 25 years, from 1995-2020. It’s been quite a ride, and we’ve been glad to have you along for it. In fact, we couldn’t have done it without your support and input. Thanks for taking the trip with us. The next 25? They’re going to be even better.
For a more detailed look at what all we’ve been up to for the past 25 years, and where we hope to go in the future, check out our recently-revised PreSonus History section.
You may have missed some firsts in the video. Here’s the full list:
1995 – Patented MIDI control over analog devices
1996 – the first multi-channel compressor with onboard bus link
1997 – the first stereo analog compressor with presets and manual control
1998 – Invented proprietary IDSS control
2000 – the first 8-channel mic preamp with ADAT output
2002 – The first Analog/Digital recording system over FireWire
2003 – the first rackmount monitoring controller with talkback
2004 – The first FireWire audio interface with eight onboard mic preamps
2005 – the first completely software-controlled audio interface
2006 – the first audio interface with integrated monitor control
2007 – the first single-Fader DAW control surface
2008 – the first digital mixer with continuously bidirectional FireWire interface.
2008 – the first dedicated recording application for a digital mixer
2009 – the first DAW with both recording and mastering
2010 – THE First DAW with direct-to-Soundcloud export
2011 – the first DAW with Melodyne integration
2011 – The first digital mixer control app on the Apple App Store
2012 – the first iPhone monitor mix control app in the App Store
2013 – the first cross-platform integration between software and hardware
2014 – the first powered loudspeaker with Dante™ connectivity
2015 – THE First DAW with cross-platform multitouch support
2016 – the First bi-directional control between a DAW and digital mixer
2018 – the First DAW with real-time pitch control over MIDI and audio
2018 – The first fully-integrated AVB ecosystem
2019 – invented Patent-pending constant directivity loudspeaker design
AND SO MANY MORE
– Patented MIDI control over analog devices
– the first multi-channel compressor with onboard bus link
– Invented proprietary IDSS control to provide manual adjustment over the drain current of an input FET amplifier
– the first 8-channel mic preamp with limiting and A/D conversion to ADAT
– the first Analog/Digital recording system over FireWire
– Invented adjacent filter limiting
– Invented adaptive noise cancellation
– the first rackmount center console monitoring controller with talkback
– the first FireWire audio interface with eight onboard mic preamps
– the first digital sidechain in an analog compressor
– the first solid-state/vacuum tube dual-path mic preamp
– the first audio interface to be networkable over FireWire
– the first completely software-controlled audio interface
– the first audio interface with integrated monitoring remote control
– the first single-fader DAW control surface
– the first FireWire interface for Roland VS hard disk recorders
– the first digital mixer with continuously bidirectional, per-channel FireWire interface
– the first dedicated recording application for a digital mixer
– the first DAW with recording and mastering on the same platform
– the first digital mixer with cascading over FireWire
– the First DAW with direct-to-Soundcloud export
– The first digital mixer control app to be available on Apple App Store
– the first iPad controlled audio interface
– the first iPhone monitor mix control app in the App Store
– the First digital mixer with integrated SMAART system measurement
– Invented proprietary UCNET protocol for cross-platform communication and control between software and hardware
– the first powered loudspeaker with onboard processing and iPad control
– the first powered loudspeaker with Dante™ connectivity
– the First DAW with cross-platform high-DPI and multitouch support
– the First and still only DAW with Scratch Pad alternate mix and arranger tool
– the First and still only DAW with Mix Engine FX for engine-level console emulation plug-ins
– the First bidirectional control and mix settings import/export between a DAW and digital mixer
– the First DAW with pitch control over MIDI and audio simultaneously (and in real-time)
– the first fully integrated AVB ecosystem
– Invented a patent-pending constant directivity loudspeaker design
– the first the single fader DAW control surface with integrated audio interface