How to Save CPU Power with Amp Sims
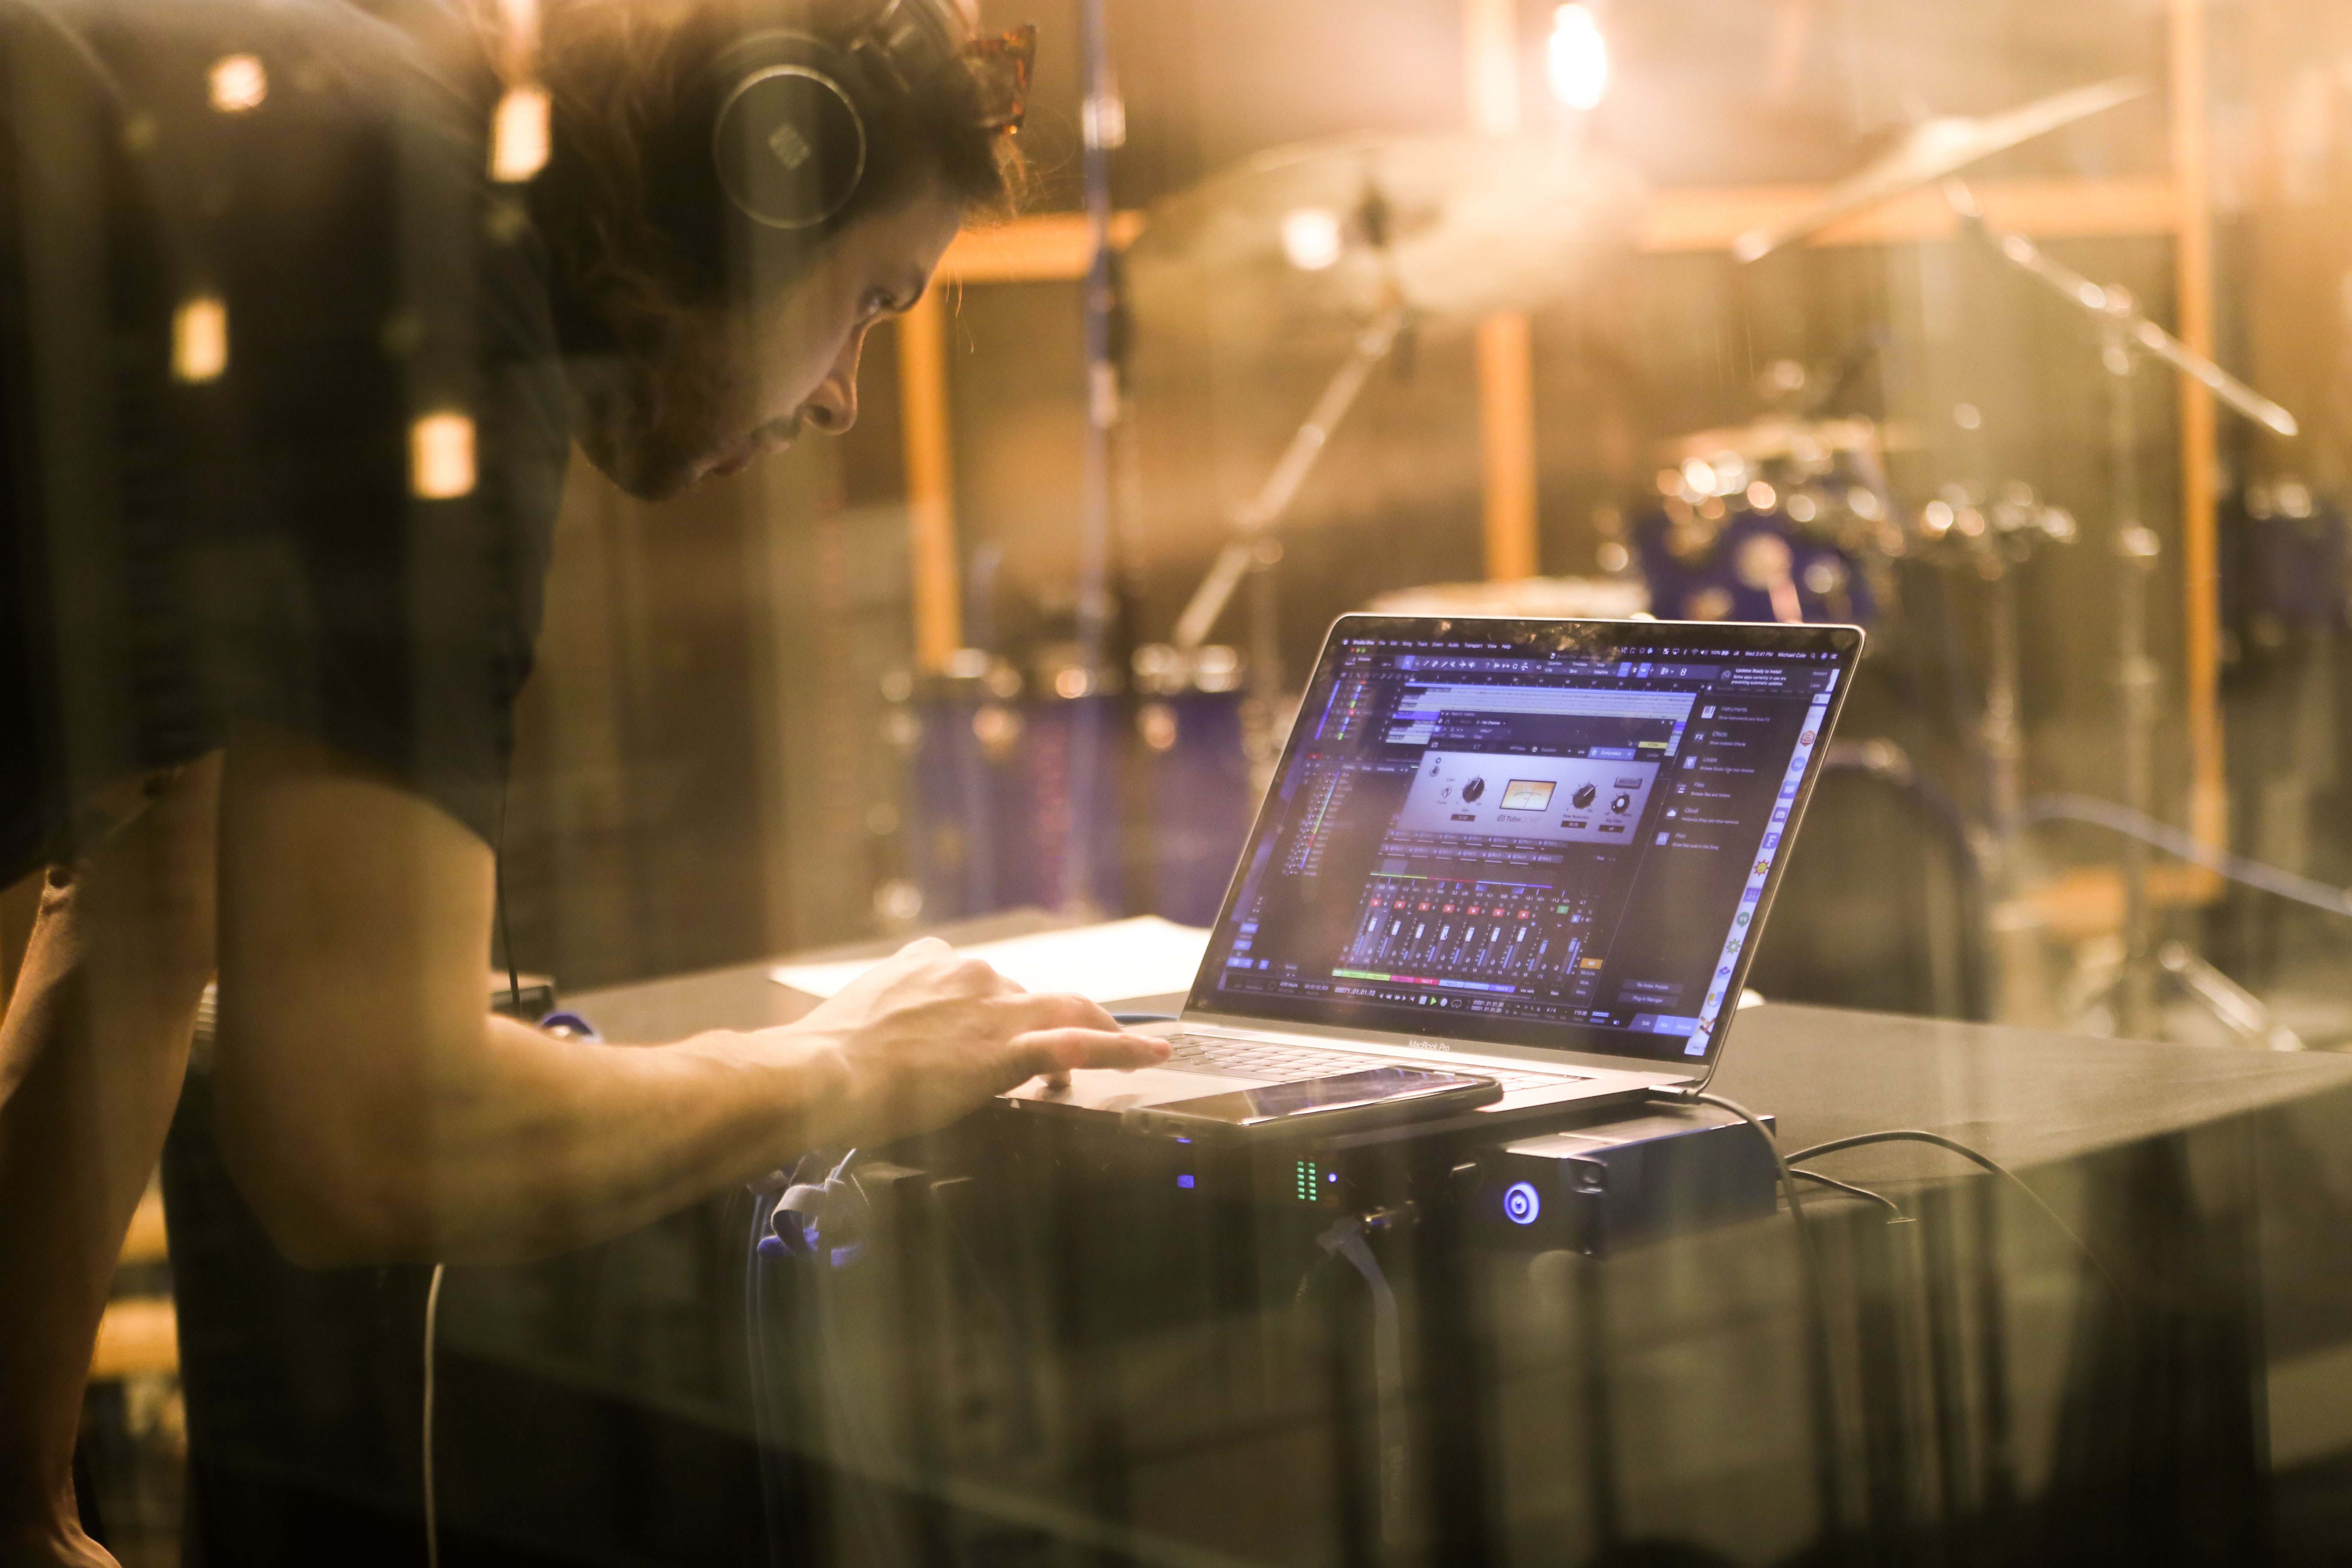
You’ll often see this kind of comment in forums: “There must be something wrong with Studio One! I can run only a couple amp sim instances before the program can’t handle any more!” But you’ll also see this comment about other DAWs—because the “problem” isn’t the DAW, it’s the amp sims and current computer technology. Fortunately, Studio One has anticipated these issues, and offers three effective solutions.
Remember, an amp sim is processing a dry guitar track in real time—not playing back processed audio. Amp sim sound quality has improved dramatically over the past few years, but the trade-off is the CPU power needed to do the serious number-crunching required for realistic amp sounds. Studio One’s CPU-saving options are great with virtual instruments, which can sometimes suck even more power than amp sims—but guitar players who are discovering the fun of amp sims need to know about these options, too.
The Old-School Fix
Although some people recommend the general-purpose, old-school fix of increasing latency to reduce stress on your CPU, that makes playing guitar much less fun. Another solution is to buy a much faster computer. Studio One’s solutions work at lower latencies, as well as older, slower computers.
Solution 1: Bounce to New Track
Select one or more Events. Right-click on any of them, and choose Event > Bounce to New Track (Fig. 1). This creates a new audio track that incorporates the sound created by the original track’s processing, but without any inserted plug-ins—the sound is “baked into” the new audio track. Audio tracks require far less CPU power than a track whose effects are being created in real time. Bouncing leaves the original track in place but mutes it, so you can unmute it to return to the original track’s audio and effects if needed.

Figure 1: If you use Bounce to Track (outlined in white) as much as I do, it will show up in the Recent Items section of your right-click context menu.
To conserve the CPU used by the original track’s effect(s), either turn off power to the effect(s), or right-click on the original track in the track column and choose Disable Track. To return the track to its initial status, right-click on the track in the Track column, and choose Enable Track.
Note that when signing off on a project, this is also an excellent way to “future-proof” the project against future operating system (or other) changes that may render a plug-in unusable. If the sound has been preserved as an audio file, you’ll at least be able to open the processed sound.
Solution 2: Transform to Rendered Audio
Right-click on the track in the Track column, or choose Track > Transform, and then choose Transform to Rendered Audio. This renders the effect sound so that it becomes part of the existing audio track. Unlike bouncing, this operation doesn’t create a new track, and it automatically disconnects the effect from the CPU to save power.
When you choose Transform to Rendered Audio, a dialog box appears with two options (Fig. 2).
![]()
Figure 2: The Transform to Rendered Audio dialog box.
You can always undo if you change your mind, but Preserve Realtime State (which I highly recommend checking) preserves the original, real-time state so you can always return to the original track settings and effects. Preserve Realtime State also persists through saves and copies. To return to the original track, right-click on the track in the Track column, or choose Track > Transform, and then choose Transform to Realtime Audio.
The second dialog box option renders any effects tail, such as a long trail of echoes or delay, that extends past the length of the existing Events. You can choose Auto Tail, where Studio One detects how long the tail lasts and renders according, or specify a fixed tail of a particular length. (A fine point: Studio One fades out the Event over the tail’s duration, but it’s an editable envelope.)
Render Event FX
Event FX, as accessed through an Event’s Inspector, are invaluable. With Ampire XT (and many other amp sims), you can’t automate amp or cabinet changes—only parameters within amps and cabinets. So, if the verse’s guitar part is one Event and the chorus’s guitar part is a different Event, each can have its own amp sim sound.
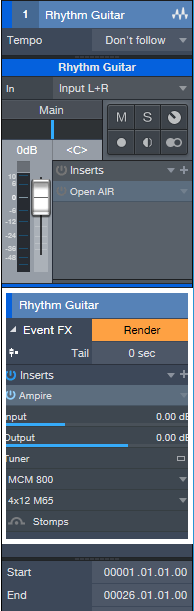
Figure 3: Here, Ampire XT is an Event FX, and can be rendered to save CPU power. Note that you can also choose different amps and cabinets, see a tuner thumbnail, and turn the Stomps section on or off.
The trade-off is that more amp sims draw more CPU power. Fortunately, Event FX have a Render button (Fig. 3). Immediately upon rendering, the sound becomes part of the audio, the effect itself disconnects from the CPU, and the Render button changes to Restore. Similarly to transforming an audio track, you can revert to the original state at any time by clicking Restore.
Multiple Renders in One Operation
Suppose a track has two Events, each with their own Ampire XT inserted via an Event FX, and there’s a CPU-hungry reverb processing the entire track. If you apply Transform to Rendered Audio to the track, it will Render the Event FX and the Track effect automatically. But if you then need to make changes and transform the Track back to realtime audio, the Track and Event FX will be restored to their initial states.
Bounce to New Track with both Events selected will produce the same results in the bounced track, i.e., all the effects will be rendered. If you want to return from where you started, delete the bounced Track, and unmute the two Events in the original Track (which will still have its effects inserted).
Once you bounce or transform tracks and reclaim all that CPU power, you can continue going cRazY with amp sims—without stressing out your computer, or Studio One.
Sir Bob Cornelius Rifo (The Bloody Beetroots)’s Faderport 16
Ahh, yes. The Bloody Beetroots. Led by none other than “NO Mask” clad frontman/musician/producer, Sir Bob Cornelius Rifo.

?☝️Faderport 16 as a centerpiece of Sir Bob Cornelius Rifo’s studio setup
PreSonus: For those who don’t know already, please tell us about yourself and what you’ve been up to?

Sir Bob: Been in the music business since 2006, worked with a lot of artists from Paul McCartney to Tommy Lee, going to Jason Aalon Butler, to Zhu.
I’ve played all the major festivals of the world, multiple times; Coachella, Lollapalooza, Primavera Sound, Rock im Ring, Rock imPark, Sziget, EDC, Summer Sonic, Fuji Rock… I could go forever.
I’m a musician, producer, and photographer—and I go crazy for motors!
PreSonus: So, tell us… how did the Faderport 16 and you become involved?
Sir Bob: I fell in love with the original Faderport almost four years ago and now got crazy with FaderPort 16. I needed a simple and solid machine. This fit the bill nicely!
Long story short—I love mixing and having control of the faders under my fingers. Nothing can replace the human touch and the Faderport 16 somehow returns it back.

PreSonus: What DAW do you use with the Faderport 16?
Sir Bob: Ableton Live 10.
PreSonus: What would you say you like most about PreSonus?
Sir Bob: Your customer service, peripheral installation speed, and ease of product use.
PreSonus: Any tips or tricks with our products you’d like to share?
Sir Bob: As you can imagine, I’m not new to DAW controllers. I’ve played with a lot of them, and I’ve bought many during the years from Mackie to SSL. This is the only one that has never given me any problems… which should be a priority for all controllers out there, just saying.
PreSonus: In closing… what would be on your “wish list” from us in the future?
Sir Bob: I’m dreaming about the Faderport 24. MAKE IT REAL!!!

- The Bloody Beetroots: Homepage
- The Bloody Beetroots: Twitter
- The Bloody Beetroots: Instagram
- The Bloody Beetroots: Facebook
- The Bloody Beetroots: Spotify
Into the Esoteric: Unveiling the World of Oriental Percussion
[This guest blog post comes to us from EarthMoments.]
To journey into the realm of Middle Eastern music is to unveil a tradition that is inextricably linked to religion—a uniting factor that brought together people of several different countries, languages and cultures.
The prevalence of Islam enabled the Arabic influence to spread across areas including Morocco, Iran, Egypt, Turkey and North Africa from the 7th century onward—a cultural influence that also permeated the region’s musical framework. There are various elements that give Arabic music its distinctly otherworldly quality—the music often features quarter tones between notes, the Arabic scale is based on various maqamat or modes, and complex rhythmic patterns play an essential role in the tradition.

In order to connect producers to this region’s exotic spectrum of instruments and rich sonic diversity, EarthMoments has released a bundle that grants them exclusive access to an otherwise elusive musical tradition.
EarthMoments’ Hamsa Vol. 02 – Arabic Percussion showcases several percussion instruments from the Middle East, North Africa, and Arabic musical traditions.
Forming the mainstay of the percussive practice are a variety of hand drums, instruments like the dumbek—a classic goblet-shaped drum traditionally made of ceramic clay and with a deeply resonant sound; the darbuka – also ‘goblet’ shaped, and said to be a modern variation of the dumbek; and the riq—a frame drum with 5 sets of cymbals, usually skinned with goat or fish skin – all of which are included in the bundle.

These traditions are heavily steeped in rhythmic patterns that perhaps at first listen are unusual to the Western-trained ear—complex time signatures that evoke a sense of the mystical realm from which these sounds emerged. In creating the bundle, the EarthMoments team made it a point to go beyond a surface level depiction of the ‘exotic Orient’—and chose instead to showcase both traditional commonly heard rhythms, as well as less conventional, rare folk rhythms that stray far from the mainstream.

Included are rhythms like the Malfuf—a fast pattern that originates in Egypt and Lebanon and is often played as an intro for classical orchestral compositions, specially created for a belly dancer’s entrance and exit;
the Baladi – an urban folk rhythmic style, a derivative of which is the Maqsoum rhythm (the most common rhythm in Arabic belly dance music);
the Shiftateli – a hypnotic rhythm often used for the sensuous movements of the belly dancer such as undulations of the torso, floor work, or when the dancer moves with snake like arms;
and the Karachi – a fast rhythm that originated in Pakistan but is commonly found in modern Egyptian and North African music.
In unlocking this enigmatic world of sound, new doorways open up for the curious producer looking for unusual creative leads – and herein lies great potential to create truly unique, offbeat compositions.
Hamsa Vol. 02 – Arabic Percussion Bundle
The “Table” Filter Response
There are a lot of filter responses: notch, bandpass, peak, allpass, high pass, lowpass, shelf…now let’s add the “table” response to the collection.
Parametric EQs can add peaks and cuts that are broad, narrow, or anywhere in between, but they all have slopes on either side of the filter frequency. The table response described here can boost or cut over a range of frequencies, with a flat response over that range. This avoids having to dedicate several overlapping parametric stages, which still doesn’t achieve quite the same result. The key to this response is combining shelving EQs.
Table Response Boost
To boost a frequency range, set the low- and high-shelf frequencies to the lowest and highest frequencies in the range (Fig. 1). Use the Shelf setting to determine how quickly the boosted section returns to the flat response. I’ve found the 12 and 24 dB settings works well, because the Q control comes into play. This can provide additional modifications to the response, which we’ll cover later. However, for the gentlest effect, 6 dB is valid in many situations as well.
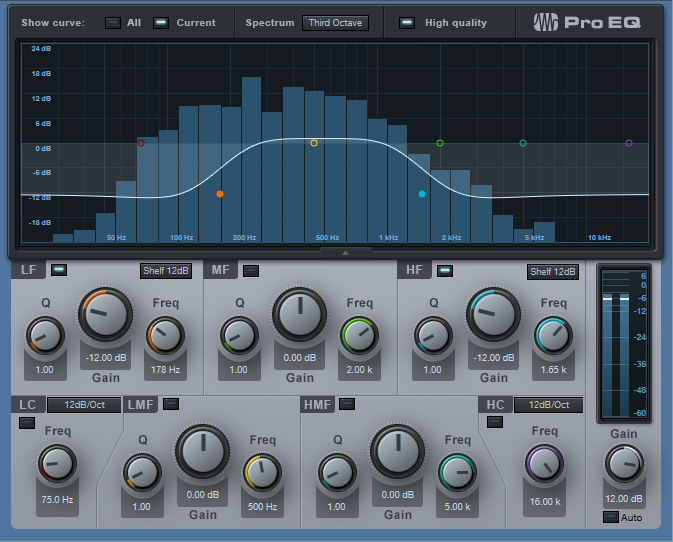
Figure 1: This table response, inserted before a high-distortion amp sim, gives greater sensitivity to midrange notes and also trims the highs and lows for a “tighter” sound.
But we’re not done quite yet. To provide an actual boost, increase the output Gain control for the desired amount of boost. For example, if you want the table response to boost +12 dB, set the high and low shelf Gain settings to -12 dB, and the output Gain control to +12.
Table Response Cut
Similarly to the boost option, set the low- and high-shelf frequencies to the lowest and highest frequencies in the range you want to cut (Fig. 2). Again, use the Shelf setting to determine how quickly the boosted section returns to the flat response; the same general comments about how the shelf slope works with boosting apply here too.
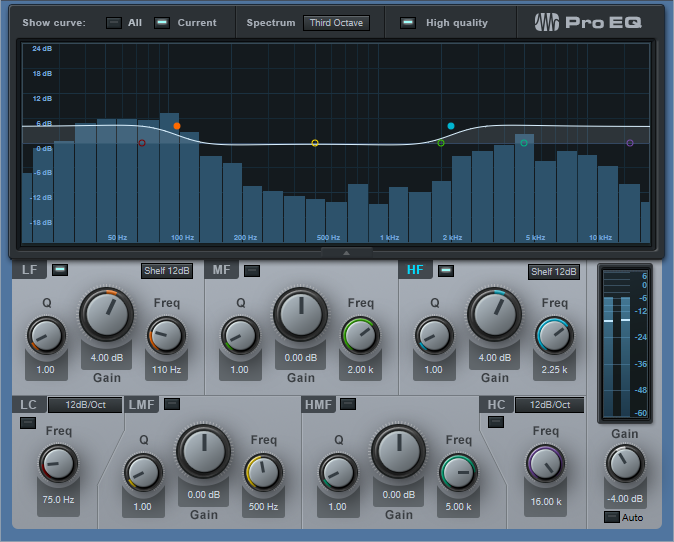
Figure 2: This table response for a drum loop cuts back on the midrange a bit to help emphasize the kick and the snap/sizzle of the share and high-hats; it also reduces any “midrange mud,” and makes space in that frequency range for other instruments.
Cutting requires an equal and opposite approach to what we did for boosting. If you want the table response to cut 4 dB, then boost the shelf controls by +4 dB. Then, set the output gain control to -4 dB. This restores the shelf boosts to flat, and adds the desired amount of cut for the specified frequency range.
Using Q
When cutting with the low shelf or boosting with the high shelf, increasing resonance by turning up the Q control adds a peak just above the shelf’s corner frequency, and a dip below the corner frequency. When boosting with the low shelf or cutting with the high shelf, increasing Q adds a peak just below the shelf’s corner frequency, and a dip above the corner frequency. This emphasizes the extremes of the chosen frequency range, while also increasing the depth of the cuts near the corner frequency. Try adding resonance to the low shelf when using this technique for vocals, particularly narration (Fig. 3).
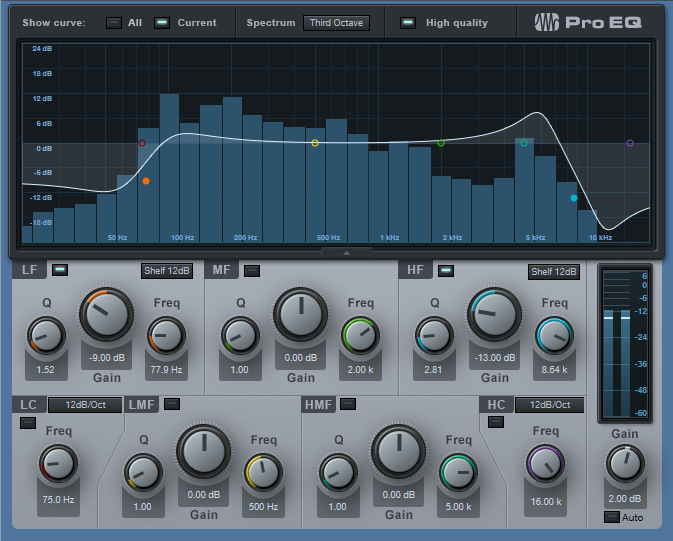
Figure 3: The table response adds a bit of a low-frequency boost (with Q) to give the “late night FM DJ sound,” but also cuts lower frequencies to reduce p-popping. Meanwhile, the high-frequency shelf emphasizes the voice’s articulation, while reducing extraneous highs, hiss, and sibilance.
Of course, the table response doesn’t replace a parametric. But sometimes, it might be just the response you need, and you’ll find it faster to dial in the right frequency range by moving the shelf controls than trying to make multiple stages of peak/boost EQ do what you want.
Remembering Derek Jones
Derek Jones was a Notion fan, expert user, and PreSonus advocate who formerly managed the Notion Users Facebook Group. If you ever had a run-in with Derek on-line, it was guaranteed to be positive—we can’t even begin to count the number of people in the Notion community who benefitted from his help and patience. If you count yourself among them, please feel welcome and encouraged to say something nice in the comments.
Rest easy, Derek, and thanks for your kind time and attention. You’re already missed.
The Notion team are deeply saddened by Derek’s passing. He was hugely valued here, indeed all of our users benefited from the improvements and feedback he contributed over the years on top of the direct help he gave to users within the Notion user group he created. The hundreds of members that built up over time became a really supportive and kind online community, aided of course by Derek’s patient and positive direction. I remain very grateful for his passion for music making, and for his friendship.
Chris Swaffer
Product Manager, Notion
Jonny Lipsham Studios
All About Ampire’s Virtual Miking
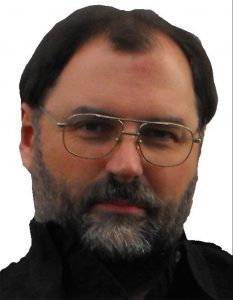
A physical guitar amp is more than a box with a speaker—it’s a box with a speaker being picked up by a mic in a room. Both the mic and room contribute to the overall sound. To better emulate the sound of a physical guitar amp, Ampire includes a Mic Edit Controls panel that allows making a variety of virtual mic adjustments.
Ampire doesn’t include room emulation, because you can emulate room sound with several of Studio One’s plug-ins—Room Reverb, Open Air Reverb, Mixverb, and Analog Delay. However, it’s best to avoid adding ambiance until most other tracks have been cut, so that the ambiance achieves the right balance. Too much ambiance can clutter the mix, or hog the stereo field.
The mics you choose, their levels with respect to each other, and whether you add delay can make a major difference in your amp’s sound. So, let’s investigate the Mic Edit Controls panel (Fig. 1).
Figure 1: The Mic Edit Controls in Ampire XT.
Choosing the Mic Type
Many guitarists record with their amp cranked to really high levels, to get their “sound.” Dynamic mics are ideal because they can handle high levels, and the inexpensive Shure SM57 is the classic guitar cabinet mic—many engineers choose it even when cost is no object. Although dynamic mics may lack brightness compared to condenser mics (as modeled by Mic C), this doesn’t matter much with amp cabinets, which typically don’t have much energy above 5 kHz or so anyway. Mic A in the Mic Edit Controls panel has the SM57’s sonic character, and will likely be your go-to mic.
Mic B produces the sound associated with ribbon mics, which shows one of Ampire’s benefits: older ribbon mics tended to be fragile—but you can’t blow up a virtual mic. Ribbon mics have an inherently warm midrange. Royer’s R-121 mic is popular for miking cabs, and Mic B models its overall sonic character.
Mic C emulates the PreSonus PM-2 matched pair of condenser microphones. Condenser mics are often too sensitive for close-miking loud amps, but when moved a bit back from the cab, they can give a brighter, more “open” response that handles note attacks well. They’re also commonly used as room mics, which is why these two virtual mics are arranged in an X-Y miking configuration to give a stereo image.
Wait a Minute—Did You Say Stereo?
Guitars are mono signal sources, but taking full advantage of Ampire’s mics, as well as room ambiance plug-ins, requires a stereo signal. To convert the mono guitar into a dual mono signal (i.e., stereo, but with the same audio in the left and right channels), record the guitar with the Channel Mode set to Mono (one circle showing to the right of the Record Input selector). Although this means that any plug-ins will be in mono, that’s acceptable when tracking. After recording the track, change the Channel Mode to stereo (i.e., two circles showing to the right of the Record Input selector), select the event, and bounce it to itself (ctrl+B). Now the mono guitar is dual mono.
Mic Control Applications
Each mic has three controls: level, mute button (which makes it easy to evaluate what a particular mic contributes to the overall sound), and phase switch (the Ø button). Also, Mics B and C have Delay controls.
Often when miking a physical amp with more than one mic, you’ll vary their blend to find the right mix. The Mic Mix Link button toward the extreme left simplifies this process. When enabled, altering one mic’s level adjusts the levels of the other mics oppositely. For example, turning up Mic A turns down Mics B and C, or turning up Mic B turns down Mics A and C.
The Phase buttons and Delay controls can make major differences in the overall sound. There’s no right or wrong phase or delay setting; use whatever sounds best to you. Try the following to hear how these controls affect the sound. (Bear in mind that amp sims do a lot of calculations, so moving the controls will sound “choppy.” This is because Ampire has to recalculate constantly to reflect the changing settings.)
- Turn off Mic Mix Link.
- Mute Mic C.
- Set Mic A’s Level up full, and Mic B’s Level down all the way.
- Enable Mic Mix Link.
- Lower Mic A’s level. Mic B’s level will increase. Note the difference in sound as the levels change.
- Alter Mic B’s Delay time, and again, change Mic A’s level. You’ll hear a sound that’s somewhat like flanging, due to the comb filtering caused by Mic B being out of phase.
- Enable the Phase reverse switch for Mic B, and again, alter Mic A’s level. You’ll hear a wide tonal variation.
Now check out how Mic C creates a stereo spread. With Mic Mix Link off, adjust Mic A and/or Mic B for the desired sound. Bring up Mic C’s Level control slowly, and you’ll hear the stereo image bloom. Again, the Delay control and Phase reverse button make a big difference in the sound.
Clean Sounds, Too
One of my favorite mic applications is with clean guitar sounds (cabinet only, no amp). Mic C is particularly useful, because its brightness gives the cabinet’s tone a useful lift, and creates a stereo image. Finally, note that if you change the Channel Mode from mono to stereo (or the reverse), the sound may mute. Varying one of the Mic level controls restores the sound. Of course, it’s easy enough to call up an Ampire preset, and just start playing… but becoming proficient with the Mic Edit Controls opens up a wealth of possibilities.
How to Use Nektar Panorama in Studio One
This just in from Ralf over at Nektar! This tutorial series shows how Nektar DAW Integration software lets you control Studio One from Panorama T4 and T6 MIDI controllers—everything from setup to mixer mode to instrument mode is covered. Check it out!
Part 1 (Basics and Overview)
Part 2 (Mixer Mode)
Part 3 (Instrument Mode)
Notion 6.6 Release Notes
Notion 6.6 Maintenance Release
Notion 6.6 is now available. It’s a minor maintenance update that adds compatibility with multi-core Windows machines and fulfils the upcoming security requirements of Apple’s Catalina operating system. Handwriting, MusicXML and MIDI import enhancements that were made for the recent Notion iOS 2.5 update have been inherited too, plus there’s some good news for 5-string banjo players…
This is a free update for Notion 6 owners that can be obtained by clicking “Check for Updates” within Notion.
All Fixes and Enhancements
Operating System Compatibility
- Notion now compatible with dual Xeon / multi-core processors
- [macOS] Notion is now ‘notarized’ as required by macOS10.15 Catalina
- Please note, Notion 6.6.x will be the final version to support Windows 8 and earlier, and macOS 10.12 Sierra and earlier.
Handwriting
- Fix for handwriting engine occasionally stopping during a long session
- Fix for subsequent measures sometimes changing after handwriting recognition on an earlier measure
- Rests on ledger lines no longer cause an issue
- Elements that cross systems (e.g. ties) now supported when using the handwriting area or continuous score view
- Adjacent offset notes on ledger lines now don’t transpose on subsequent notes being entered
- Fix for handwriting recognition problem on systems that have a repeat line
MusicXML
- Now imports grace notes with beaming information
- Better handling of imported beaming information
- [Win] Fix for arco and pizzicato being abbreviated on export
- Fixed occasional duplication of symbols, when exporting legato-accent, and mezzo-staccato
- Chords originally imported into Notion from Studio One’s Chord Track, are now exported as expected from Notion
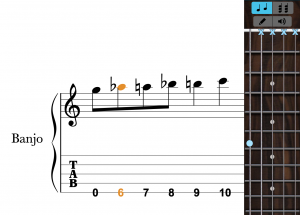
- Fix for TAB pitches being wrongly transposed by an octave on export, for non-transposing fretted instruments (e.g. banjo, mandolin, ukulele)
Notation
- 5-string banjo fret numbers now start at the 5th fret as expected
- Lyrics and chord symbols now paste without replacing the notation, after copying a selection that is longer than one measure
- Fix for crash if lyrics melisma is followed by a hidden measure (i.e. hidden empty staff / cut section / multi-measure rest)
- Fix for crash caused by deleting notes in measures with rhythm slashes in another voice
- When in ‘Dark’ theme, note durations are now visible in the cursor if between staves (go to Preferences>Theme>Dark)
-

Voice Colours Shown in Dark Theme

Audio
- Fix for crash caused by different buffer sizes between Notion and ReWire
- Hi-hat foot splash sample fixed
- Fix plugin test for shell plugins (Was reported by users of RealStrat)
- Fix enabling certain plugins (Was reported by users of Output Movement)
General
- [macOS] Ctrl+mouse click on a loaded insert in the mixer, now brings up the “right-click” context menu as expected
- Language fixes
- User Guide updated
Notion iOS 2.5 Release Notes
Notion iOS 2.5 Major Maintenance Release
![]() Notion iOS 2.5 is here, a major maintenance update for the best-selling notation app on iOS. This is a free update for Notion iOS owners that can be obtained by visiting Notion in the App Store on your device, or checking your available updates.
Notion iOS 2.5 is here, a major maintenance update for the best-selling notation app on iOS. This is a free update for Notion iOS owners that can be obtained by visiting Notion in the App Store on your device, or checking your available updates.
And while you’re here, please check out our new official Facebook user group: https://www.facebook.com/groups/PreSonusNotionUsers
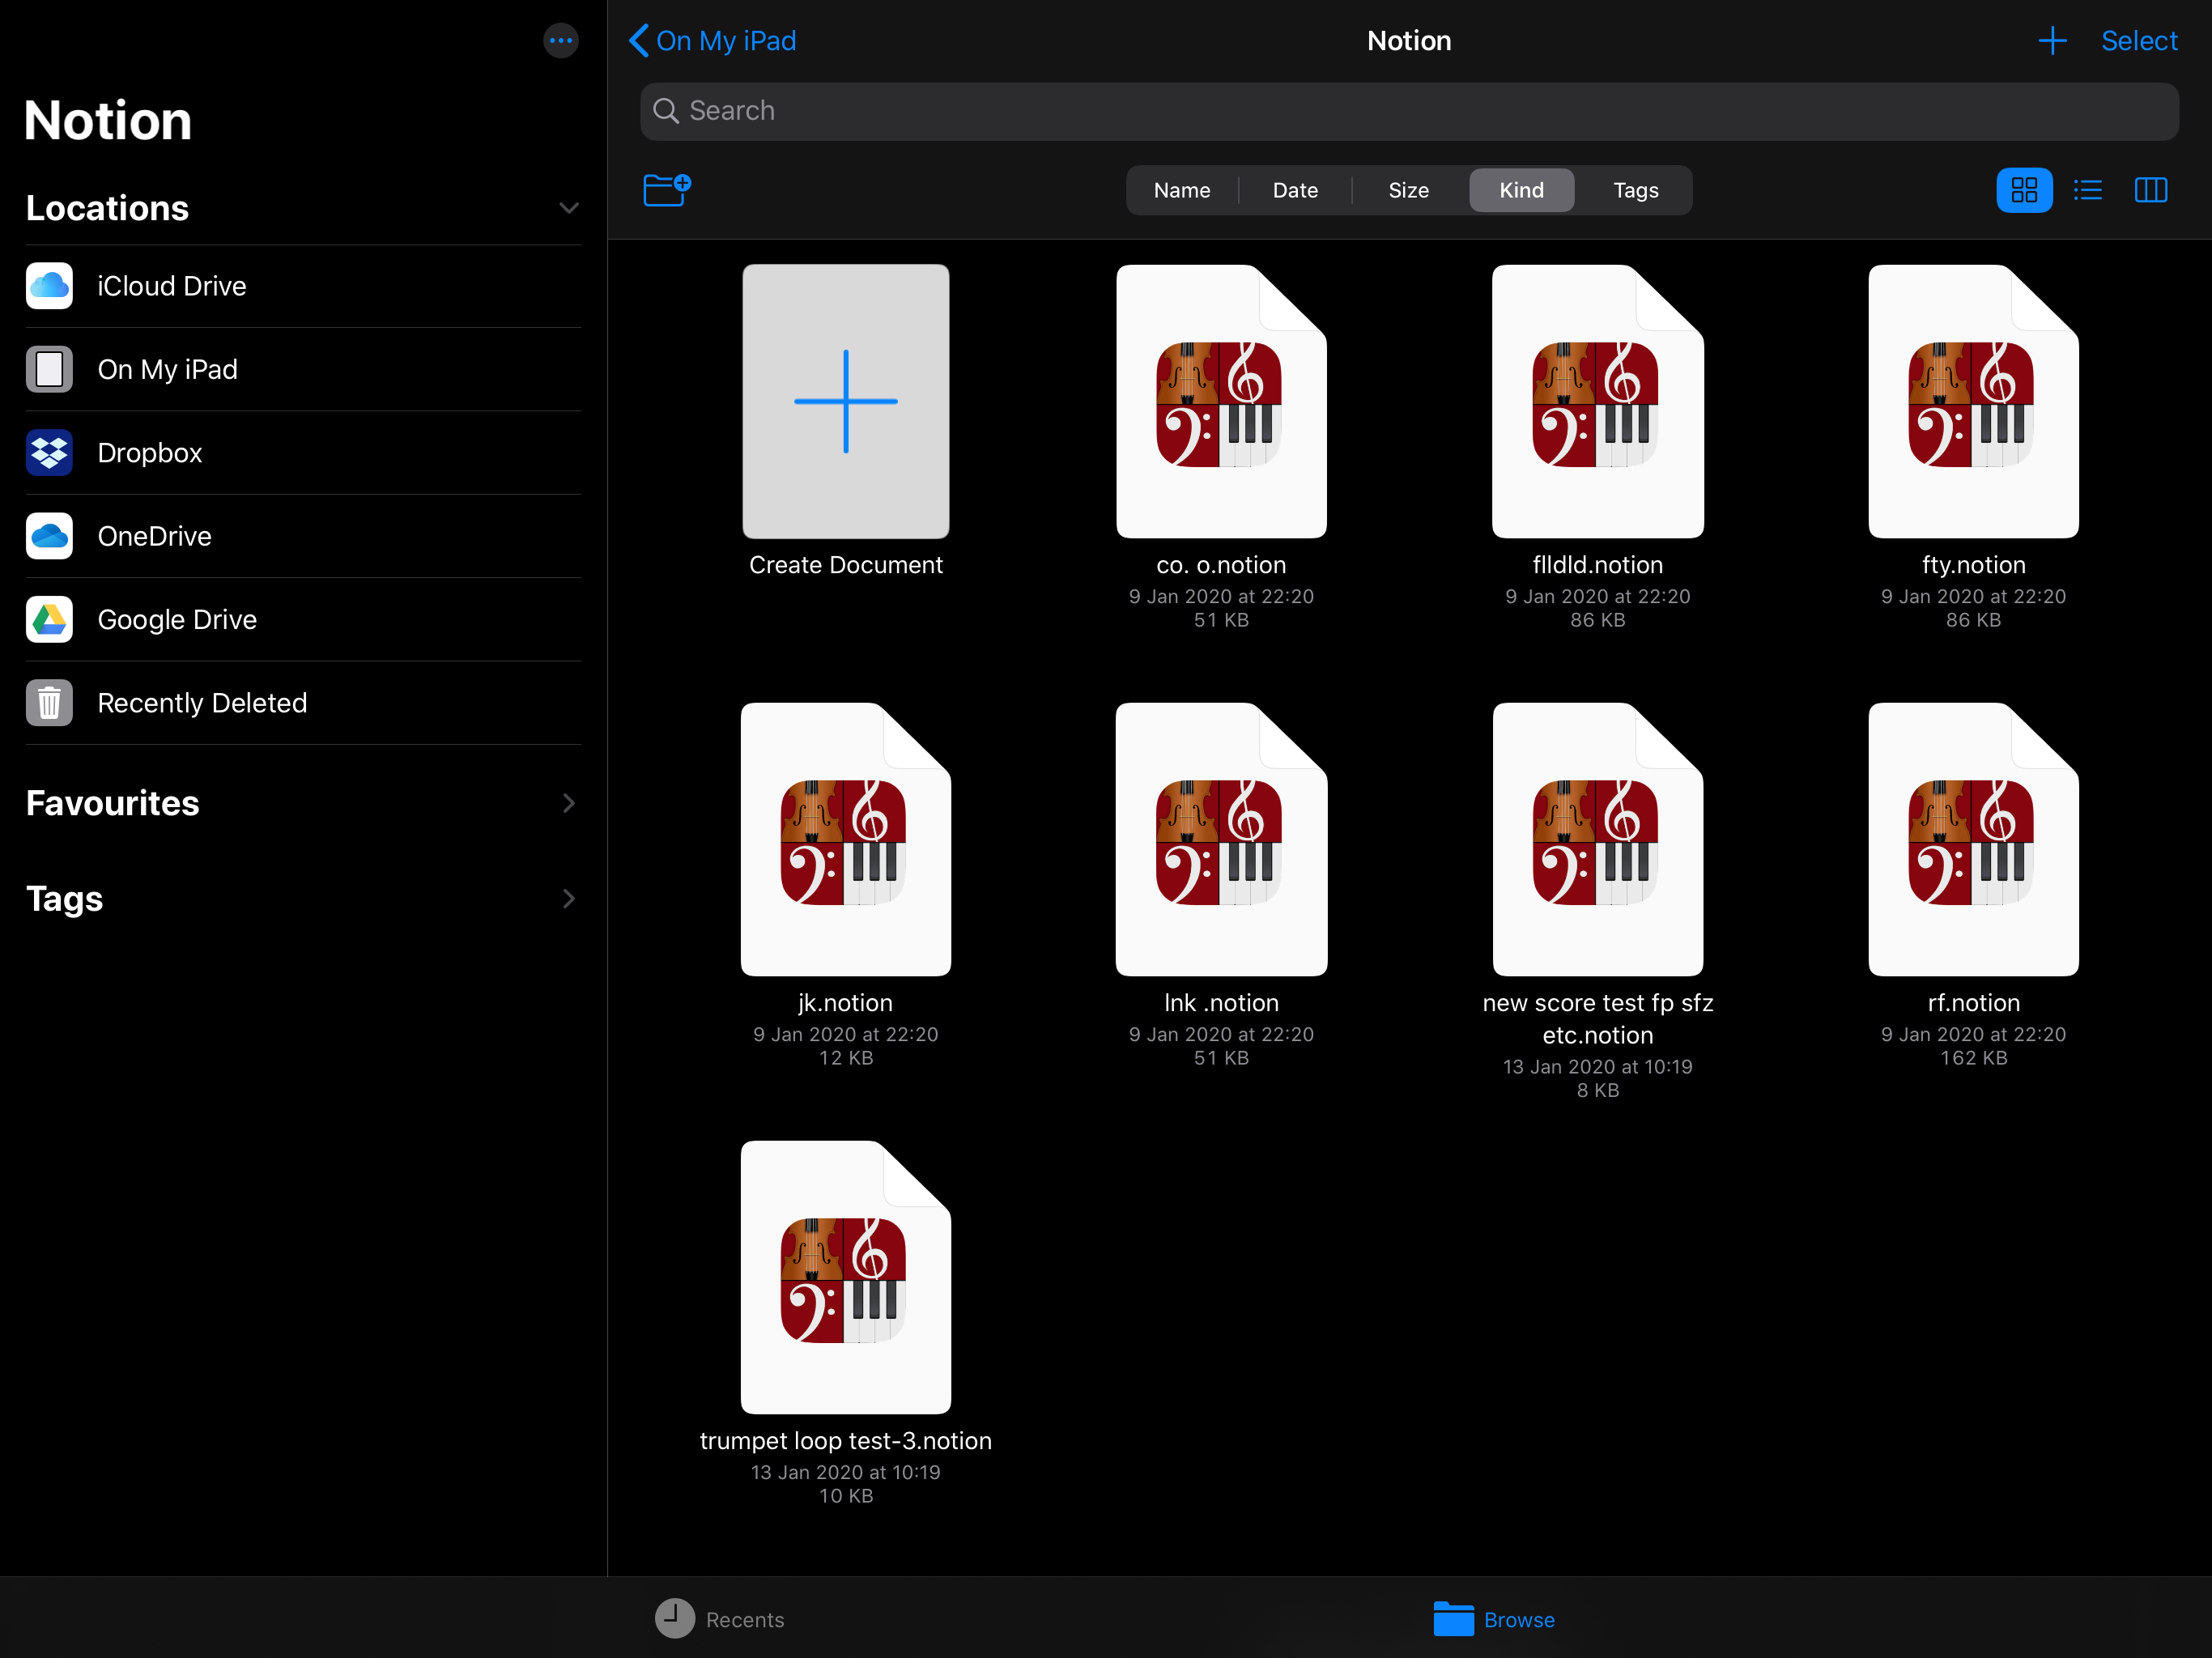
NEW: Document Handling
(iOS11 and later) Notion now directly supports Apple’s built-in document opener. This allows you to create, open and save scores directly in the location of your choice, whether on the device, in Notion’s iCloud folder, or via the linked cloud folders of your choice (such as Dropbox, Google Drive or OneDrive for example)
Note – If you are running iOS9 or 10, then there is a document opener built in to Notion that will allow saving to the device, or to Notion’s iCloud folder only.
Notion iOS 2.5 New Browser (shown in Dark Mode)
NEW: Export as MP3
Now you can export your score as an MP3 audio file, alongside the existing options of WAV and AAC formats. Just choose MP3 as the Export file format, and it will save an MP3 in the same location as your Notion document.

Listen to your scores on the go, with these lovely Eris HD10BT Bluetooth headphones (coincidentally, also made by PreSonus….)
NEW: Export for SMP Press
 Export as SMP Press File is a simple process that creates a single PDF containing the full score and all the parts in score order. SMP Press, from Sheet Music Plus, is a self-publishing portal for composers. Its free to join, and you earn a commission for every sale.
For more info, click here: https://smppress.sheetmusicplus.com/
NEW: Save as Template
Now you can save a document you are working on as a new template. Go to Export, make sure Notion File is selected, then Save as Template. This will ask you to give it a name—your new template will be available from the New Score dialog next time you create a new document.
Choose your instruments or a template. Or create your own!
All Fixes and Enhancements
Change in Minimum Requirements
- Notion v2.5 requires Apple iOS9 or higher (was iOS8).
- Please note, Notion 2.5.x will be the final version to support iOS9.
iOS Device Improvements
- Add ‘Close’ button to Score Setup for larger phones, in order to dismiss the Score Setup menu
- Tools in the sidebar not covered by the ‘notch’ in larger iPhones
- Larger phones now load the correct chord symbol dialog (rather than trying to load the iPad version of this dialog which then couldn’t be dismissed)
- When in split view on an iPad, the onscreen fretboard, keyboard and mixer now show in the correct size
- Optimised for Dark Mode
Handwriting
- Fix for handwriting engine occasionally stopping during a long session
- Fix for subsequent measures sometimes changing after handwriting recognition on an earlier measure
- Rests on ledger lines no longer cause an issue
- Elements that cross systems (e.g. ties) now supported when using the handwriting area or continuous score view
- Adjacent offset notes on ledger lines now don’t transpose on subsequent notes being entered
- Fix for handwriting recognition problem on systems that have a repeat line
Audio
- Fix for some newer devices, where Notion was not using the device sample rate leading to distortion when playing back or exporting an audio file.
- Playback warning pop-up for large scores removed
- Hi-hat foot splash sample now plays back
MusicXML
- New MusicXML elements imported: sf, sfp, fp, sfz and fz; beaming; measured tremolos that include tuplets; very short duration notes (down to 1024th notes); fermatas; harmonic circle symbol / open circle symbol; snap (Bartok) pizzicato; scoop, doit and fall-off
- New MusicXML elements exported: clef changes; pizz and arco; pre-bends; sf, sfp, fp, sfz and fz; mutes; measured tremolos; noteheads; fermatas; harmonic circle symbol / open circle symbol; snap (Bartok) pizzicato; scoop, doit and fall-off
- Tablature export and import fully reworked
- Support for ‘.musicxml’ file extension
- Better handling of any missing slur end elements on import, to avoid very long slurs occurring
- Voices on grand staff reworked
- When importing with time signatures that have a high numeral (e.g. 11/4), whole measure rests now show as expected
- Better handling of imported beaming information
- Now imports grace notes with beaming information
- Fixed occasional duplication of symbols, when exporting legato-accent, and mezzo-staccato
- Fix for TAB pitches being wrongly transposed by an octave on export, for non-transposing fretted instruments (e.g. banjo,
mandolin, ukulele)
MIDI
- Improved rhythmic spelling on MIDI import
- Fix for MIDI files not being imported from other apps in some circumstances
General notation and note entry
- 5th string banjo fret numbers now start at the 5th fret as expected
- Lyrics and chord symbols now paste without replacing the notation, after copying a selection that is longer than one measure
- When writing chords with the on-screen piano keyboard, notes are no longer ‘held down’ after moving to the next position
- Fix for crash caused by deleting notes in measures with rhythm slashes in another voice
- When writing chords with the onscreen guitar fretboard, notes are held on the fretboard after moving to the next position to allow repeated chord strumming (keep moving to the next position with the right arrow to enter multiple chords). The chord is automatically cleared from the fretboard if a new note is tapped on the fretboard
Slash Notation
- Bass note of Chord Symbol now supported in playback
- Slashes with augmentation dots now have more spacing in Jazz Font
- Notes can be deleted in measures with rhythm slashes in another voice, without crashing
Tremolo
- Tremolo Entry behaviour changed: e.g. for a fingered tremolo with quarter duration, now insert two eighths before applying the tremolo
- Tremolo can now be tapped onto the first note or in between notes
- Stems now can go in either direction in a voice 2 tremolo
- Fingered tremolos that include chords now play back as expected
- Bug fixed for the second note of a fingered tremolo changing duration if tremolo entered onto second note (now does nothing)
- Bug fixed for a third note being erroneously added to an existing tremolo, if a tremolo is entered onto the second note (now does nothing)
Text
- Fix for existing text in text boxes becoming hidden when editing
- Lyrics font can now be changed globally per document. Go to either Full Score Settings or Parts Settings, then Layout>Lyric Font
- Fix for a melisma causing an issue if followed directly by a hidden measure (e.g. by a cut, a hidden staff, or a multi-measure rest)
Paste
- Paste into a Specific Voice is now accessed via a long press, at the point you wish to paste into the music
- Pasting into a different voice now does not remove any existing rest at the beginning of the destination measure
- The whole measure is now not replaced/overwritten when pasting a partial measure as expected.
- Paste no longer causes rhythmic changes, when pasting multiple times between different voices or between a grand staff
- Paste now ignores ties in other voices on a grand staff
- When using Duplicate, now automatically adds more measures before pasting, if you are duplicating past the end of a score
- Lyrics and chord symbols now paste without replacing the notation, after copying a selection that is longer than one measure
Languages
- Tuplet dialog is now translated properly in Japanese language
- Musical intervals are now translated properly in German language, in transposition window
- When Notion is set to Korean, Japanese or Sim Chinese, the drumpad now enters cymbals with expected cross noteheads
- New Score corrected in Spanish
General
- General performance and stability improvements
- Print Parts to PDF now prints in score order
EarthMoments Presents: Indian Street Drummers – Indian Percussion
[This guest blog post comes to us from EarthMoments.]
Street style: ecstatic South Indian ceremonial drumming, and raw and primal beats from the gullies of South India. This is a wildly unconventional bundle now made accessible to producers worldwide.
EarthMoments’ collection – Indian Street Drummers – Indian Percussion – showcases the heart and soul of the streets of India with the original, largely undocumented sounds of Tapattam street drummers.
Click here to learn more!