Luke Mornay: Twenty Five Ten
We’re extremely excited for our good friend and recording artist Luke Mornay on the release of his new album Twenty Five Ten which has already grabbed a 5-Star review on New Sounds UK!
Let’s find out more about what he’s been up to with this project as a longstanding user of PreSonus hardware and software for his musical endeavors through the years.

Luke: I’m a producer / composer and mixing engineer best known for my remixes for Kylie Minogue (a Grammy-nominated Billboard #1), The Killers, Robbie Williams, Bob Marley and Amy Winehouse–to name but a few–I just produced Twenty Five Ten, an album in homage to my late mother.

It has sounds for here and now, rooted in decades of influences and experiences.
Featuring successful collaborations with Kevin Godley (10 CC, Godley & Creme), model Roxy Horner, Nick Tart (Diamond Head), Rachael & James Akin (EMF), Lucy Pullin (The Isle of Man, Robbie Williams), Melanie Taylor, Flora, Phat Hat.
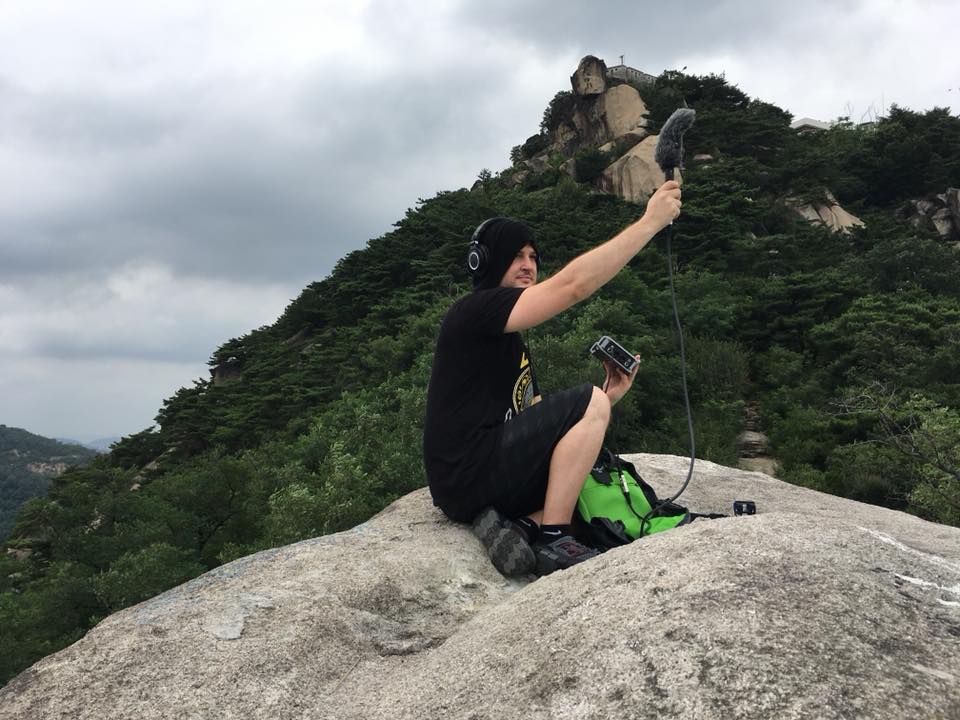
My 18-track album was recorded in various places such as Brisbane (Australia), Tel Aviv, Mallorca, Brussels, Los Angeles, Dublin, Katowice (Poland), and Baton Rouge (USA).
Besides my emotional motivation to get this project done, I really wanted this record to connect genres, eras, and mix generations. Somehow connect the dots between timelines in a unified story, with its joyful and bonkers moments, with its own directions and contradictions, or more simply put: my story.
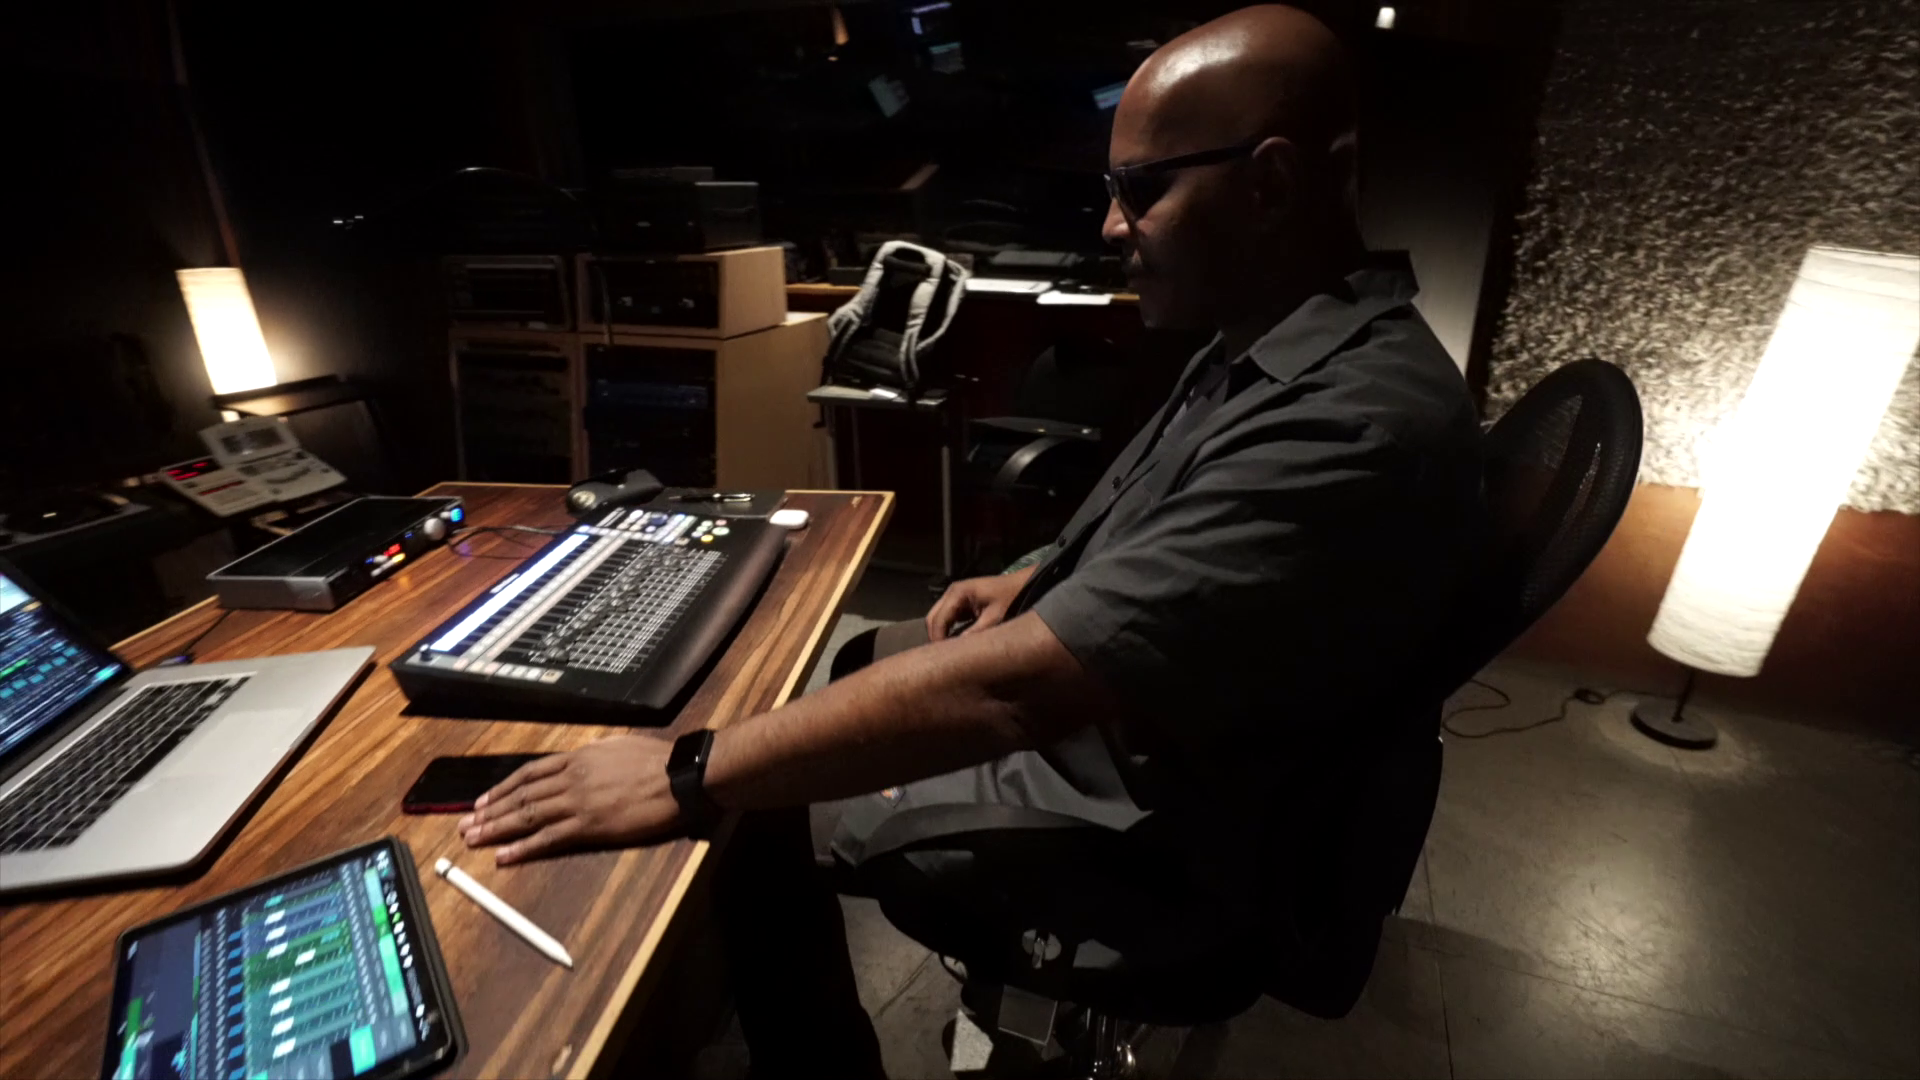
I have a rock-solid PreSonus eco-system based around a Quantum 2, FaderPort 16, and ATOM, nothing superfluous—they all have a purpose. The FaderPort 16 is giving me the gestures I’m used to when balancing tracks on a console; the vibe is based on even relationships between instruments.
It’s a different experience, and the decisions I’m making helped me to assign a more prominent role to sounds buried in a mix, with fingers on all faders I’m sorta painting a sonic picture based on my impression. With a mouse it’s also achievable, but it’s more cerebral; it’s laser focused, and less expressive.
The ATOM is perfect when I want to jam with drums or synth shots. It’s perfect for fortunate accidents! I come up with ideas I wouldn’t get from a keyboard. In some of my remixes I like to slice vocals that I then drop into impact to create what we call “vox lox” to build new lines, for example that was a centerpiece of my Kim Wilde Kids In America remix. The new chorus idea was all done with Impact XT and the ATOM.
Quantum 2 is just brilliant, it’s been my companion in so many tasks, it’s never let me down. As musical director for a Native American show I’m in charge of, I used this thing on stage in large venues with thousands of people, the sound was amazing and so stable. I also mixed a full season series for a TV network; a short film for Disney; sound mix for HBO; my album and remixes—it’s been so reliable and with a constant, pristine sound. It fits perfectly in my backpack, so I’m super mobile.
For what applications are you using Studio One Professional?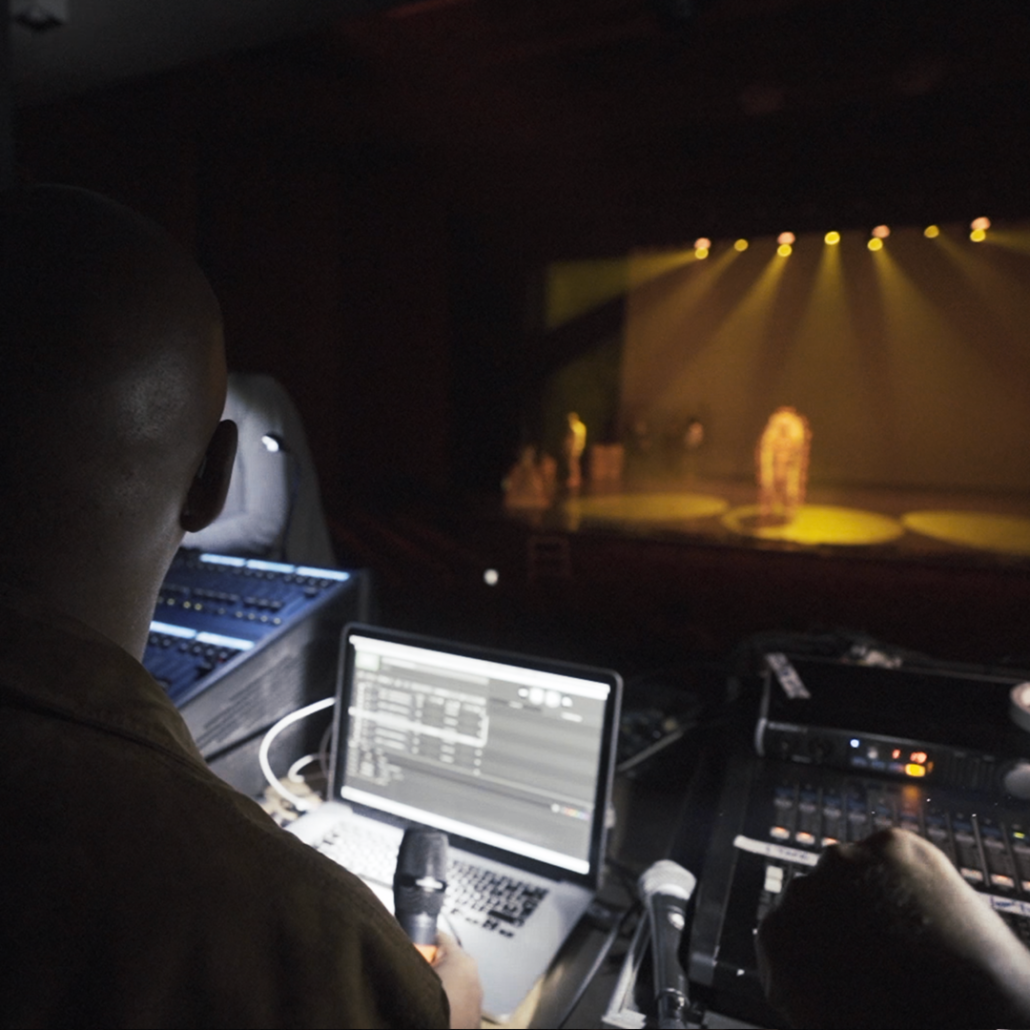
I’m working 100% in the box and I’m using Studio One for everything and anywhere.
I usually work from home, and when necessary I just take my laptop to a commercial studio, plug my Quantum 2 to their system, launch Studio One, and I’m set. I can do the adjustments I feel are needed and go back home.
My album was also mastered that way, I’ve had a reliable listening environment there, and all songs loaded into the project page. The big plus was when I felt that I was doing too much tweak, I could just open the song, fix whatever was needed with one click and go back.
Lately besides my remixes, I’ve been asked to mix a couple of original songs from the ’80s/’90s on which I’ve been given the multi-tracks, such as Fine Young Cannibals, Shakespear’s Sister, or Bananarama to name but a few.
I could really set up Studio One to be ready at all time and nicely organized like a vintage console, and now with Version 5 Professional, I can switch between an SSL or Neve sound in just 2 clicks. That’s fantastic.
What led you to choose Studio One?
Studio One is just another part of me, it never gets in the way. It’s a companion standing in front of me that is always ready for war.
The interface is very clean and soothing in a way, it always feels like some quietness before the storm. It also sounds great, fully-featured and with the Project page, you can virtually do anything within ONE app.
These days as a musician you have to wear so many hats that the last thing you want is distractions and learning curves on different apps. With Studio One I can produce, compose, mix, and master with features located in familiar places.
What Studio One features have proven particularly useful and why?
The drag & drop concept, be it for sounds, presets, instruments, or FX. This thing is a home run. When I feel that I’m not going to be in a productive mood, I spend a lot of time organizing all of the above for future sessions.
How does Studio One compare to other DAWs you have used?
 This software brings me peace of mind, and that’s priceless. PreSonus shines by making huge steps at their own pace with three priorities: the user experience, consistency and coherence.
They can be the adult in the room in a world where feature lists to sell new major updates are prioritized over the quality of their achievement.
With backward compatibility, if something is poorly implemented from the start, then you’re stuck with it until the end of days. We all love new features, of course, but it shouldn’t come at that price.
So when I see something not yet available in Studio One, I just tell myself: “If you can’t make music with what Studio One has to offer today, maybe you should just quit.” The kid in me is not a fan of that sentence, but it’s a nice motto to move on.
Which Studio One feature or concept doesn’t get enough spotlight (or isn’t talked about enough) in your opinion?
Without a doubt I’d say macros, they can be really powerful, I remember doing one for a friend of mine, he was new to Studio One, he was looking after a way to slice and map samples easily.
So I came up with one that analyzed the loop, detected transients, sliced at transients and sent them to Sample One XT, it was so good that I’ve added it to a shortcut and ended up using it myself. I’m thinking of sharing it with the community.

Any useful tips/tricks or interesting stories based on your experience with Studio One that would be of interest to our user base?
During the lockdown with friends we’ve had some virtual sessions, we were sending ideas back and forth and it appeared that none of them used MusicLoops, they were saving their ideas or overdubs as songs.
I told them that I have a folder called ideas, so every time I try a new synth or jamming with a virtual instrument, I just drag & drop it to that folder, and it then becomes an asset for my future project. Everything is saved in a single file with an audio version, MIDI, presets, and FX used all in one go.
From time to time, I like to browse that folder to see if there’s anything inspiring or useful.
That’s basically the story of the opening track on my album, I’ve had this nasty groove made with Impact XT floating around for some time, and one day it was the right idea for the mood I was in.
Never lose your ideas, phrases and so on, don’t expect to remember anything two years or two months from now with random or cryptic names… Just drag and drop in a place, where you’ll find your sparkles of ideas at all times!
Any final comments about PreSonus and Studio One?
I always found the name intriguing, now that I see how powerful it’s become over the years, and on its way to become the ultimate DAW, I take it that it was not just a name… it was a plan.
PreSonus Sphere Members: check out Luke’s newest Studio One Presets on his Featured Artist Profile!
Facebook | Instagram | YouTube | Spotify
Website : www.lukemornay.com
#ATOMChallenge
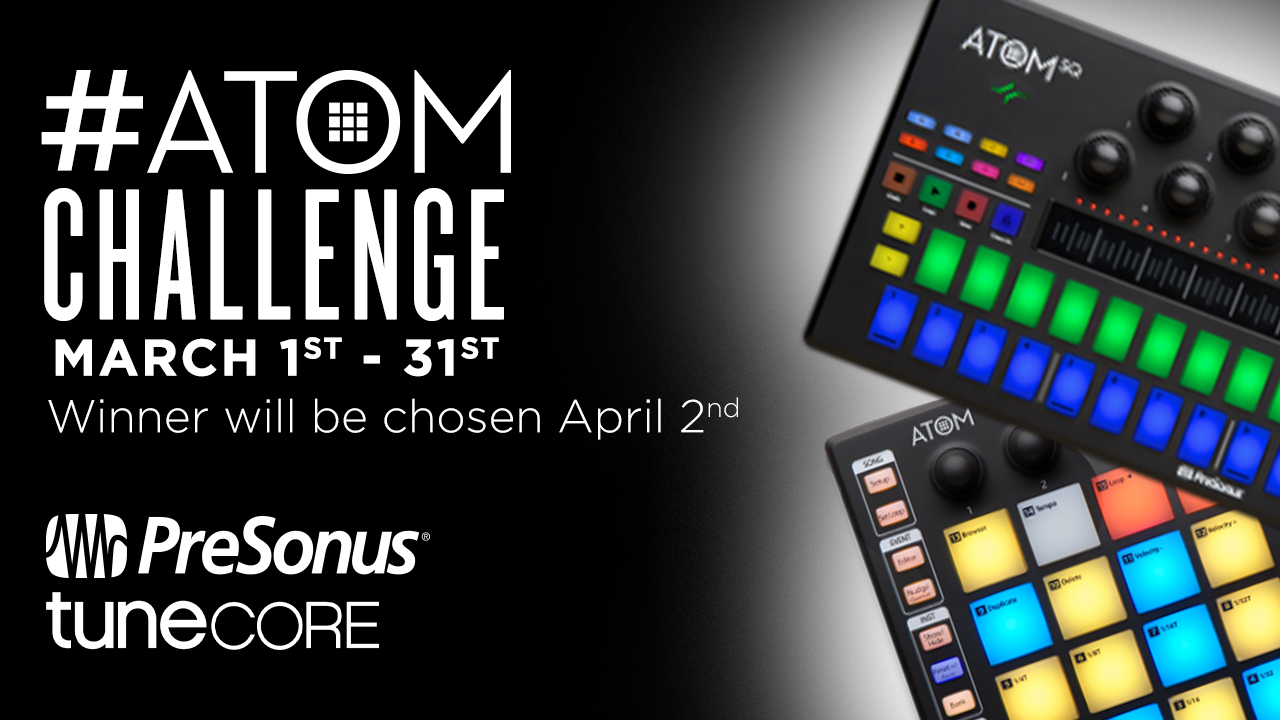
Show us your ATOM or ATOM SQ in action! Tag PreSonus in a video of you performing your sickest beat with the hashtag #ATOMChallenge to be entered to win an ioStation 24c and one free year of album distribution from TuneCore. Contest is held from March 1st – 31st, winner announced April 2nd.
Here’s what you need to do to enter:
- You must tag PreSonus on Instagram, Facebook, Twitter, or TikTok
- Post a video of yourself performing a beat on your ATOM or ATOM SQ
- Post the video to your account and include the hashtag #ATOMChallenge in the caption
START SUBMITTING ENTRIES TODAY!
One winner will be chosen on April 2nd and win an ioStation 24c and one free year of album distribution from TuneCore. Private accounts will not qualify, so set your profiles to public if you want to win! Winners will be contacted directly by PreSonus.
Check out Product Manager, Dom Bazille, accepting the challenge:
Remembering Peter Burrows

Simultaneously an industry giant and a gentle one, Peter Burrows was 300 pounds of motorcycle-riding, upright bass-slapping, River Thames moxy shoehorned into a tweed vest and a newsie cap. He was an engineering marvel, a devoted family man, a history buff, and a well-traveled audio industry vet; simultaneously an impossibly kind soul who took no crap. Pete, wiser than most of us, seemed to have figured out the secret to an anxiety-free life balanced in confidence, love, intellect, and humor—leaving many of us a little jealous about why we couldn’t figure out how to to do that for ourselves. But, you see, figuring things out was just what Pete did. Pete reverse-engineered living.
He came from London to the states (likely by motorcycle, because he would have figured that out, too) in the mid ‘90s to work at Mackie, and it wasn’t too long before he eventually found his way down to PreSonus about nine years ago. He worked with us for a long time in Engineering Services, where his troubleshooting acumen and larger-than-life personality couldn’t have been a better fit. Pete had a tendency to ride his Harleys and Indians to work in sweltering Louisiana summers—but only on the days when he didn’t show up in a hot rod. (The only thing louder than those engines was his laugh, by the way.)
But when Baton Rouge flooded in 2016, Peter Burrows was the one guy who still found a way to come into work. That’s admirable enough to an employer, of course—but Pete, being Pete, chose to come in by kayak.
Seriously.
And that’s the kind of guy he was. What might be a problem to you or I wasn’t a problem for Peter Freakin’ Burrows. It was, in fact, an opportunity for him to show you he had an idea for a fix, and he was sure it was going to work, so let’s just get it started and—hey look, it worked! Wasn’t so hard after all, mate.
As Pete aged, so did his tastes. He maintained a particular musical passion for primal rockabilly. And while his nonmusical interests were diverse, they also tended to skew vintage. He explored classic motorcycles, old guns, pinball repair, and 1930s fashion to their absolute fullest. Of course, that was all going down when he wasn’t spending boardgame time with his wife and two kids. Pete’s family is suggesting donations to Gentleman’s Ride, with friends in the UK encouraged to reach out to the Canal River Trust.
Take some time today to hug your loved ones and raise a glass to departed friends. It’s what Pete would’ve wanted you to do.
Godspeed, Pete. We’re not sure what you’re riding on your trip to the other side, but we can’t wait to see you again so you can show us how it works.

Quad Image Enhancer
Studio One’s Binaural Pan processor can widen, or narrow, an instrument’s stereo image. Aside from making “bigger” sounds that fill out the stereo spread, it also has practical applications. For example, you can spread out a thick stereo synth pad, or a guitar feeding two cabs in stereo, by turning the width control clockwise from the center position. This opens up more room for vocals, kick, snare, bass, and other centered elements. Binaural Pan can also do the reverse—like narrowing a wide, stereo synth bass part to focus it more—by turning the Width control counter-clockwise from the center position.
For mastering, Binaural Pan can make mixes seem larger than life. However, it’s not necessarily a “one-size-fits-all-frequencies” solution, because you might want to spread the highs as far as possible, but narrow the bass, and add only a little bit of spreading to the upper mids—so let’s make ourselves a multiband image enhancer.
This Quad Image Enhancer FX Chain is ideal for mastering, as well as for working with individual instruments. Fig. 1 shows the modules. The Splitter splits the audio into four bands: Low (below 250 Hz), Low Mid (250 Hz – 1 kHz), Hi Mid (1 kHz – 4 kHz), and High (above 4 kHz). Each of these goes to a Binaural Pan to control the image, and a Mixtool to trim the level (-6 dB to +6 dB).
Figure 1: Modules used in the Quad Image Enhancer multipreset.
The split frequencies are arbitrary. You might want to move them around, although the ones in the default multipreset work well with a variety of music.
The Control Panel (Fig. 2) accesses all the needed parameters. Enabling the Mono button is like turning Width fully counter-clockwise, but being able to switch this provides a convenient diagnostic tool for quickly comparing a band’s sound in stereo or mono. Similarly, enabling Bypass makes it easy to hear the effect that widening (or narrowing) has on a particular band. If you need to mute individual bands so you focus completely on one or two bands while editing them, open up the FX Chain, select the Splitter, and mute the desired output(s) in the edit window’s upper-left corner.
Figure 2: Quad Image Enhancer control panel.
How to Use It
When the Width controls are centered, they don’t affect the sound. You can crank up the widths for a wider sound, but you can also be a little more strategic. The following audio example plays an excerpt of mixed but unmastered audio, followed by the same excerpt going through the Quad Image Enhancer. For this application, the Lo band is narrowed, Lo Mid unchanged, Hi Mid widened slightly, and Hi widened all the way.
Note that unlike some delay-based widening solutions, this FX Chain doesn’t cause any comb filtering-induced “phaseyness” if collapsed to mono.
To widen a sound even further, turn up the Trim control for the Hi Mid or Hi bands by 1-2 dB. Because high frequencies are more directional than low frequencies, emphasizing the high frequencies increases the illusion of width.
Although there are some excellent third-party multiband imaging plug-ins available, you don’t need to go outside the Studio One ecosystem—just download the multipreset, and you’ll be ready to widen, or narrow, your stereo image.
DOWNLOAD THE QUAD IMAGE ENHANCER PRESET HERE
Justin Lassen – In Memoriam
 The PreSonus family was heartbroken to hear about the passing of our dear friend, collaborator, and long-time partnering artist, Justin Lassen. During his career, Justin worked with such artists as Madonna, Garbage, The Killers, Lady Gaga, Lenny Kravitz, Robert Miles, Nine Inch Nails, Linkin Park, Evanescence, Apocalyptica, and more. A talented presenter and spokesperson for the democratization of audio production, Justin also worked with many high-profile technology firms, including Intel, Sony, and Konami.
Sound.
It’s the word that immediately comes to mind when thinking of Justin. His love of it. The sounds around us. The noise of the world that becomes music to those willing to listen. Justin had a unique gift for hearing and capturing that music.
 As a composer and sound designer, Justin was passionate about discovering unique sounds for his creations. After the release of his landmark sample library of horror sounds, White Rabbit Asylum, which has been used in such films as Underworld: Awakening and I, Frankenstein, Justin went on the adventure of several lifetimes, traveling to more than 22 countries over the course of ten years to create his masterful ambient industrial sound library, Black Fox Society. Using binaural and ambisonic microphones and field recording equipment, he ventured into caves, castles, jungles, shrines, cathedrals, bone-filled secret passages, waded down rivers, trekked over mountains, and even dove underwater on his relentless quest to collect his sounds.
PreSonus was honored to include his piece, Vulpes Obsidian Sanctum, as a flagship demo in Studio One 5. It provides a glimpse into the way Justin heard the world. Justin was a composer, producer, multi-instrumentalist, and remix artist who worked in film, sound design, and gaming—but most of all he was a friend and inspiring human being who will be deeply missed by all those who knew him.
Read more about Justin’s sonic travels.
Listen to Vulpes Obsidian Sanctum.
PnP (Plug ’n Play) Mono to Stereo Converter

If you think I have an obsession with converting mono to stereo, well…you’re right. There are still a lot of mono signal sources around (guitars, mics, vintage synths), but we live in a stereo world.
EQ or delay are the two main ways to convert mono to stereo. The August 17, 2018 tip covered how to use multiband dynamics to create stereo from mono. The December 31, 2020 tip (Super-Simple Mono-to-Stereo Conversion) described something similar but used the splitter, along with a Macro Control panel for added flexibility. The advantage of using EQ for stereo separation (compared to delay) is that if designed properly, there are no phase issues if the stereo is collapsed back to mono.
For delay-based stereo, the August 30, 2019 tip (Widen Your Mono Guitar) works with mono or dual mono tracks, collapses very well to mono, and by using FX Channels, provides a variety of panning and level options. However, the more I used this technique, the more I realized that I kept using the same settings almost all the time. So, it made sense to create a multipreset with fixed settings—then all I had to do was drop it into an insert to provide instant mono-to-stereo conversion. (Note that this isn’t about automatic double-tracking; we have a different technique for that.)
How It Works
This process requires a stereo channel, so set the Channel Mode to stereo (i.e., you’ll see two dots to the right of the input field). However, the audio itself can be mono or dual mono. Fig. 1 shows the FX Chain’s “block diagram.” The Splitter splits into left and right channels.
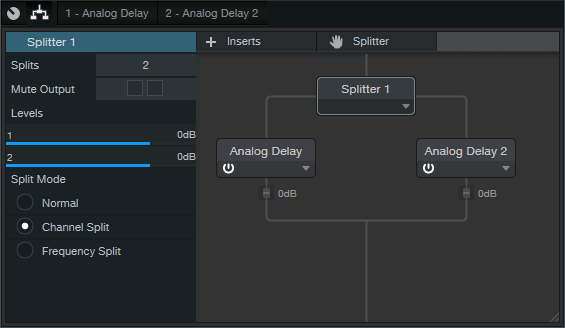
Figure 1: This multipreset’s simplicity belies its effectiveness.
Each split has an analog delay with identical settings (Fig. 2), except the delay time for one is 11 ms, and for the other, 13 ms.
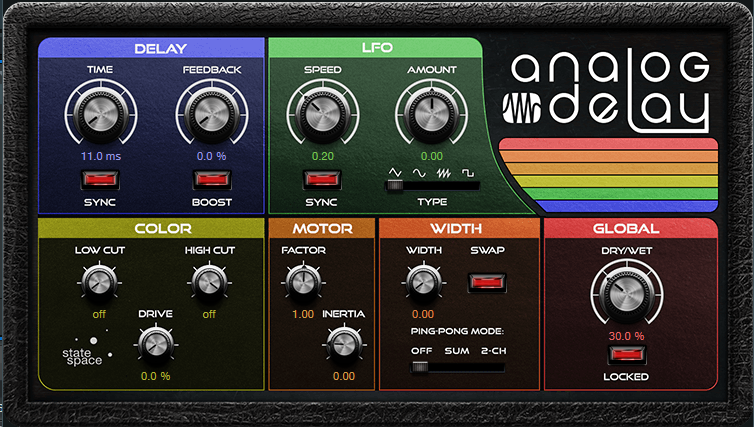
Figure 2: Delay time settings for the Analog Delays. The only difference between the two is the delay time.
Customization
I’ve tested this with guitar, vintage mono combo organ, Minimoog, and other mono sources, including voice. However, it’s not really suitable for bass, which you normally center anyway.
The fixed settings are the best “compromise” settings for collapsing to mono, as well as for creating a stereo image that’s not too spread out (or has an undesired slapback effect). The carefully chosen settings are part of what makes this a “plug-and-play” multipreset. But If you want a wider stereo image, increase the Dry/Wet controls equally for the two delays. You probably don’t want to go much over 50%. You can also increase the 13 ms delay to a higher value but the more you increase the wet level or time, the greater the likelihood that the stereo effect won’t collapse as well into mono.
So, between this and the previous blog posts, I think we’ve pretty much covered mono to stereo conversion—hopefully your guitar or vintage synth will thank you.
DOWNLOAD THE PnP MONO-TO-STEREO CONVERTER HERE!
Using a Touchscreen with Studio One
The first touchscreens could detect a single touch, but modern touchscreens can handle up to ten touch points—which makes sense, because we have ten fingers. Studio One supports ten touch points natively on Windows, and thanks to a built-in TUIO extension, on the Mac as well.
DAW control with touch sounds sexy, but using touch on a large monitor is a different experience compared to using touch on a smartphone or tablet. Furthermore, whether a third-party plug-in supports multiple touchpoints is hit-or-miss. Also consider that a good touch monitor costs around $300—that’s quite a bit more than a standard monitor, so you need to decide how valuable touch would be to you.
Practically speaking, you probably don’t need touch, but it does offer two major advantages when working with Studio One. The main plus for me is being able to use a touchscreen control surface and mouse simultaneously—two-handed operation improves the physical workflow. The other advantage is being able to edit multiple parameters simultaneously with effects and virtual instruments (like adjusting filter cutoff while trimming the filter envelope amplitude, or editing EQ frequency and boost/cut8 simultaneously).
The Ergonomics of Using Touch
To use a touchscreen as a control surface, I lay the monitor down almost flat, at about a 20% angle (Fig. 1). It feels very much like working with a conventional hardware mixer. For this application, it’s vital that the monitor have an adjustable A-frame stand, so that you can adjust it to any angle you want.
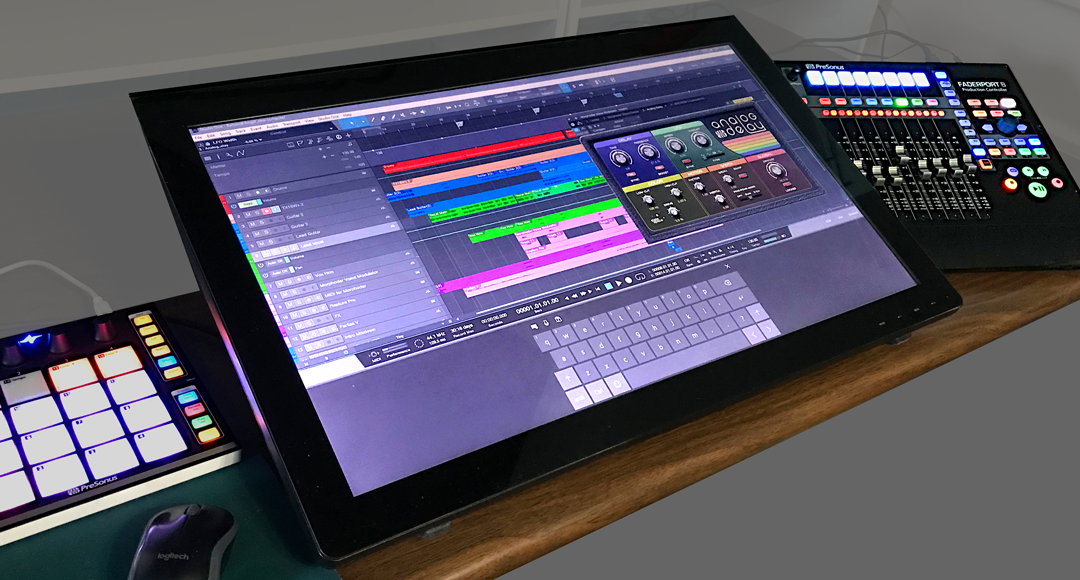
Figure 1: The Planar touchscreen is flanked by PreSonus control surfaces—that’s a lot of hands-on control. It’s at more of an angle than I normally use so that the screen is more visible.
Where touch doesn’t work, at least for me, is trying to use it with a conventional monitor placement (i.e., at a right angle to the desk surface, directly in front of you). Reaching out tires your arms; when I’m using the touch screen as a conventionally placed monitor for a project like writing an article, I rarely use touch. However, it can be helpful to move windows around while the mouse is doing something else, or touching a function after the mouse has made a selection. If you have RSI issues, touch can also provide a break from using a mouse all the time.
Also note that it takes a while to develop “touch technique.” You generally need to use the point of your finger to be sufficiently precise, and with the monitor at a low-lying angle, I usually have to aim a little toward the top of what I’m trying to hit. Also, you need to learn a few new tricks. You “right-click” simply by touching, and then continuing to hold your finger down until the context menu appears. And you can zoom tracks horizontally or vertically with two-finger pinches or stretches, which is pretty cool…as well move a project horizontally along the timeline by just swiping left or right.
Integrating a QWERTY Keyboard
You also need to decide how to integrate a QWERTY keyboard. If it’s in front of the touchscreen, then the touchscreen needs to go further back, which diminishes its ease of use because you have to reach further. One option is placing a keyboard on your lap, or adding an under-table keyboard drawer. Then you can slide the keyboard out when needed, and slide it back in when you want to concentrate on the touchscreen.
Another option is using Windows’ onscreen keyboard. Although primarily intended for tablet mode, right-click on the Taskbar, and choose “Show touch keyboard button.” This button will appear on the taskbar and persist; click on it to show/hide the keyboard. (Also for what it’s worth, you can enable a button for an onscreen touchpad.) Note that you have several keyboard options, from a mini-keyboard to one that includes Alt, Ctrl, Windows, and Function keys (Fig. 2).
Figure 2: This shows the full keyboard, set for the option to float anywhere over the window. Note how the faders are stretched to give excellent touch resolution.
So Is It Worth It?
If you miss working on a hardware mixer surface, a gently angled, horizontal touch screen is pretty close to that experience. Studio One’s ability to extend the height of faders is also great—when you mostly want to concentrate on fine level adjustments, you can do so with touch. Multitouch on effect and instrument parameter adjustment is also welcome, especially compared to bouncing the mouse back and forth among parameters. Another factor is that unlike an external hardware control surface, you don’t have to “mentally map” the hardware to what you see on the screen—after all, you’re adjusting what’s on the screen.
If you have a choice between spending $300 on upgrading your speakers or buying a reasonably large touchscreen, I’d prioritize upgrading your speakers. But if you’re looking for a new tool that can give you an edge in certain workflows, a touchscreen may be the answer. And even if it isn’t, it can always serve as a conventional monitor, and provide an extra screen. And we can never have enough screens!
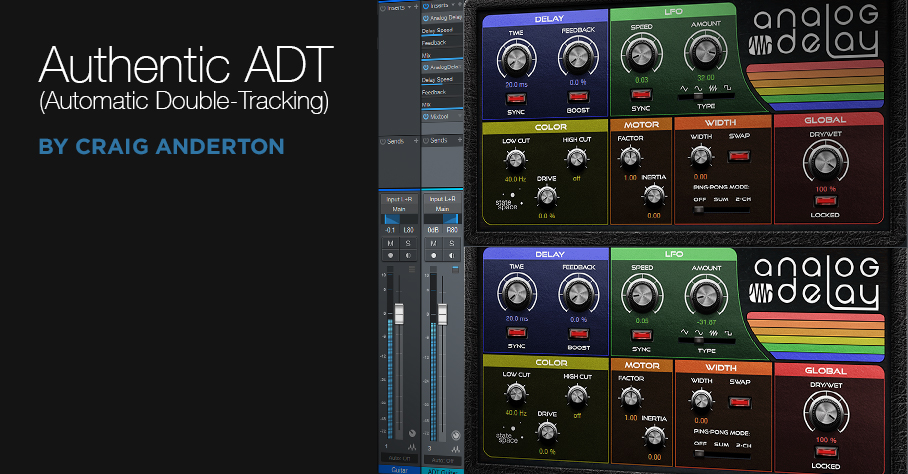
Authentic ADT (Automatic Double-Tracking)
Double-tracking is the process of recording the same part a second time, and trying to duplicate the original part as closely as possible. The goal is to make a part sound bigger, more prominent, or (with mono instruments), create a stereo image from the two tracks.
Spoiler alert: humans aren’t perfect. When playing the second part, there will be slight timing, and perhaps pitch, variations. Within reason, these variations are good, because they keep the part from sounding like the original part was just copied to another track. However, sometimes it’s difficult to play a second part that’s tight enough, especially with something like a complex or fast lead guitar part. The usual solution is to do electronic doubling using an effect, like Studio One’s Chorus/Doubler.
However (at least to my ears), electronic doubling has never sounded quite the same as actually double-tracking a part. So here’s a different approach that I find more satisfying, and closer to “the real thing.” It requires copying the original track, processing it as described in this tip to create the doubled sound, then mixing the processed track with the original track. The audio example plays the original track, then the doubled version using this technique.
I wasn’t planning to do an effects chain, because the Analog Delay settings in Fig. 1 are pretty foolproof. In fact, unless you want to explore the options brought out to the control panel, just insert the FX Chain, and carry on with your mixing or recording.
Figure 1: Analog Delay settings for the Authentic ADT effect.

How It Works
To give a more randomized effect, there are two delays (delayed sound only) in series, set for the same initial delay time, but modulated at different LFO rates. So the longest, and shortest, delays happen only when the maximum deviations of the two LFOs coincide. Otherwise, the delay changes constantly, in a somewhat non-periodic way.
But the “secret sauce” is using this on a track dedicated solely to producing the ADT effect. One of the problems with electronic ADT is that the variations can never be ahead of the original, or at the same time—they can only lag. Real double-tracking doesn’t work that way. Sometimes the player will hit a little ahead, sometimes a little behind, and sometimes right on the beat.
To solve this issue, suppose your initial delay setting 20 ms, as in Fig. 1. Because there are two delays in series, this means the total initial delay setting is 40 ms. Move the copied, doubled track 40 ms ahead (earlier) on the timeline. Now the initial delay isn’t delayed compared to the original track, so as the delay time varies, it can lead or lag the original part. (Moving the doubled track ahead by 20 ms acts more like an electronic doubler, where the doubled part always lags, or plays at the same time as, the original.)
Initial delay time settings of 13 to 25 ms work well. For whatever value you choose, move the original track ahead in time, compared to the original track, by twice the amount of the delay time setting.
The Macro Controls Panel
Fig. 2 shows the Macro controls panel. These parameters have been constrained to what I find to be useful settings.
Figure 2: Control panel for the Authentic ADT FX chain.

The maximum delay is 25 ms because remember, there are two delays in series so this can go as high as 50 ms. If this amount of delay happened all the time it would be perceived more like slapback echo, but happening on occasion adds to the realism.
Depth and Rate are to taste. I generally adjust them to give a minimal flanging effect in case the original and doubled tracks end up being summed to mono at some point. However, that’s a worse-case scenario. This technique is designed for a cool stereo effect, with the original and ADT tracks panned oppositely (not necessarily full left and right, just oppositely).
Mod Shape affects only one of the delays, but is interesting. A sawtooth shape, with the other delay being modulated by a sine wave, may give good results if the audio isn’t too continuous. Square can be useful with very low Width settings, but you’ll probably get more use out of sine or triangle wave modulation.
So go ahead—download the FX Chain! I think you’ll agree it gives a more authentic ADT sound.
DOWNLOAD THE AUTHENTIC ADT FX CHAIN
RMB Justize: Music Of The (PreSonus) Sphere
Discovering new sonic universes to explore is what being a musical artist is all about!
Let’s dive into RMB Justize’s discussion about his worlds of sound, and how he does it all with PreSonus Sphere:

“Versatility and persistence are a deadly combination of characteristics. They are much-needed weapons to have in an artist’s arsenal.”
Based in Chicago, IL with ties to the DMV area… Taylor Gang’s in-house producer Ryan “RMB Justize” Baker grew up in a musical household, his mother being a classical violinist for the Chicago Sinfonietta, exposing RMB’s ears as early as six years old.
“I caught the music bug from Mom, for sure. I remember turning 11 or 12 and having nothing but a voice recorder and a Yamaha DJX keyboard. Skateboarding was the thing back then, with influences ranging from Sum 41 to Incubus to The Neptunes and Noreaga. A couple of years later I finally dove into making music with computers, using every piece of software I could get my hands on until now. But… then came PreSonus Studio One, which changed it all for me.
“The interest came from an artist I worked with at the time—he wouldn’t stop mentioning it! After spending countless months into years on ProTools, FL Studio and Reason, I wanted a program that could do it all. I’m a religious template maker, as most are, so the workflow determines the imagination most if not all of the time and Studio One takes care of the madness with ease. Let’s just focus on the music and pushing envelopes more than finding where to click certain stuff. PreSonus did it right, ranging from AudioBox interfaces I’ve owned in the past, all the way to the new Quantum which gives me more than enough power to control the room.”
Since the premiere of Studio One version 5 in July of 2020, RMB has become a power user… eventually convincing a few fellow producers and artists to try it, if not make a full switch.
“There have been times where I’ve walked into big label studio sessions and people look confused because they’ve never seen Studio One in person! Once I show my way of doing certain things, using certain plug-ins in certain ways, they’re overly surprised. It’s hands-down the fastest program, which lets me flex my mind-work and turn my rough thoughts (even voice notes) into full records. I’ve had people come to my studio for sessions and look surprised when they ask why I use it. You have to try for yourself to find your workflow.”

Honorably noted, PreSonus Sphere has made his processes for online collaboration, recording, mixing, and mastering an album-quality one-stop-shop, helping the migration become a breeze. Especially during times of a pandemic where people can’t communicate like they normally would, it’s a necessity.
“I think all DAWs should have an ecosystem such as PreSonus Sphere, whether you’re just getting started or an A-list musician. The tools available make it seamless to share files and keep up to date on things like deadlines and most recent notes/mixes, rather than scrambling through emails and hard drives (which we can all relate to, I’m sure). Having that system in one spot, one site, one page, actually kept me in line when finishing a label record and staying up to date without confusion.” (Chevy Woods—Since Birth)
Recently focusing more on production and audio engineering as well, the AAF import feature has been a godsend.
“I still find myself walking people through how to convert sessions to AAF rather than tracking out. There is no other program that will line the session up identically with automation and fades, to say the least, which saves more time than I expected. That’s just a small piece of my realization, of how capable this DAW is. Cheers, PreSonus!”
Since the start of the COVID-19 pandemic, RMB’s main focus is to create cutting-edge music, knowing he has the perfect DAW to do so, with no issues.
RMB Justize @ PreSonus Sphere
The Filter Shape Shifter

Ah yes…the good old days. When tape cost a week’s salary, you had to clean your recorder’s tape heads and capstan every day, and worst of all, there was no undo. And I had to make fun effects by laboriously breadboarding parts, soldering, and deciding what tradeoffs to make because an effect with 26 controls and 12 switches wasn’t really viable.
But now we have Studio One so we don’t have to mess with tape, and FX Chains, so we can make our own crazeee multieffects without having to solder anything! Which brings us to this week’s tip.
Back in the 70s, sample-and-hold effects from synthesizers were a big deal. This effect synched to tempo, and stepped through a resonant filter. Its cutoff frequency changed on the beat, and held until the next beat, at which point it changed to a different random cutoff frequency. I always liked that effect with guitar, and thought it would make a good Friday Tip, along with a companion, downloadable FX Chain. But I got carried away…check out the audio example, with guitar, bass, and drums.
Fig. 1 shows the FX Chain basics. The chain splits the stereo input by channel, into two Autofilters. These are modulated by their LFO step sequencers, which sync to the beat. The filters are before Ampire, so they alter the distortion character in a more subtle way than they would if they followed Ampire.
Figure 1: The Filter Shape Shifter “block diagram.”
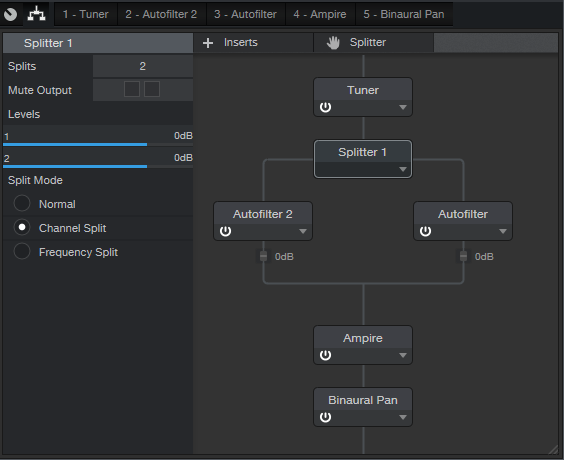
Here’s the story on the Macro Controls (Fig. 2).
Figure 2: Macro controls for the Filter Shape Shifter FX Chain.
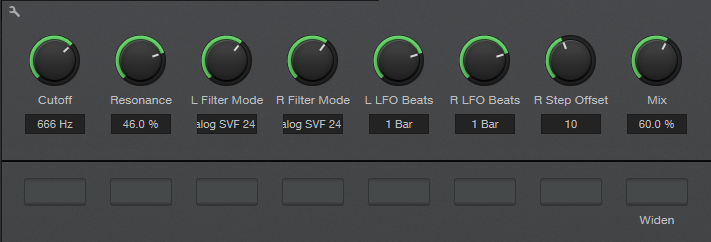
Cutoff and Resonance are “master” controls for both filters. The Filter Modes choose the filter types for the left and right Autofilters, while the two LFO Beats controls choose the rhythmic sync for the left and right LFOs.
R Step Offset is a bit unusual. It changes the values for all of the right LFO’s steps except for 1, 4, 8, and 12. Automating this parameter and varying it can add a considerable amount of variety to the sound, but keeping a constant, relatively high filter frequency on steps 1, 4, 8, and 12 maintains the beat.
Mix changes the wet/dry mix for both filters, and Widen enables a Binaural Pan when you want a wider stereo spread. And you know you want it.
Do check it out, and have fun warping your guitar-meets-Ampire sound!
DOWNLOAD THE FILTER SHAPE SHIFTER FX CHAIN HERE