Category Archives: Uncategorized
Andrea Bocelli and Studio One at the Top of the Billboard Charts!

“In 2017, I was invited by Pierpaolo Guerrini of PPG Studios to be a part of the preproduction of Sí alongside guitarist Daniele Bonaviri,” he continues. “The album production was given to the great producer Bob Ezrin who’s worked with Pink Floyd, KISS and Peter Gabriel.”

“We met several times in my studio—JGRStudio in Rome—and Pierpaolo’s Studio PPGStudio in Tuscany for the sound design process with Studio One and Pro Tools. During these sessions, I recorded all the acoustic guitars and sound design for the pre-production process of several tracks on the record. I also used Studio One for drum editing for some yet-unreleased acoustic versions… and we were quite impressed by how fast and accurate drum editing with Studio One is.”
“So now, Studio One is officially our DAW of choice and the most active in PPGStudio—Andrea’s main recording studio. It’s been an honor to work with Bob Ezrin, and I’m so proud to work with Andrea Bocelli, the most famous singer ever.”
Follow Jurij on Facebook here!
Join the Studio One Family here!

Learn how to use your ATOM Pad Controller!
Check out the latest videos about our hottest product this year the ATOM!
Learn more about the ATOM here:
https://www.presonus.com/products/ATOM
Friday Tip of the Week – EZ Squeez: the One-Knob Compressor!
Sometimes you just want a compressor that’s quick and easy. Maybe you’re tracking and need to compress the vocals, or hear what the bass will sound like when you add some compression on mixdown. But you know what happens—you adjust the threshold, and then the ratio, but now realize you need to re-adjust the threshold, which means the output gain needs adjusting…and maybe the knee…
If you have a bunch of ready-to-go presets, great. But here’s another option: The EZ Squeez compressor. It uses an FX Chain macro to alter six compressor parameters at once, so that a single knob sweeps from no compression, to some compression, to compression that’s more like a guitar sustainer stompbox. Although there’s a downloadable preset, I’d recommend reverse-engineering this to learn the power of the FX Chain’s Macro Controls. The principles used in this FX Chain apply to many other processors.
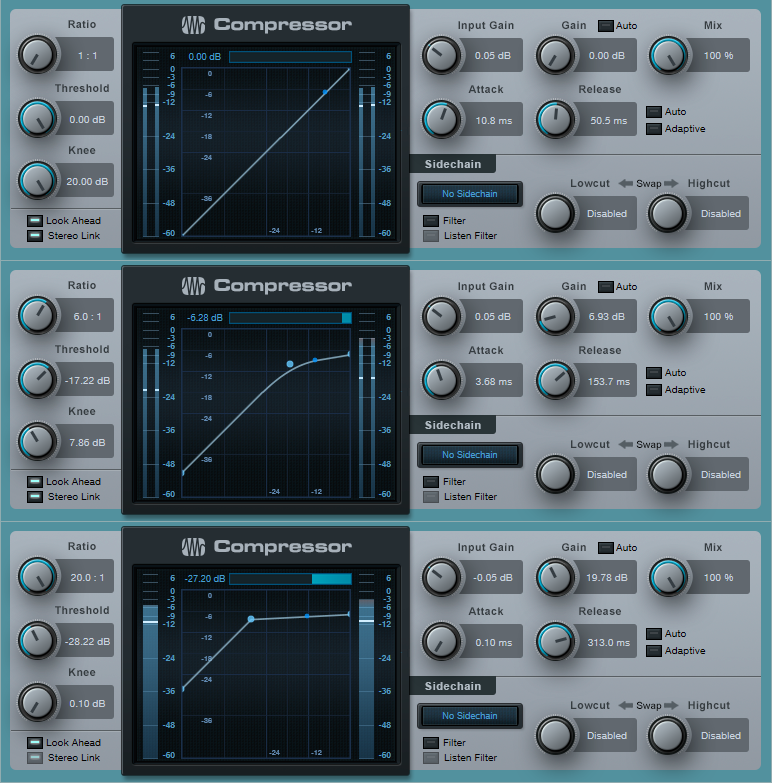
Figure 1: Three different Macro Control settings.
Figure 1 (top) shows the compressor settings with the EZ Squeez knob turned all the way counter-clockwise (minimal compression). As you turn up the EZ Squeez control, the Ratio, Release, and Gain increase, while the Threshold, Knee, and Attack decrease. The middle image shows the EZ Squeez knob turned up about 60% of the way. Turned up all the way, the parameter values become more extreme, as shown in the lower part of the screen shot.
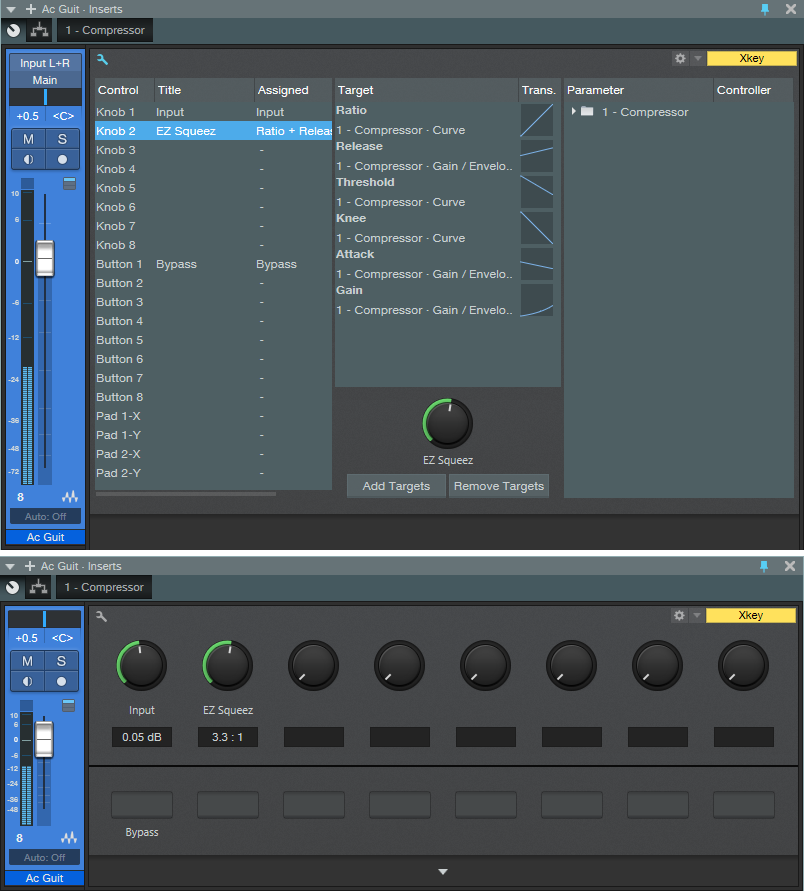
Figure 2: (Top) Macro Controls parameters and (bottom) Macro Controls interface.
Figure 2 shows the Macro Controls. Rather than expose the control settings, it’s easier just to download the Multipreset, and then click on the curves for yourself. Note the curves on the Gain and Release parameters. Given that there’s only one node on the curve you can’t get too sophisticated, but these are close enough to give a fairly even response as you move the knob from fully counter-clockwise to fully clockwise.
Because compressors are so dependent on the input signal level, I did cheat on the “one-knob” concept and added an input level control. This allows trimming the input level so that it falls in the compressor’s “sweet spot.” There’s also a bypass button so you can compare the compressed and uncompressed sounds.
As to applications, you’ll probably find that EZ Squeez knob settings of 30% to 65% will work for a variety of signal sources. Past that point, the compressor gets into a more extreme territory that pumps mixed drums, and acts more like a sustainer for guitar. But it’s easy enough to find what works the best—just turn the knob until the compression sounds right. After all, that’s the whole point!
Download the EZ Squeez.multipreset
Friday Tip: Delay-Free Stereo from Mono
After a recent tip on how to extract two mono tracks from a stereo track, one of the comments asked for how to convert mono into stereo. Well, we aim to please…so here’s one option.
A common way to create stereo from mono is by duplicating the track, delaying one of the tracks compared to the other, and panning them left and right. However, this approach has two problems. First, you might not want a delay. Second, when you collapse the signal back to mono, there will likely be partial cancellation due to phase differences. The method we’ll cover here not only produces stereo imaging from a mono source, but collapses perfectly to mono. It works with pretty much any instrument, but is most effective with instruments that play chords (for example, try this on acoustic guitar—it works well).
Console Setup
Create two buses. One of these will become the left channel, and the other, the right channel. In your mono source track, create two pre-fader sends (one for each bus). Turn down the mono source’s fader.
Multiband Dynamics Setup
Insert a Multiband Dynamics into one of the bus inserts. Solo the bus with the Multiband Dynamics. Click on “Edit All Relative” and set the Ratio control to 1.0. This will set all bands to a ratio of 1.0, which converts the Multiband Compressor into a multiband EQ.
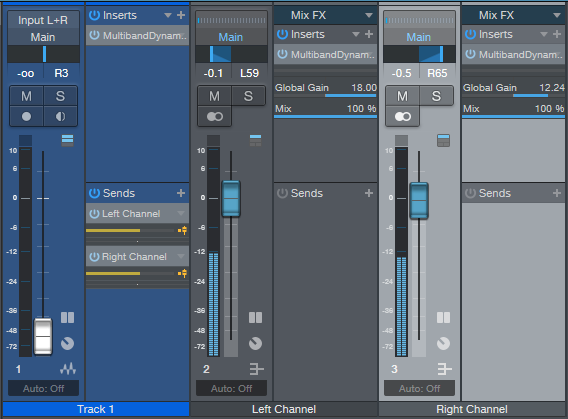
Play the track you want to convert to stereo. Solo each band in the Multiband Compressor, and adjust the frequency sliders to divide up the frequency response evenly over the five bands (the screen shot shows frequencies selected for dry electric guitar). Mute bands 1, 3, and 5.

Next, drag the Multiband Dynamics into the other bus’s Inserts slot. For this bus, mute bands 2 and 4 instead of bands 1, 3, and 5, then pan the two buses left and right. Now the frequency responses are equal and opposite for the two buses. Voilà! Stereo! (Note that you probably don’t want to pan the buses too far to the left and right, because the stereo effect will be unrealistically exaggerated—as in the audio example. But it does get the point across.)
We’re not done yet, though. The levels of the two buses will be fairly low because with only two or three bands, the output level will be down quite a bit. Turning up the bus faders may be sufficient to compensate, but if not, turn up the Multiband Dynamics processors’ master Gain controls (not the per-band Gain controls). Feel free to play around with the pan and Gain controls to achieve the desired sonic balance. Also, no law says you need to mute every other band. For example, you might want a bassier sound on the left by muting the three upper bands, and a brighter sound toward the right by muting the two lower bands.
Finally, note that when you toggle the master bus from stereo to mono, the sound collapses to mono without any funky phase interactions. Done!
PreSonus Giveaway on May 22! #PreSonus4Ever
 We’re hosting a FREE webcast this Tuesday with some preeeeeetttty huge news! We’re excited to share with y’all.
To celebrate, we’re giving away a FaderPort 8 to one lucky entrant during the broadcast! That’s a $500 USD value!
Here’s how to enter:
- Must be following PreSonus on Facebook and/or Twitter.
- Share the Live Webcast to your personal Facebook feed or Tweet the YouTube Link during the broadcast.
- Include #PreSonus4Ever in your post.
And that’s it! You’re entered. One winner will be drawn at random and notified directly on May 22 at 2 pm CST. Contest open globally. Webcast starts at 10 am CST on May 22, 2018 on Facebook and YouTube. TUNE IN!
Using the FaderPort 8 with Neil Zaza
Neil Zaza is a career guitar virtuoso who recently took some time out of his schedule to discuss his personal workflow with the PreSonus FaderPort 8 controller. He covers everything from set up to plugins to automation, he goes deep and covers it all! For your enjoyment, we complied the full series into one playlist here. Check it out and enjoy!
For more on the FaderPort, click here!
For more on Neil, click here!
Friday Tip of the Week: Get Your Kicks with Kick Drum Replacement
I admit it…I’m very picky about kick drums. But I also like using drum loops, so I often want to replace the kick. Fortunately, it’s not hard to do with Studio One, and you don’t need a dedicated drum replacement application to do it.
In this example, the audio track with the drum loop (Acoustic Verse 2 in the screen shot, toward the left) has two pre-fader sends. One goes to the Main Drums bus, which carries the drum loop audio. The reason for having a separate bus with the drum audio (and for turning down the original drum audio track) is because we want to reduce the level of the loop’s kick as much as possible. So the loop’s audio has two Pro EQs in series—both set to 48 dB Low Cut at around 100 Hz—to create a super-steep slope and get rid of most of the kick.
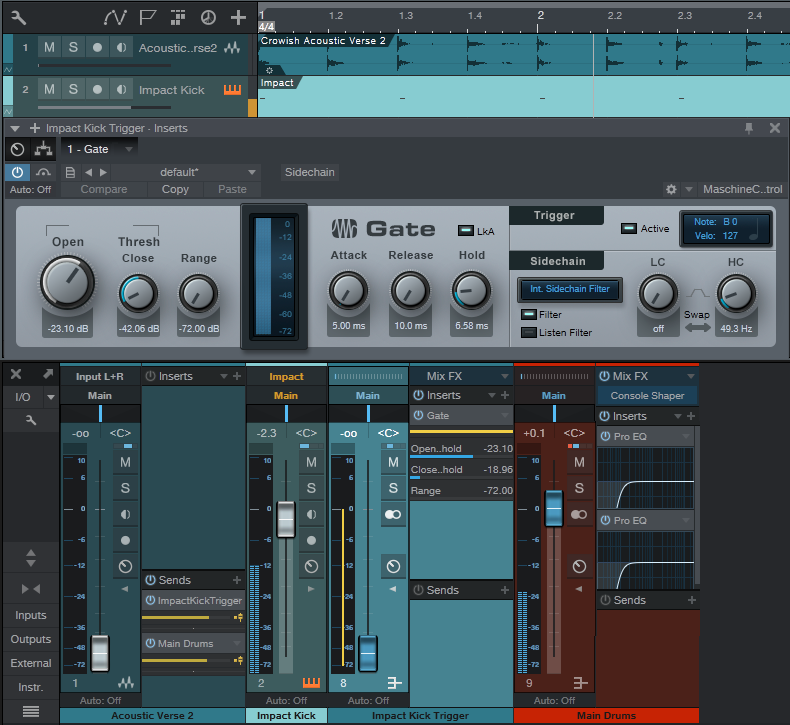
The other send goes to the Impact Kick Trigger bus, which exists only to hold a Gate (that’s why the bus fader is all the way down—we don’t want to hear the audio). To isolate the kick for triggering, turn down the Gate’s HC control so that the Gate responds only the lowest frequencies where the kick drum lives. Whenever the Gate opens, it can send out a MIDI note with your choice of note and a fixed velocity (you’ll have to add any dynamics yourself), and an instrument track can respond to that note. I set up an instance of Impact with a suitable kick drum, and assigned the Gate trigger to it. So, Impact provides the replacement kick drum sound and the Main Drums bus has the original drum loop without the kick. You can listen to the kick in real time as you trigger it, but you can also record the MIDI trigger in the instrument track.
The only caution is that the Gate parameter settings for Threshold and Attack/Release/Hold are critical for reliable triggering. For example if there are 16th-note kicks, you have to make sure that hold is short enough to allow retriggering; and you want Threshold high enough to it’s triggered only by the kick.
There are many variations on this theme…you may want to double an existing kick with the kick replacement, rather than reduce the original kick’s level as much as possible, or use the Pro EQ Low Cut filters to take out only the very lowest frequencies, so the original kick provides the higher-frequency beater sounds…whatever sounds best.
Of course if the drums are on individual tracks, then it’s easy to replace the drum sounds. But even with a mixed drum loop, it’s often possible to isolate at least the kick and snare to give drum loops a whole new character.
It’s #PreSonusFAMFriday with John Bastianelli!
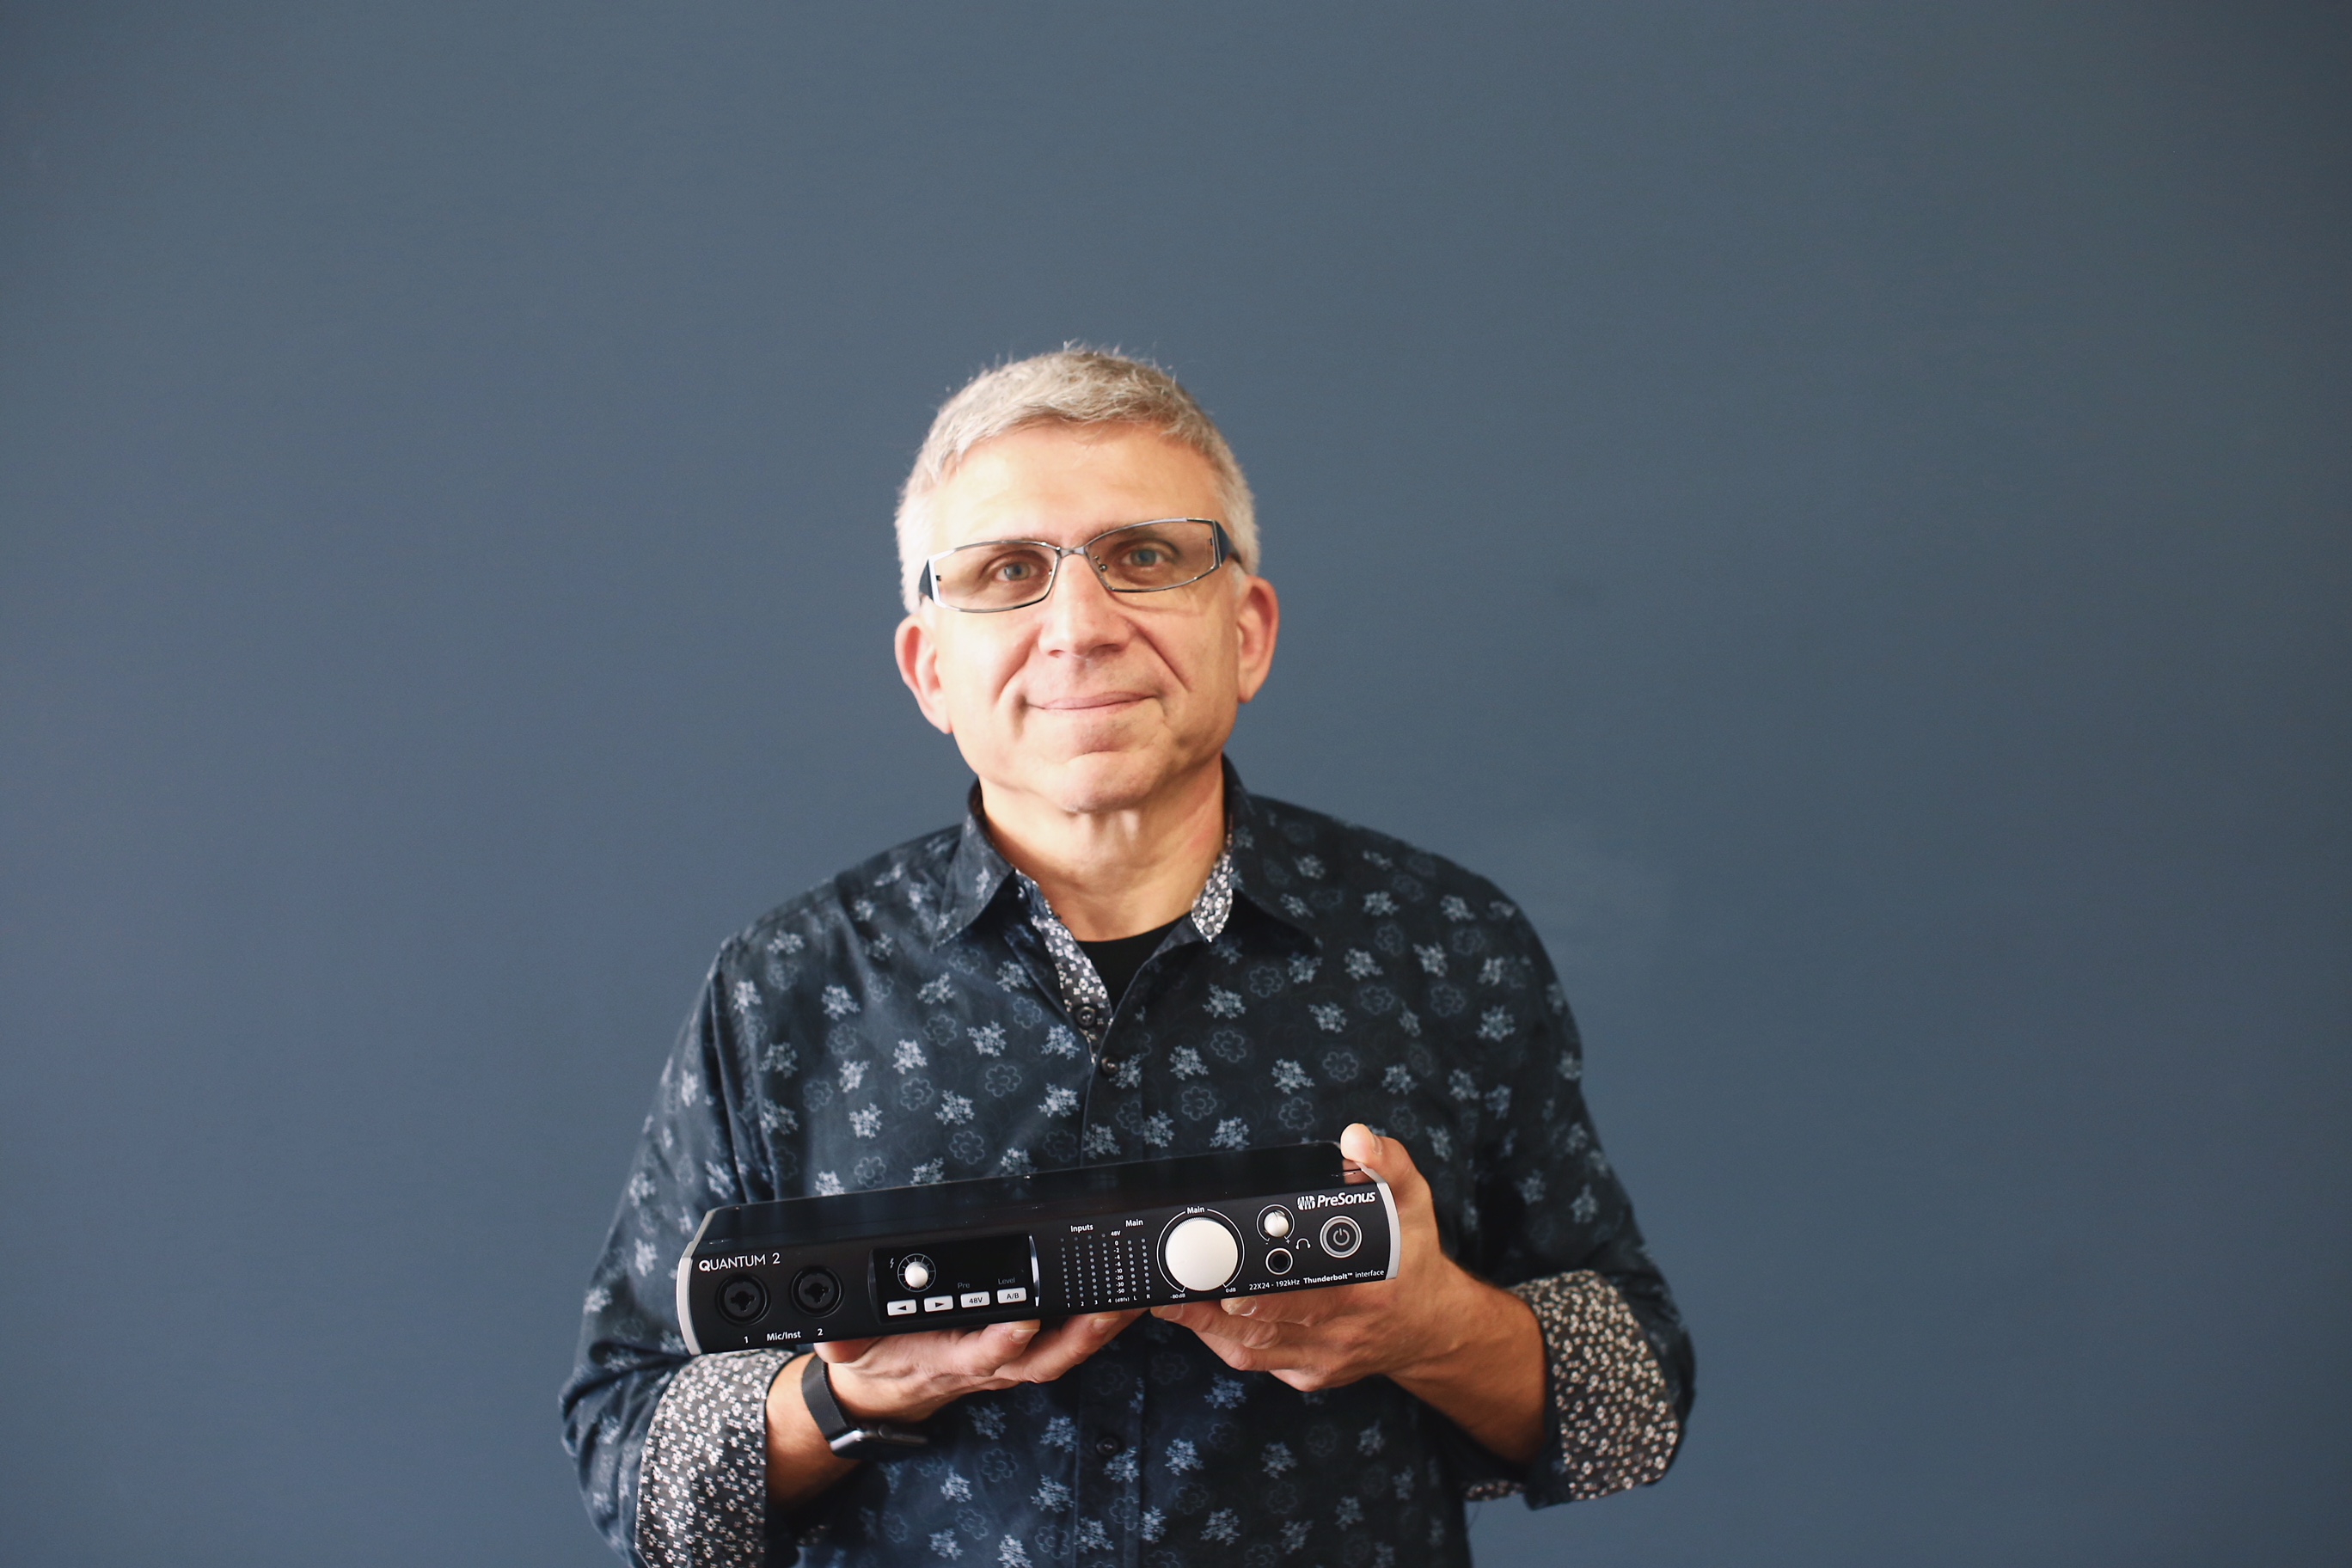
The one and only John Bastianelli combines talent, charisma, drive, fun, smarts and know-how perfectly here at PreSonus! Thankfully so–he’s one of the masterminds behind the Quantum 2 and he’s here to tell us all about it! It’s #PreSonusFAMFriday with John Bastianelli.
What’s your favorite thing about your job? Why did you choose to work here?
It was a vinyl record actually: John Coltrane’s Blue Train.
“Every Breath You Take,” Police. I always like to belt out the bridge as I sing like crap and totally annoy everyone straining to hit those high notes, that’s the purpose of Karaoke as far as I’m concerned, right? 😉
Everyone has a side gig, what’s yours?
Playing, producing and writing music.

I’ve been involved in product development for many years and the Quantum is by far the best audio interface I’ve ever worked on/with and slept with at any price point! 😉 The sound quality, ease of use, and lack of latency has finally made working “inside the box” as easy as the old days of analog recording. It doesn’t get any better this. This one product has inspired me to get back into making music again, even when I get home after a 12 hour day at the office, it calls my name from afar!
Why did you choose this as your favorite?
Simply put, this product inspires me to be creative, makes me want to make music and sounds amazing—recording an alto saxophone can be difficult as there are a lot of high frequencies that are difficult to reproduce/capture unless you have high quality mic pres and converters, the Quantum and Quantum 2 capture my sound perfectly and makes me sound great. I practically like the Quantum 2 because of the size and portability and I don’t need more than 4 mic pres.
Got any tips for working with the Quantum 2?
 Plug it into your Thunderbolt port, open Studio One or your favorite app and hit record, then watch what happens!
A Thunderbolt Flux Capacitor… Super exciting!
Connect with John on LinkedIn here!
Learn more about the Quantum 2 here!
It’s #PreSonusFAMFriday with Chris Hare!
When you think of IT guys, you don’t always think of the coolest guy in the office. WELL NOT AT PRESONUS! Let us introduce you one of the most talented, coolest, laid backest dudes on the block, Chris Hare.
It’s #PreSonusFAMFriday with Chris Hare!

Joe vs. The Volcano.
What was the first 8 track, cassette, CD or digital download you purchased?
The Bee Gees Greatest Hits on cassette. I have fond memories of riding in the back of my parents station wagon in the late 70’s listening to all sorts of disco music. You could say it’s my “happy place”.
Who’s your go to band or artist when you can’t decide on something to listen to?
Pat Metheny.
I’m a sucker for a melody so anything by Burt Bacharach & Hal David.
Everyone has a side gig, what’s yours?
Playing guitar for whoever I can trick into listening to me.
I’m blown away by the plugins that come right out of the box with the new Series III mixers. Once I saw we were doing a single rackspace 16 channel model, I realized that I can use it for my acoustic/nylon string guitars as well as my guitar synth. I’m able to replace a solid state preamp/channel strip, stand alone noise gate, vintage hardware reverb, and a line mixer with just a 1u SL III 16r.
Why did you choose this as your favorite? 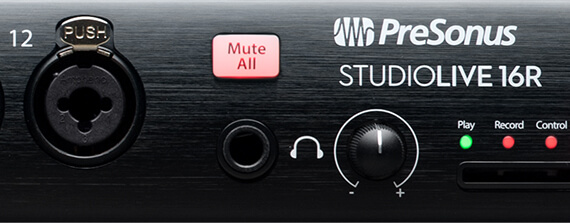
If anybody knows anything about me, it’s that I’m a HUUUUGGGGE Pat Metheny fan and have been really drawn to his style of playing and his use of timbre and effects. As such, the reverb sound is crucial to getting a great amplified nylon string tone and the plugins on the new Series III mixers really nail it perfectly. Add in the other vintage modeling of plugins for the compressor and EQ and you’ve got a sound that you used to need a big studio desk and special hardware effects to achieve.
Tell us about a successful event you worked with PreSonus products. InfoComm, NAMM, Install somewhere….
My favorite events have been the PreSonusphere events, where we would have users come to Baton Rouge for a few days of intensive workshops and master classes. It was great experience and always interesting to meet the end users and hear about how they used PreSonus products and get their feedback and suggestions first hand.
Got any tips for working with the StudioLive Series III 16R?
As I’m using in a more unconventional fashion as really a processor for my acoustic guitars, I would say try to find unique ways that you can incorporate it into your rig or setup. It’s a very flexible product and I’m sure there are musicians who are going to find things to do with it that we never thought of.
Just trying to continue to grow as a musician and play with other musicians who inspire me whenever I can. I keep saying I’m going to use our glorious studio here at the PreSonus Mothership to record a jazz trio record sometime and maybe this will be the year.
It’s PreSonusFAMFriday with Stevie Meranta!

2 years.
What was the first 8 track, cassette, CD or digital download you purchased?
The Black Parade, My Chemical Romance.
Who’s your go to band or artist when you can’t decide on something to listen to?
Anything by Journey or Queen.
Everyone has a side gig, what’s yours?
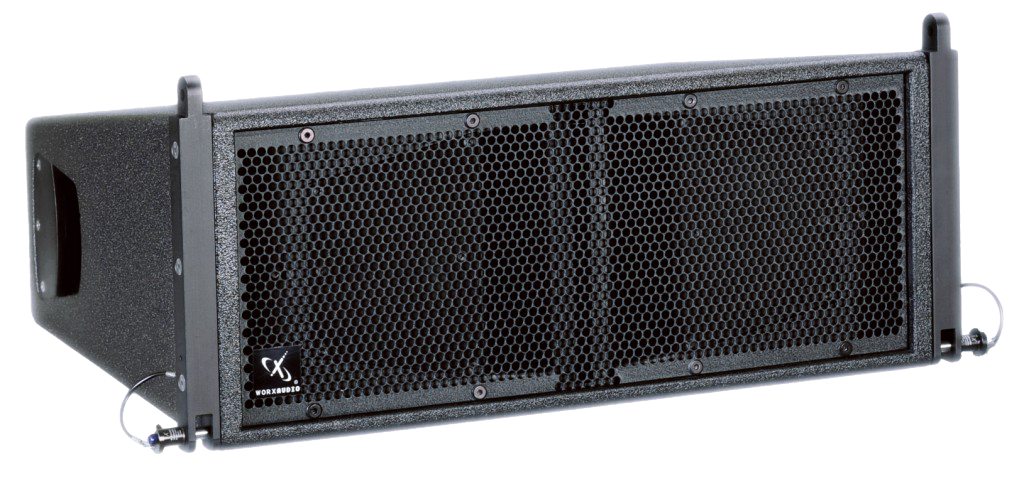
What do you love about the WorxAudio XL1?
The clarity of the box is amazing. I also love the 160 degree coverage pattern of the horn so it covers such a large area. The DSP is very simple to use for tuning.
Why did you choose this as your favorite?
They are wonderful to mix onand so feature and performance packed. Its hard not to love them!
What all PreSonus products do you use?
Got any tips for working with the XL1 ?