Category Archives: Studio One
Friday Tips: How to Normalize Comped Takes
Comping’s goal is to piece together the best parts of multiple Takes (vocals, guitar, etc.) into a single, cohesive part. This involves Studio One’s loop recording, which repeats a section of music over and over during a looped section. You record another Take during each pass, while previous Takes are muted. Doing multiple takes without having to stop lets you get comfortable, and try different approaches. Once you have multiple versions, you audition and select the best sections.
However, when auditioning the Takes to decide which sections are best, it’s helpful to compare levels that are as similar as possible. Normalization is the right tool for this—but while it’s not yet possible to normalize individual Takes, there’s a simple solution.
- Right-click on the main, parent Track for the Takes and choose Unpack Layers to Tracks (Fig. 1).

Figure 1: The four Takes right immediately below the parent vocal have been unpacked into four Tracks (color-coded blue).
- Next, select all the audio in the new Tracks.
- Type Ctrl+B and then Alt+N. This normalizes all the Tracks.
- Right-click on each Take’s audio and choose Delete (do not delete the Take itself; see Fig. 2).
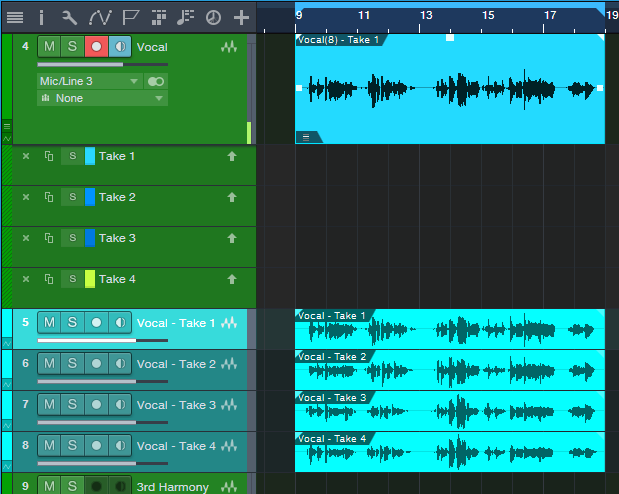
Figure 2: The Takes have been deleted. The four normalized tracks are below.
- Select the audio in the new Tracks.
- Drag the audio from the new Tracks up, so that they replace where the Takes were (Fig. 3).
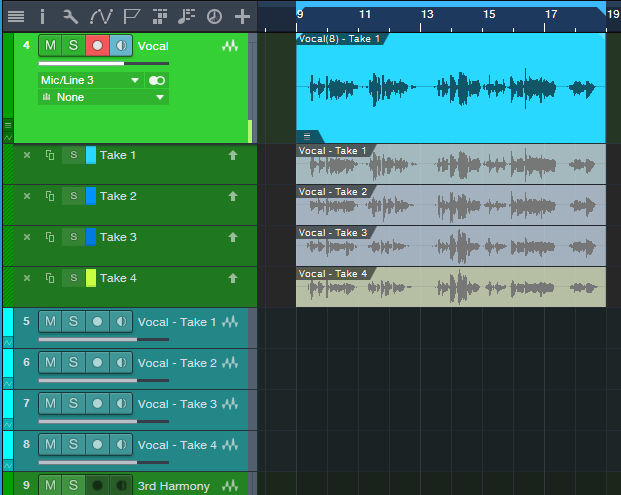
Figure 3: The normalized Track audio now occupies the Take Lanes.
- The empty Tracks are no longer needed, so remove them.
- And that’s all there is to it—now you can take advantage of Studio One’s Take-oriented comping tools, as well as the Listen tool (keyboard shortcut 8), with normalized audio.
PreSonus Weekend Rundown
It’s been a busy week. Let’s rehash the important stuff you may have missed.

This is a fun one going on with our friends at Splice. Mix “Nobody’s Gonna Love You” into a radio-ready track to win hardware and software from us, the Mixing University course from Recording Revolution, an Eyeball microphone cover, and a call with Briana Tyson.
Friday Tips: The Center Stage Reverb
If you’ve ever played a large venue like a sports arena, you know that reverb is a completely different animal than what the audience hears. You hear your instrument primarily, and in the spaces between your playing, you hear the reverb coming back at you from the reflections. It might seem that reverb pre-delay would produce the same kind of effect, but it doesn’t “bloom” the way reverb does when you’re center stage in a big acoustical space.
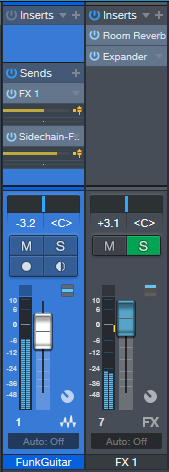
This week’s tip is inspired by the center stage sound, but taken further. The heart of the effect is the Expander, but unlike last week’s Expander-based Dynamic Brightener tip, the Expander is in Duck mode, and fed by a sidechain. Here’s the Console setup.
In the audio example, the source is a funk guitar loop from the PreSonus loop collection; but any audio with spaces in between the notes or chords works well, especially drums (if the cymbals aren’t happening a lot), vocals that aren’t overly sustained, percussion, and the like. I deliberately exaggerated the effect to get the point across, so you might want to be a little more tasteful when you apply this to your own music. Or maybe not…
The guitar’s channel has two sends. One goes to the FX Channel, which has a Room Reverb followed by an Expander. The second send goes to the Expander’s sidechain input. Both are set pre-fader so that you can turn down the main guitar sound by bringing down its fader, and that way, you can hear only the processed sound. This makes it easier to edit the following Room Reverb and Expander settings, which are a suggested point of departure. Remember to enable the Expander’s Sidechain button in the header, and click the Duck button.
The reverb time is long—almost six seconds. This is because we want it going constantly in the background, so that after the Expander finishes ducking the reverb sound, there’s plenty of reverb available to fill in the spaces.
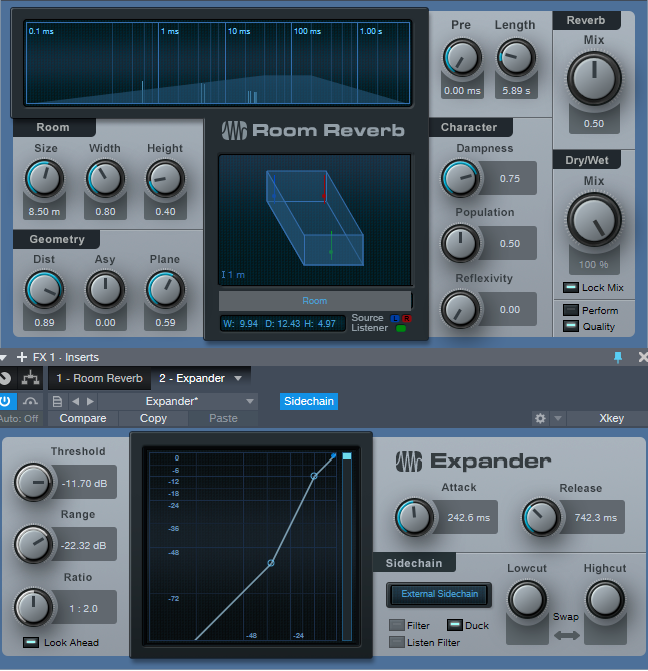
To tweak the settings, turn down the main guitar channel so you can monitor only the processed sound. The Expander’s Threshold knob determines how much you want the reverb to go away when the instrument audio is happening. But really, there are no “wrong” settings—start with the parameters above, play around, and listen to what happens.
This is a pretty fertile field for experimentation…as the following audio example illustrates. The first part is the guitar and the reverb effect; the reverb tail shows just how long the reverb time setting is. The second part is the reverb effect in isolation, processed sound only, and without the reverb tail.
This is a whole different type of reverb effect—have fun discovering what it can do for you!
Introducing the SPARK Collections!
 Introducing the SPARK Collections!
Hit the ground running with the new Spark Collection of loops and add-ons from PreSonus! These low-priced loop packs are a great place to start making music for less. These professional, royalty-free tracks are a great source of inspiration for starting a new song, learning how to mix, or adding a little flavor to your existing compositions. We’ve launched Spark Collections with a whopping 35 packs… with many more to come!
Everything from trap, reggae, pop, and sound FX are available in the Spark Collections – for just $4.95 USD each!
Click here to shop Spark Collections on shop.presonus.com!
PreSonus Symphonic Orchestra has been updated

- key switch assignment in “Orchestral FX KS”, “Orchestral Tuba”, “Tenor Trombone”, “Japanese Bowles”, “Temple Blocks”
- sample mapping in “Harp FX”, “Strings FX”, “Trumpet FX”, “Celli FX”, “Brass FX”, “Flute FX”, “Orchestral FX KS”,
- round robin volume inconsistencies in “Viola – Staccato”
- loop points to “Viola – Arpeggios” (major, minor, diminished)
- layer and release sample volume in “Viola Section”: Staccato, Tremolo, Trill HS, WS
- wrong key switch removed in “Viola Section”: Trill WS
- loop activated in “Viola Section”: Arpeggio minor/major
- layer gain in “Big String Section – Staccato”
- sample start points in “Bass Section – Pizzicato”, “Bass Section KS”
- Uninstall PSO Contemporary Strings.soundset and PSO Classic Orchestra.soundset via the Studio One Browser:
- Go to the browser file tab
- Open the Sound Sets folder in the root
- Locate the Sound Sets mentioned above
- Right-click on the Sound Sets and select “Uninstall”
- Install the new versions:
- In the application menu, select “Studio One Installation…”
- In “My Purchased Items” select the two new Sound Sets of the same name
- Click “Install”
Via web browser:
- Go to my.presonus.com and log into your MyPresonus account
- Go to My Products > Add-Ons
- Locate PreSonus Symphonic Orchestra and click “View more details”
- Download the two new Sound Sets (PSO Contemporary Strings and PSO Classic Orchestra)
- When download is complete, drag the new Sound Sets into the Studio One application window while running
Friday Tips: The Dynamic Brightener for Guitar
When you play an acoustic guitar harder, it not only gets louder, but brighter. Dry, electric guitar doesn’t have that quality…by comparison, the electrified sound by itself is somewhat lifeless. But I’m not here to be negative! Let’s look at a solution that can give your dry electric guitar some more acoustic-like qualities.
How It Works
Create an FX Channel, and add a pre-fader Send to it from your electric guitar track. The FX Channel has an Expander followed by the Pro EQ. The process works by editing the Expander settings so that it passes only the peaks of your playing. Those peaks then pass through a Pro EQ, set for a bass rolloff and a high frequency boost. Therefore, only the peaks become brighter. Here’s the Console setup.
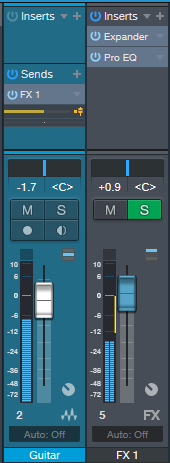
The reason for creating a pre-fader send from the guitar track is so that you can bring the guitar fader down, and monitor only the FX Channel as you adjust the settings for the Expander and Pro EQ. The Expander parameter values are rather critical, because you want to grab only the peaks, and expand the rest of the guitar signal downward. The following settings are a good point of departure, assuming the guitar track’s peaks hit close to 0.
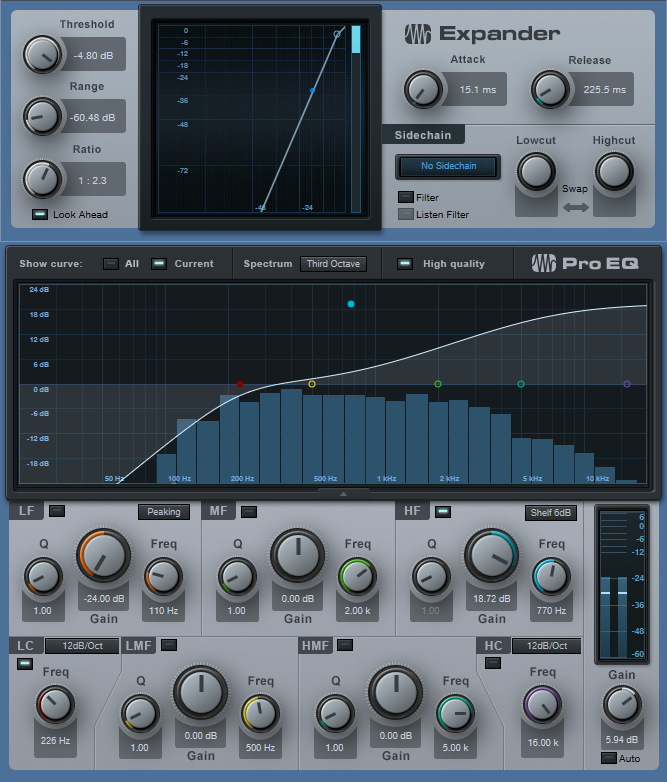
The most important edit you’ll need to make is to the Expander’s Threshold. After it grabs only the peaks, then experiment with the Range and Ratio controls to obtain the sound you want. Finally, choose a balance of the guitar track and the brightener effect from the FX Channel.
The audio example gets the point across. It consists of guitar and drums, because having the drums in the mix underscores how the dynamically brightened guitar can “speak” better in a track. The first five measures are the guitar with the brightener, the next five measures are the guitar without the brightener, and the final five measures are the brightener channel sound only. You may be surprised at how little of the brightener is needed to make a big difference to the overall guitar sound.
Also, try this on acoustic guitar when you want the guitar to really shine through a mix. Hey, there’s nothing wrong with shedding a little brightness on the situation!
Mixing Competition with Recording Revolution, Splice, and Briana Tyson
 We’ve partnered with Splice, The Recording Revolution, and Briana Tyson for a mixing competition!
Practice your chops bringing stems from Briana to life and share your best mixing tips and tricks with the rest of the community! Here’s how it works. Click the link below to visit Splice and download the project files and stems for Once all the mixes are in, Graham from Recording Revolution will listen through the mixes and choose the one he thinks is radio ready to win his premiere mixing course Mixing University, a pair of Eris E66 Monitors and a copy of Studio One 4 Professional, an Eyeball microphone cover from Kaotica, a video call with Briana Tyson, and consideration from Briana Tyson for official release!
Click here to learn more and sign up!
Friday Tips: Crazee Snare Enhancements!
You never know where you’ll find inspiration. As I was trying not to listen to the background music in my local supermarket, “She Drives Me Crazy” by Fine Young Cannibals—a song from over 30 years ago!—earwormed its way into my brain. Check it out at https://youtu.be/UtvmTu4zAMg.
My first thought was “they sure don’t make snare drum sounds like those any more.” But hey, we have Studio One! Surely there’s a way to do that—and there is. The basic idea is to extract a trigger from a snare, use it to drive the Mai Tai synth, then layer it to enhance the snare.
Skeptical? Check out the audio example.
ISOLATING THE SNARE
If you’re dealing with a drum loop or submix, you first need to extract the snare sound.
- Create an FX Channel, and insert a Pro EQ followed by a Gate.
- Add a pre-fader send from your mixed drums to the FX Channel. Aside from providing a more consistent level for triggering, a pre-fader send lets you turn down the main drum track. This way you hear only the FX Channel, which makes it easier to tweak the EQ and isolate the snare.
- With the Gate bypassed, tune the Pro EQ to the snare frequency. Use the LC and HC with a 48 dB/octave slope to provide the preliminary isolation, then use a super-sharp bandpass setting to zero in on the snare frequency (Figure 1). The EQ’s background spectrum analyzer can help by making sure the bar in the range you’re boosting goes as high as possible. In stubborn cases, you may need to double up the bandpass filter with a second sharp bandpass filter.
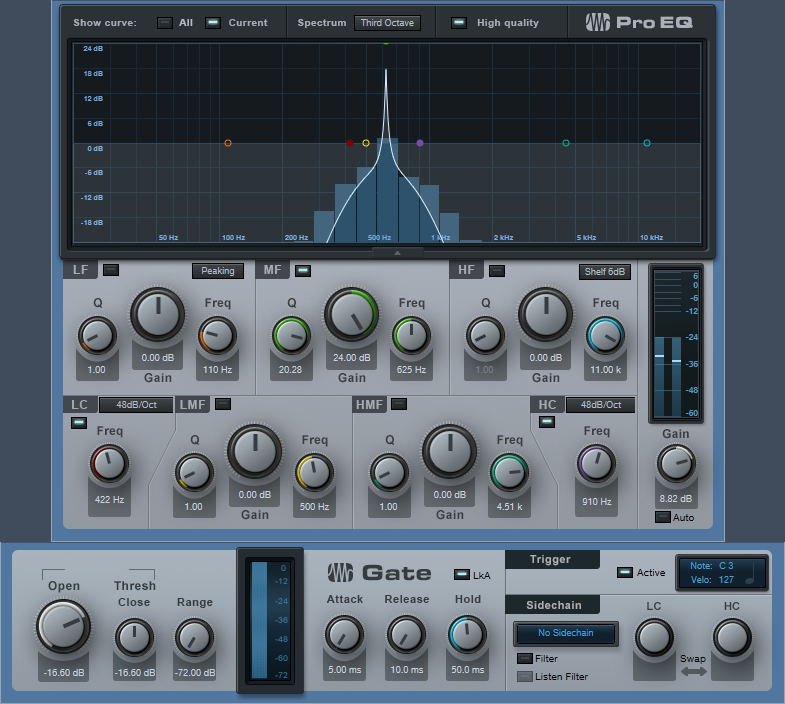
Figure 1: Use the Pro EQ and Gate to extract a snare drum trigger.
- Enable the gate, and click on Active to enable the trigger output. Set the Note and Velocity as desired (however when using noise with Mai Tai, the specific Note isn’t that critical). Adjust the Gate’s settings so that it triggers on the snare hits. Like the Pro EQ, the controls here are critical as well.
- A short attack is usually best.
- Keep release relatively short (e.g., 10 ms), unless you want to mix in some of the peaked/gated sound from this channel along with the Mai Tai and drums.
- Hold times around 50 ms can help prevent false triggering. But you can also get creative with this control. If you don’t want to trigger on hits that are close together (e.g., fills), a long Hold time will trigger on the first snare of the series, but ignore subsequent ones that fall within the hold time.
- Insert the Mai Tai. Set its input to Gate, and enable the mixer’s Monitor button. Figure 2 shows the finished track layout.

Figure 2: Track layout for snare drum extraction.
TWEAKING THE MAI TAI
Now the fun begins! Figure 3 shows a typical starting point for a snare-enhancing sound.
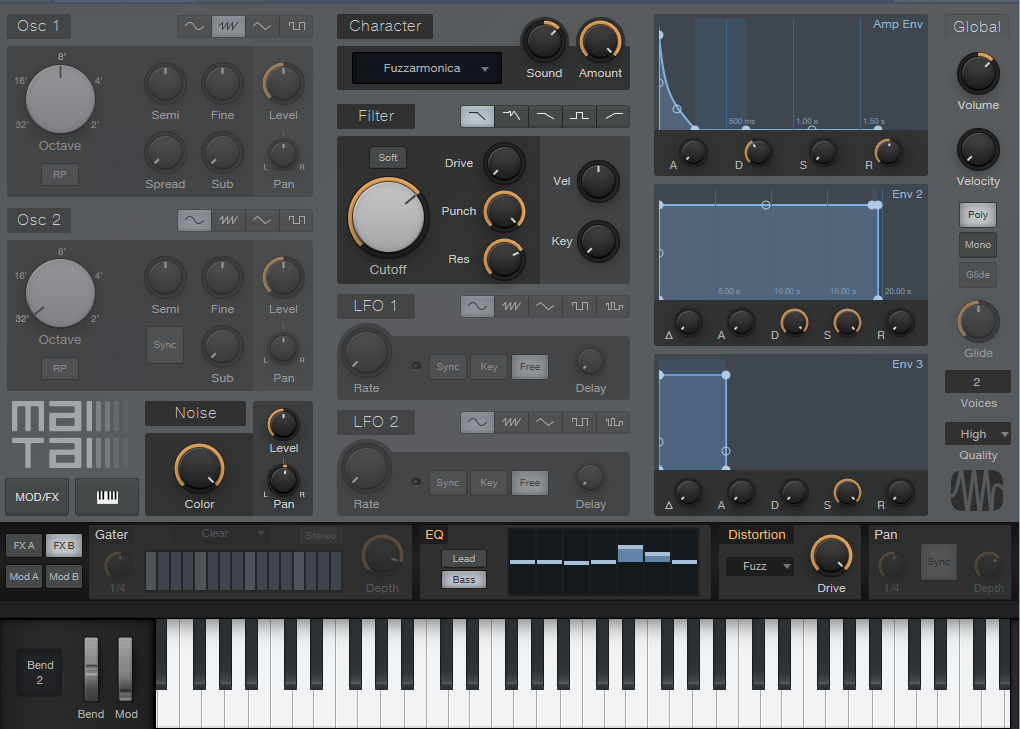
Figure 3: Starting point for a cool snare drum sound with Mai Tai.
The reason for choosing Mai Tai as the sound source is because of its “Character” options that, along with the filter controls, noise Color control, and FX (particularly Reverb, EQ, and Distortion), produce a huge variety of electronic snare sounds. The Character module’s Sound and Amount controls are particularly helpful. The more you play with the controls, the more you’ll start to understand just how many sounds are possible.
BUT WAIT…THERE’S MORE!
If the snare is on a separate track, then you don’t need the Pro EQ or FX Channel. Just insert a Gate in the snare track, enable the Gate’s trigger output, and adjust the Gate Threshold controls to trigger on each snare drum hit. The comments above regarding the Attack, Release, and Hold controls apply here as well.
Nor are you limited to snare. You can isolate the kick drum, and trigger a massive, low-frequency sine wave from the Mai Tai to give those car door-vibrating kick drums. Toms can sometimes be easy to isolate, depending on how they’re tuned. And don’t be afraid to venture outside of the “drum enhancement” comfort zone—sometimes the wrong Gate threshold settings, driving the wrong sound, can produce an effect that’s deliciously “right.”
Friday Tips: The Limiter—Demystified
Conventional wisdom says that compared to compression, limiting is a less sophisticated type of dynamics control whose main use is to restrict dynamic range to prevent issues like overloading of subsequent stages. However, I sometimes prefer limiting with particular signal sources. For example:
- For mixed drum loops, limiting can bring up the room sound without having an overly negative effect on the drum attacks.
- With vocals, I often use a limiter prior to compression. By doing the “heavy lifting” of limiting peaks, the subsequent compressor doesn’t have to work so hard, and can do what it does best.
- When used with slightly detuned synth patches, limiting preserves the characteristic flanging/chorusing-like sound, while keeping the occasional peaks under control.
- Limiting is useful when following synth sounds with resonant filters, or with instruments going through wah or autofilter effects
THE E-Z LIMITER
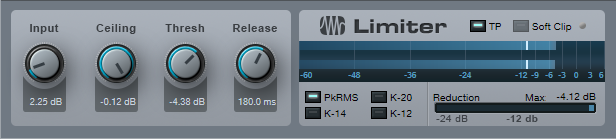
Some limiters (especially some vintage types) are easy to use, almost by definition: One control sets the amount of limiting, and another sets the output level. But Studio One’s limiter has four main controls—Input, Ceiling, Threshold, and Release—and the first three interact.
If the Studio One Limiter looked like Fig. 1, it would still take care of most of your needs. In fact, many vintage limiters don’t go much beyond this in terms of functionality.
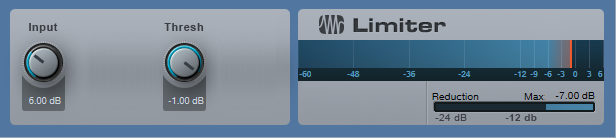
Figure 1: If Studio One’s Limiter had an “Easy Mode” button, the result would look something like this.
To do basic limiting:
- Load the Limiter’s default preset.
- Turn up the input for the desired limiting effect. The Reduction meter shows the amount of gain reduction needed to keep the output at the level set by the Threshold control (in this case, -1.00 dB). For example, if the input signal peaks at 0 dB and you turn up the Input control to 6 dB, the Limiter will apply 7 dB of gain reduction to keep the Limiter output at -1.00.
Note that in this particular limiting application, the Threshold also determines the maximum output level.
THE SOFT CLIP BUTTON
When you set Threshold to a specific value, like 0.00 dB, then no matter how much you turn up the Limiter’s Input control, the output level won’t exceed 0.00 dB. However, you have two options of how to do this.
- With Soft Clip off, gain reduction alone prevents the waveform from exceeding the ceiling.
- With Soft Clip on, clipping the peaks supplements the gain reduction process to keep the waveform from exceeding the ceiling (Fig. 2).
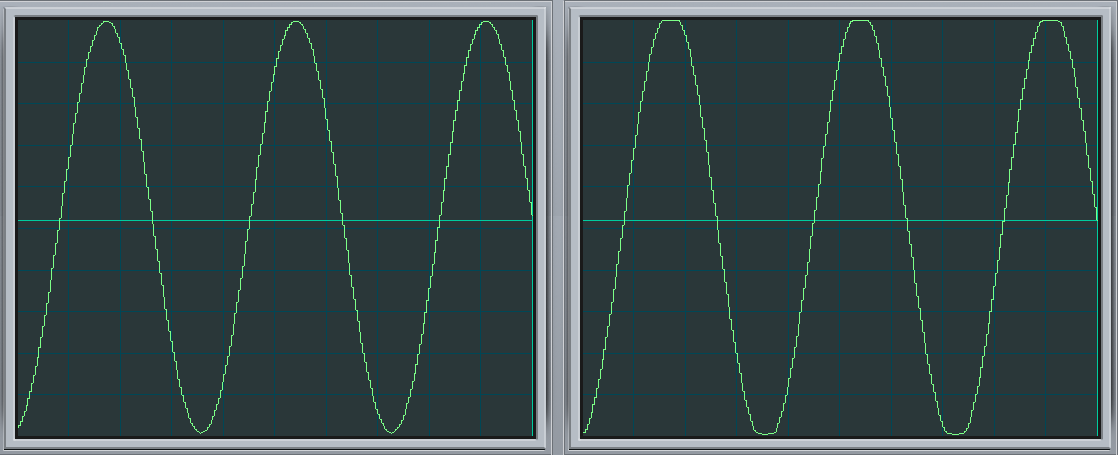
Figure 2: The left screen shot shows the waveform with the input 6 dB above the Threshold, and Soft Clip off. The right screen shows the same waveform and levels, but with Soft Clip turned on. Note how the waveform peak is flattened somewhat due to the mild saturation.
While it may sound crazy to want to introduce distortion, in many cases you’ll find you won’t hear the effects of saturation, and you’ll have a hotter output signal.
ENTER THE CEILING
There are two main ways to set the maximum output level:
- With the Threshold set to 0.00, set the maximum output level with the Ceiling control (from 0 to -12 dB).
- With the Ceiling set to 0.00, set the maximum output level with the Threshold control (from 0 to -12 Db).
It’s also possible to set maximum output levels below -12.00 dB. Turn either the Ceiling or Threshold control all the way counter-clockwise to -12.00 dB, then turn down the other control to lower the maximum output level. With both controls fully counter-clockwise, the maximum output level can be as low as -24 dB.
SMOOTHING THE TRANSITION INTO LIMITING
Setting the Ceiling lower than the Threshold is a special case, which allows smoothing the transition into limiting somewhat. Under this condition, the Limiter applies soft-knee compression as the input transitions from below the threshold level to above it.
For example, suppose the Ceiling is 0.00 dB and the Threshold is -6.00 dB. As you turn up the input, you would expect that the output would be the same as the input until the input reaches around -6 dB, at which point the output would be clamped to that level. However in this case, soft-knee compression starts occurring a few dB below -6.00 dB, and the actual limiting to -6.00 dB doesn’t occur until the input is a few dB above -6.00 dB.
The tradeoff for smoothing this transition somewhat is that the Threshold needs to be set below 0.00. In this example, the maximum output is -6.00 dB. If you want to bring it up to 0.00 dB, then you’ll need to add makeup gain using Mixtool module.
Studio One’s Limiter is a highly versatile signal processor, so don’t automatically ignore it in favor of the Compressor or Multiband Dynamics—with some audio material, it could be exactly what you need.
Friday Tips: Frequency-Selective Guitar Compression
Some instruments, when compressed, lack “sparkle” if the stronger, lower frequencies compress high frequencies as well as lower ones. This is a common problem with guitar, but there’s a solution: the Compressor’s internal sidechain can apply compression to only the guitar’s lower frequencies, while leaving the higher frequencies uncompressed so they “ring out” above the compressed sound. (Multiband compression works for this too, but sidechaining can be a faster and easier way to accomplish the same results.) Frequency-selective compression can also be effective with drums, dance mixes, and other applications—like the “pumping drums” effect covered in the Friday Tip for October 5, 2018. Here’s how to do frequency-selective compression with guitar.

- Insert the Compressor in the guitar track.
- Enable the internal sidechain’s Filter button. Do not enable the Sidechain button in the effect’s header.
- Enable the Listen Filter button.
- Turn Lowcut fully counterclockwise (minimum), and set the Highcut control to around 250 – 300 Hz. You want to hear only the guitar’s low frequencies.
- You can’t hear the effects of adjusting the main compression controls (like Ratio and Threshold) while the Listen Filter is enabled, so disable Listen Filter, and start adjusting the controls for the desired amount of low-frequency compression.
- For a reality check, use the Mix control to compare the compressed and uncompressed sounds. The high frequencies should be equally prominent regardless of the Mix control setting (unless you’re hitting the high strings really hard), while the lower strings should sound compressed.
The compression controls are fairly critical in this application, so you’ll probably need to tweak them a bit to obtain the desired results.
If you need more flexibility than the internal filter can provide, there’s a simple workaround.
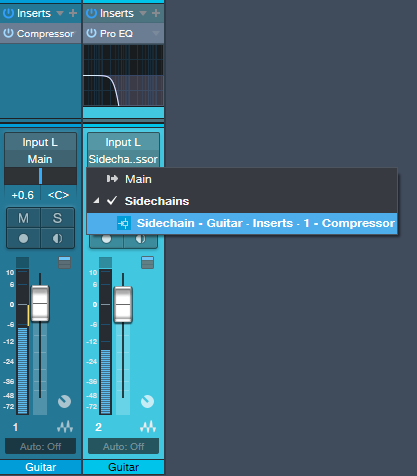
Copy the guitar track. You won’t be listening to this track, but using it solely as a control track to drive the Compressor sidechain. Insert a Pro EQ in the copied track, adjust the EQ’s range to cover the frequencies you want to compress, and assign the copied track’s output to the Compressor sidechain. Because we’re not using the internal sidechain, click the Sidechain button in the Compressor’s header to enable the external sidechain.
The bottom line is that “compressed” and “lively-sounding” don’t have to be mutually exclusive—try frequency-selective compression, and find out for yourself.