Category Archives: Studio One
PreSonus Fam Friday with Perry Tee!
Our Artist & Influencer Relations Manager, Perry Tee (and all around coolest guy in the world) is up for PreSonus Fam Friday!
How long have you worked for PreSonus?
I joined the company in 2012.
What’s your favorite thing about your job? Why did you choose to work here?
Being able to develop meaningful relationships with influential and creatively successful people to showcase real-world use cases of our product line in action; ultimately bringing humans together from different backgrounds in life who share a common love of expressing themselves through sound and vision.
So I moved out to Louisiana from California to get away for a bit; a sabbatical from the L.A. hustle, if you will. Being the birthplace of Jazz, New Orleans to this day still has a vibrant live music scene compared to other cities and I had enough $$$ saved up to live for at least 6 months. So I went from one L.A. to another LA.
For those who aren’t aware, PreSonus is based an hour northwest of New Orleans and they were hiring so I applied, got hired and ended up moving to Baton Rouge. Even though I no longer live in Louisiana, I’m still very lucky to be working daily with such amazing talented people. No other company is quite like us in terms of camaraderie and dedication to making things happen, world-wide.
What instruments do you play?
Keyboard, guitar, drums, trumpet, sax and flute. Studio One is the DAW environment is where I record and produce tangible recorded audio assets for others to use. But playing *live* with other musicians has always been my greatest strength and main love, in terms of collaborative creative events.
Of all of them, what’s your favorite?
They’re all enjoyable to play and sonically express my emotions with. It just depends on the musical framework I’m in at the moment. But it’s got to be executed live or not at all for me. And unintended human mistakes are typically the moments that makes music most interesting to me.
What is it that you love about “live” performance?
It’s fun, brings people together and a very instantaneous source of joy. When everyone is in sync with each other, it’s magical. I believe it showcases positivity in humanity.
Who has influenced your own playing or approach?
Everyone I’ve played music with onstage or worked alongside in recording studio sessions.
Everyone has a side gig, what’s yours? OR when you’re not at PreSonus, what are you up to?
Recording instrumental tracks for singers, producers and working on sound design. Teaching applied music theory, ear training plus improvisation to students young and old. Diving deeper into modular synthesis. Updating my coding skills. But most of all, being the best Dad possible.
Choose a movie title for the story of your life.
“Interstellar”. I constantly travel between different ‘worlds’ and can access experiences from all points in the timeline of my life’s stored memory banks to find viable solutions and resolving issues effectively. Never journeyed through a wormhole, though.
What’s your go-to Karaoke song?
“Regulate Ft. Nate Dogg” by Warren G.
Got any tips for working with Studio One?
Yes! Check out my Studio One “1-Minute Tip” videos:
Tell us about a successful event you worked with PreSonus products. InfoComm, NAMM, or an Install somewhere.
Every January, we congregate for a week in Anaheim to demo our Products and field questions like a tightly-knit family at The NAMM Show. Stop by and visit us at Booth #18801 in the North Building.
What are you currently working on at PreSonus? What’s next for you?
Finding more relevant product/use case resonant relationships for the company. We’re really interested in content creators and livestreamers with strong online audience engagement in addition to Artists, Producers, FOH Engineers, Studio Mix Engineers, and Mastering Engineers. Continuing to develop my Studio One chops as there’s always new improvements to our DAW happening regularly from user base input. Helping to make our products better every day for you all to enjoy and benefit from.
What’s the strangest talent you have?
I used to be able to perform the Doctor Who theme (lead synth melody line) using a cello bow on the edge of a standard hand saw; all while having gulped an entire packet of grape-flavored Pop Rocks and not letting the chaos inside my mouth affect my musical performance. That talent came to an end when all the bow hair frayed out… GAME OVER.
Anything else you want to share?
“No amount of money ever bought a second of time” (Howard Stark, The Avengers Endgame) really resonates the older I get and I hope that others will take that quote to heart too, as we make decisions that will inevitably shape the reality of what future generations will inherit from us.
Basically, choose wisely what you do with every moment of your lifetime and don’t take anything for granted!
Connect with PERRY TEE
Friday Tips: Studio One’s Secret Equalizer
[Announcement: the follow-up book to “How to Record and Mix Great Vocals in Studio One” is now available—hop on over to the PreSonus Shop to check out “More than Compressors: The Complete Guide to Dynamics in Studio One.” Thank you! We now return to our regularly scheduled programming.]
Pop quiz: How many EQ plug-ins ship with Studio One Pro?
If you answered seven, congratulations! Then you know about the Pro EQ, the three different Fat Channel EQs, Ampire’s Graphic Equalizer, the Channel Strip, and using the Multiband Dynamics as a really hip graphic EQ. But actually, the correct answer is eight.
If you turn off the “auto” aspects of the Autofilter, you can take advantage of two filters, each with multiple filter topologies: three “rhymes-with-vogue”-style lowpass Ladder filters (sorry, if I mention the actual synthesizer name, I get hassled), two analog state-variable filters (yes, the same topology as the infamous Project #17, the “Super Tone Control,” in my book Electronic Projects for Musicians), one digital state-variable filter, a comb filter, and a zero-delay, 24/dB octave low-pass filter. Furthermore, you can route the two filters in series, or in parallel, as well as offset their cutoff frequencies from each other by up to 2 octaves.
The state-variable filters are particularly interesting because you can alter the response continuously from lowpass, to bandpass, to highpass, all with variable cutoff and resonance. This gives responses that are difficult, if not impossible, to obtain any other way.
So who cares about different filter types, anyway—other than guitar players who want to get totally rad wah effects? Well, these are invaluable for sound design, FX and breaks for DJs, synthesizer sweeps, and to add spice to tracks that sound just too darn normal. Don’t think of these filters necessarily as standard EQ, but more like EQ-based special effects. These parameters are automatable too, which opens up even more possibilities.
Using the testing procedure described in the Testing, Testing tip from May 16, let’s look at some of the spectral responses this exceptionally versatile pair of filters can produce.
But First, Turn Off Everything that Says Auto
To use the Autofilter as a filter, we need to turn off the automated aspects. Ctrl+click on both pairs of Env and LFO sliders to zero them out. Now we’re left with only the filters, not the modulators trying to control them. Also turn off the gain’s Auto function, because in some of the unusual ways we’ll be using the filter, overloading and nasty distortion can result from Auto gain.
Filtering Time
Fig. 1 shows the response for the 24 dB/octave ladder filter, with resonance turned up. Note that the Pro EQ high cut (lowpass) and low cut (highpass) filters can’t create this kind of curve, because they don’t have resonance controls. This is very much like the response of the classic rhymes-with-“vogue” filter, and you can automate the filter cutoff for grandiose filter sweeps.
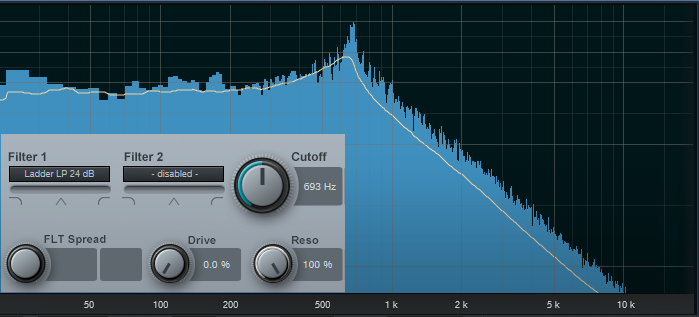
Figure 1: 24/dB ladder response, with resonance.
But wait! There’s more—because there are two different filter sections, you can offset the resonant frequencies to create double peaks. In Fig. 2, the frequencies are offset by two octaves, and the filters are in parallel (see the section outlined in orange). So now we have a double-peak ladder filter…cool.
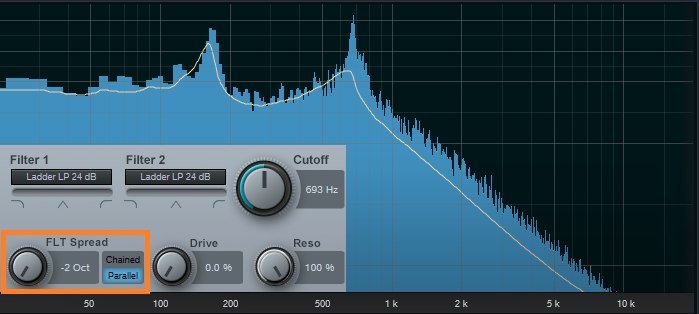
Figure 2: Double-peak ladder filter.
We can also do the “twin peaks” type of filter effect with the state-variable filters set to bandpass mode (Fig. 3). Here the filters are in parallel, and as with the above curve, they’re offset two octaves apart.
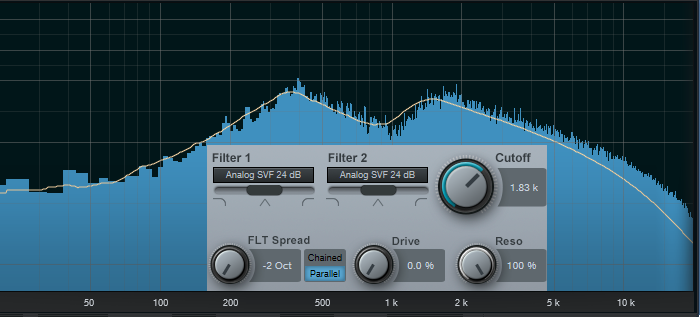
Figure 3: Dual bandpass filters in parallel can create twin peak filter responses, with fairly steep “skirts” on both sides of the peaks.
If you chain the two state-variable filters in series, set them to bandpass mode, don’t offset them, and boost the resonance, the filter curve makes a wonderful wah pedal (Fig. 4). The peak is sharp, with a steep rolloff on either side.
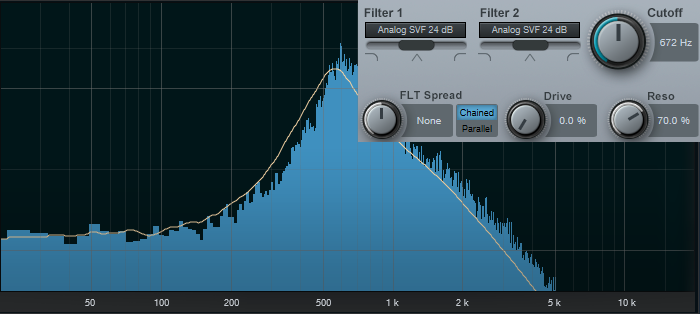
Figure 4: If you’re looking for a wah pedal sound…start here.
This also produces a strong sense of pitch with white or pink noise. One cool trick is using this setting to add a “tuned” aspect to snare drums, and other percussion instruments. Edit Studio One’s Tone Generator plug-in to generate pink noise, feed that into the above filter configuration, turn up the resonance, tune the cutoff to the desired pitch, then gate the noise with a snare hit. Mix in the desired amount of noise to give the drum a sense of pitch.
The highpass setting is useful as well, because you can obtain what’s popularly called the “voice of the Gods” effect for announcing and narration. Using a highpass filter gets rid of the super-low-frequency p-pops, but the resonance adds a boost in the bass range above the nasty stuff, so the voice still sounds full and big (Fig. 5).
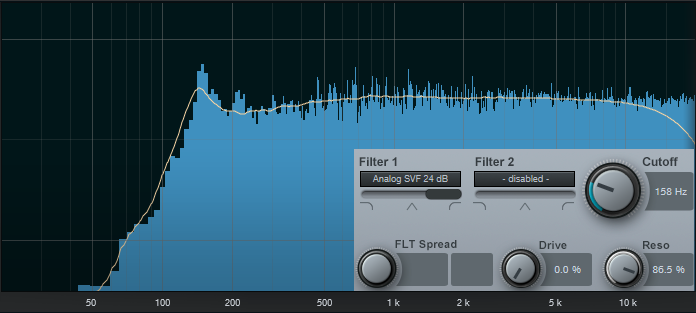
Figure 5: A high-pass filter with resonance can do wonders for narration.
It’s also possible to create responses that are just plain unusual, like this notch + double peak outside of the notch (Fig. 6). For some sound-design type wind sounds, drop the resonance to around 30%, and sweep the cutoff between 2 kHz and 6 kHz. Modulating randomly around a relatively low cutoff frequency can also give good rain and downpour sounds. Besides, who doesn’t like a curve that looks like Batman.
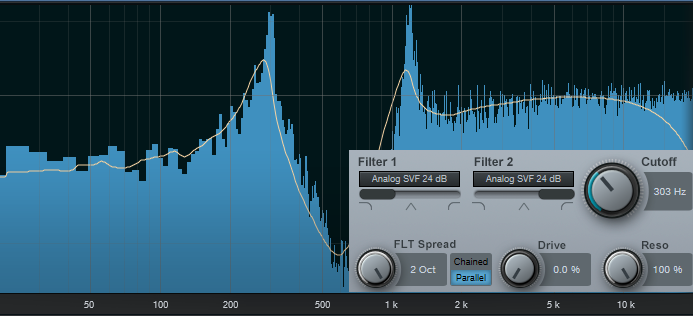
Figure 6: This unusual filter response has various uses for sound design.
Combining two different filter topologies can also give interesting results. Fig. 7 shows a ladder filter in parallel with a state variable filter, along with considerable amounts of resonance. If you really want to scope out this configuration’s flexibility, vary the Filter 2 slider to alter the topology, and/or vary the Filter Spread to change the offset between the two filter types. Of course, changing resonance alters the sound even further.
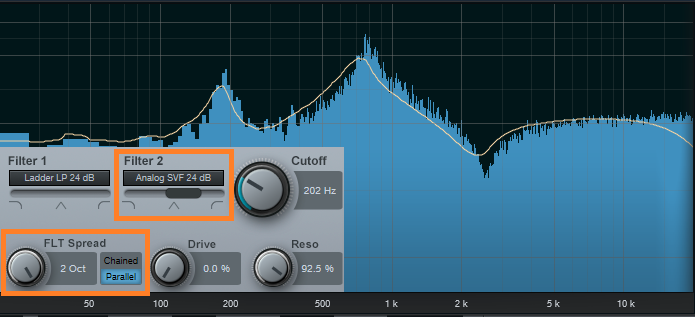
Figure 7: This filter configuration is in love with sound design and automation.
And finally…this is going to sound ridiculous, but bear with me. I often augment sampled female choir presets; octave lower sine waves mixed in subtly can give the illusion of a male choir combined with a female choir. But that’s not all—noise can be a powerful enhancer for choirs, and it’s possible to set the Autofilter to impart vocal-like qualities to pink noise.
For this application, the Zero Delay LP 24 dB is the filter of choice to insert after the Tone Generator’s pink noise output, because the filtering has a smooth kind of quality, even with high resonance. To concentrate the spectrum on voice, a Pro EQ follows the Autofilter to take off the highs and lows outside of the vocal range (Fig. 8).
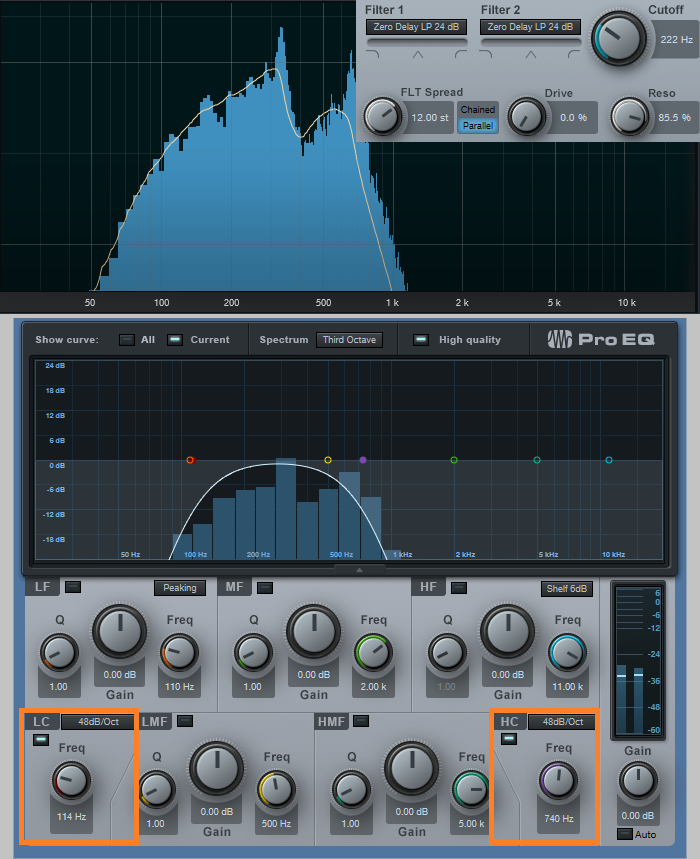
Figure 8: The Pro EQ shapes the pink noise into more of the vocal range.
Okay, now for the bummer: You can’t control the Autofilter cutoff, and therefore the pitch, with notes—only controllers. That’s not a problem if you just need a kind of pedal point choir addition; tune the cutoff to the desired pitch, and use volume automation to bring it in and out.
One workaround is to sample the resulting choir-like noise at different pitches, and load them into Sample One XT (or Impact XT) so you can create envelopes that match the envelope of whatever choir sound you’re using, and play the notes from a keyboard. The result is uncanny—in some ways, it makes a sampled choir sound more like a real choir than if it consisted only of samples. And finally, for sound design, don’t forget that filtered white noise can also augment crowd sounds.
Autofilter? Okay, yeah, well…I guess. But there’s a lot more to the story than just wah pedals and funk bass.
Grab a copy of Craig’s latest eBook here!
Nektar Technology Integration for Studio One is here!
NektarTech just announced their new DAW Integration for Studio One!
The new integration delivers a completely transparent control experience including features such as display of track and parameter names, extended transport control, project navigation, mixer operation, tweaking of virtual instruments and instant control of any selected parameter in Studio One.
Being able to tweak virtual instruments like hardware synths or mixing with full parameter feedback considerably speeds up the workflow. Dedicated “Mixer” and “Instrument” mode buttons switch Panorama’s control surface to take over the corresponding parameters in Studio One at the press of a button, literally.
Users can now log in to their Nektar account and download the required files. Not only are the integrations for the Panorama T4 and T6 available now, they’ve also added integration software for the Panorama P1, P4 and P6. In fact, ALL Nektar controllers now have DAW integration for Studio One, from their smallest controller (the SE25), to Impact GX, Impact LX+, Pacer (!) and Panorama.
The Panorama support is for version 4 and higher, all other products also support version 3 (with Panorama obviously having the most features also due to the displays.)
- Get the integration software from your NektarTech User Account.
- NektarTech T-series Product Page
- NektarTech P-series Product Page
Full features and specifications:
- Extended transport control including setting locators, metronome, automation and undo.
- Project navigation including switching channels, opening windows, zooming and more.
- Full parameter feedback on Panorama display
- Encoders control Pan, sends, macro, automation and more.
- Patch browsing for all internal instruments
- Open/close mixer view and instrument windows
- Maps customizable by using Studio One Learn
- All maps structured in the same way:
- Faders 1-4 commonly mapped to amp envelope
- Faders 5-8 commonly mapped to filter envelope
- Fader 9/Motor Fader controls instrument main volume
- “Data” encoder click-control any visible parameter
- Control 8 channels at the same time, Bank -/+ to control more channels (1-8 / 9-16 etc.)
- Current track controlled by fader 9 (or motor fader on P4 and P6)
- Master Volume Control
- Volume assigned to faders 1-8. Solo, mute and channel selection via fader buttons
- Pan, sends or channel macros assignable to encoders
- Panorama P series offers additional control over channel inserts and insert plugins
- Soft Take-Over mode eliminates parameter value jumping
- Supports Nektarine PlugIn host for deep instrument mapping
Friday Tips: In Praise of Saturation
Sure, everyone sorta knows about saturation. But let’s drill down, give some audio examples that really get the point across, and explain how saturation can help everything from individual tracks to master tapes. Really.
To be clear, we’re not talking about the distortion that “flat-tops” a waveform. Fig. 1 shows a comparison of unsaturated, saturated, and distorted versions of the same waveform (using version 4.5’s new “smooth” waveform view feature).
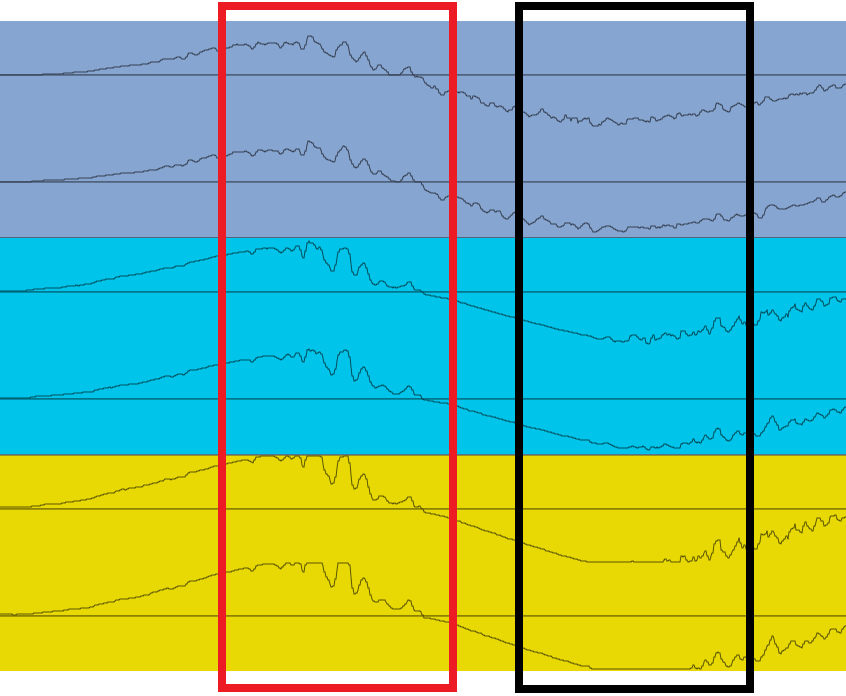
Figure 1: The gray waveform is unsaturated, the blue saturated, and the yellow distorted.
Comparing the three, in the section outlined in red, the saturated version is louder but the waveform isn’t all that different from the unsaturated audio. The distorted waveform is louder than the saturated one, but the peaks are flattened. This is particularly noticeable with the negative-going peak highlighted in black. Flattening peaks produces the kind of nasty digital distortion no one really likes, but saturation is a different animal…as the audio examples will show.
Before going any further, if you don’t have the free Softube Saturation knob, go to your PreSonus account and download it from Products > Add-Ons (Fig. 2).
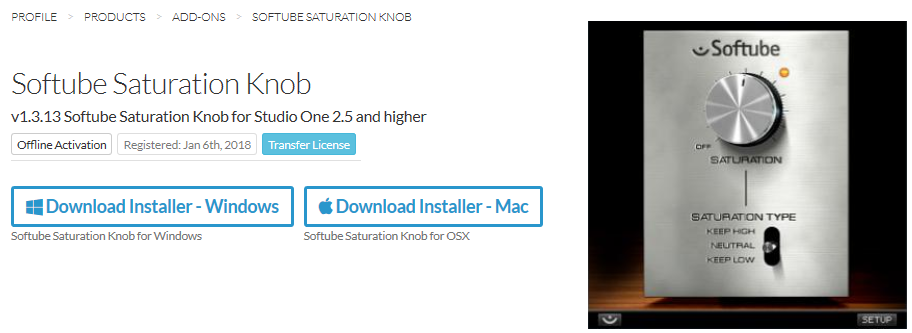
Figure 2: What are you waiting for? It’s free.
It’s a pretty basic module—turn the knob clockwise for more saturation (but I’ve never turned it up as high as shown in the picture!). Keep Low means it will apply more saturation to high frequencies, Keep High means more saturation for low frequencies, and Neutral means equal-opportunity saturation for all frequencies.
Saturation is great with drums, including mixed drums. You’ll get more punch and level (Fig. 3) that helps drums stand out in a track, without any of the artifacts (like pumping or breathing) associated with some dynamics processors.
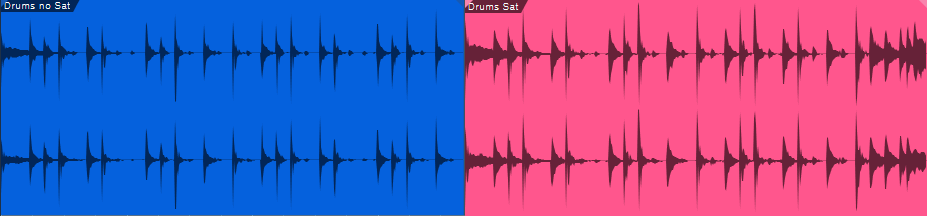
Figure 3: The waveform for the drums audio example. Unsaturated is blue, saturated is red.
Now listen to the audio example. The first four measures are the unsaturated version, the last four measures the saturated one. Note that both were normalized to the same peak value. Even though the waveforms don’t look all that different, the saturated version really punches through—yet doesn’t sound “distorted.” This same kind of approach can also work well for bass.
Now, let’s move on to saturating a two-track master. This may sound like a bad idea, until you realize that tape emulation plug-ins are basically just adding saturation, although some do it with a bit more finesse than a simple saturation plug-in (e.g., the Waves J37 provides different virtual tape formulations and bias settings). Fig. 4 shows the audio example’s waveform.

Figure 4: The two blue, four-measure groups are unsaturated; the two red, four-measure groups are saturated.
The audio example is excerpted/adapted from the song All Over Again (Every Day). I added a very slight pause between the unsaturated and saturated sections, although I’m quite sure you’ll hear the difference anyway. (To hear the final, mastered song—which of course was done in Studio One—click on the link.)
For this kind of application, you don’t want to apply too much saturation—a little bit goes a long way. As you turn up the knob you may think it’s not really making a difference, but it is. Toggle bypass frequently for a reality check. Fig. 5 shows the settings used for the master tape example.

And there you have it—we’ve done our shoutout for saturation. If you’ve missed out on the fun, load it in a track, and listen to what happens. You just might like what you hear!
The Manly Hanley Podcast chooses Studio One and StudioLive Series III
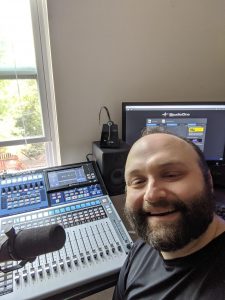
Randy Hanley is the founder and host of the Manly Hanley podcast. He’s been using Studio One and a StudioLive mixer to produce the show, and sent us a TON of info on his production method and why he’s chosen PreSonus. If you’re looking to get into Podcasting, this is a great read.
Give us some background on yourself. Who are you, what do you do, and how long have you been podcasting?
I started out as a drummer, professionally teaching at music stores for 12 years. Drums lead me to learn about computers and technology through my interest in recording. I received a certificate at the Recording Institute of Detroit, back when we were still using mini ADAT Recorders, just when a software that rhymes with “Mo’ Jewels” was becoming “the thing.” There was just something about Mo’ Jewels that I was never able to become comfortable with.
I heard of PreSonus, when a music store colleague of mine mentioned that he was going to buy the ACP 88 Compressor. I didn’t even know what it was at the time, but he explained it to me, how it offered all of this compression/multiple channels, at an extremely great value. That’s basically the very first time I heard of PreSonus.
I started a Podcast back in 2011 called “Getting Android,” but I never followed through with it. After I bought my PreSonus FireStudio Project rig for recording music, I realized that I have way more than enough power/setup to do a simple podcast, so why not give it a try? Well, I eventually got around to it, in 2019 and I’m glad I did. I’m more of a reborn podcaster, so technically, I’ve been doing it (consistently) since January.
What PreSonus products do you use?
I use Studio One 4.5 Artist and the StudioLive 16, Series III. I originally started with the FireStudio Project.
What features, in particular, make StudioLive and Studio One suitable for podcasters?
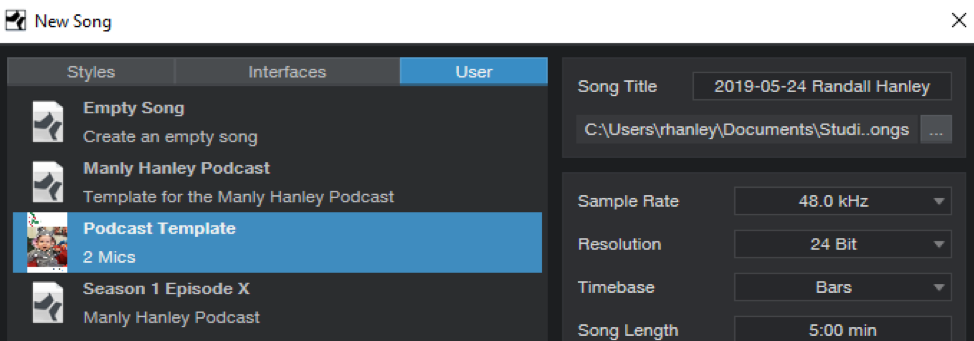
The Templates, ease-of-use, and the perfect integration between Studio One and basically ANY hardware interfaces.
For Podcasting, I’ve created my own template, which you can see below.
What I think really makes PreSonus Studio One accessible to Podcasters? It’s future-proof. For instance, many podcasters move into doing more with their podcast, and that often includes Video/Vlogging. With the Professional edition of Studio One, you have all you need to not have to jump between programs! It’s tiring to jump back and forth from Camtasia (because its audio features are terrible), just to grab the audio file from a DAW. Studio One has it all there in one place. I won’t have to worry about sync issues, or format confusion, because the recent format additions in Studio One 4.5 are amazing and all I’ll ever need.
I also have noticed that Studio One is easy on the CPU/RAM resources–which I think is very important to us Podcasters–My machine isn’t a video-rendering beast–I just use it to record audio and Studio One is extremely fast, even on my somewhat modest machine.
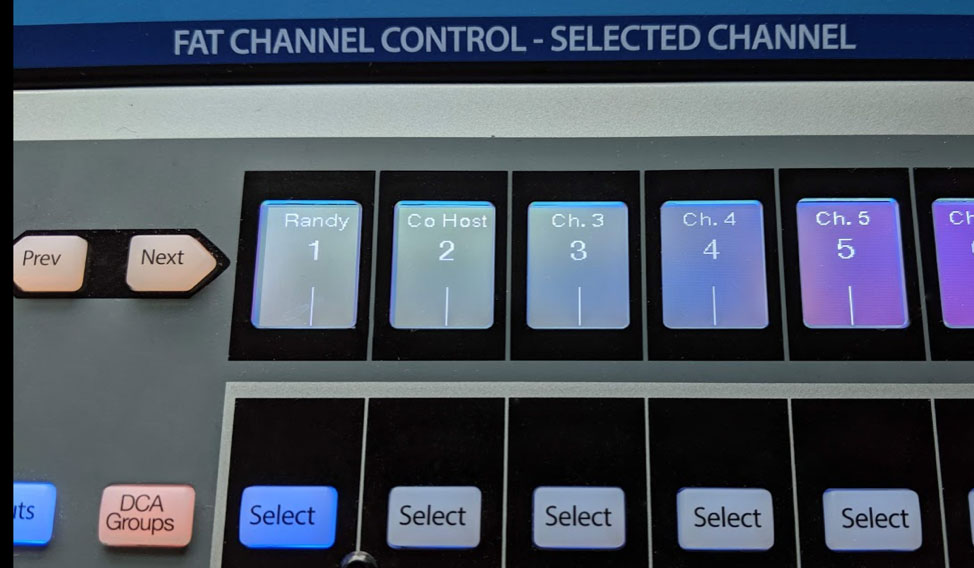
I never feel like I’m lost with the way I can label things. It’s easy enough for my co-host to sit a tablet on the StudioLive and remotely control the faders of the mixer if we need to fix levels. Additionally, the labels on the mixer can reflect what I’ve named them in Studio One. I feel like there is always a way for me to get the job done with PreSonus.
Before I purchased the StudioLive 16, I thought to myself that this might be total overkill to use for a podcast. But then I thought back to how many products I’ve wasted my money on over the years, such as cheaper USB microphones. All of the money I spent on those products easily cost more than just buying this mixer, which includes Studio One anyway. It was a no-brainer. (Incidentally, I recently heard that PreSonus dropped the price on some of the Series III mixers as much as $200.)
Additionally, I was frequenting some Facebook podcasting groups, seeing which kind of problems users commonly had. Users were always running into issues setting up Audacity. Users also ask questions about “Where do I get my Podcast edited, produced, normalized, compressed…” the list went on an on. I realized I could do ALL of the above in Studio One. It’s a HUGE money-saver when it comes to producing my own podcast. I’m not paying anyone to do anything other than advertising and host my Podcast. The way I’m looking at it, I’m saving a ton of money each and every month producing it on my own. With my plug-ins and templates inside of Studio One, I don’t really have to do much editing, ever!
I heard so many good things about Studio One, especially that it was included with many of the hardware products that PreSonus sells and integrates well. Studio One can open projects from other DAWs such as Cubase, Pro Tools and others.
 I also never have to worry about running out of inputs. I don’t know of a podcast that has 16 people talking at once ?.
Also, with Studio One and my PreSonus hardware interface working with USB is the big sell for me doing this podcast. USB just works. I haven’t had to install any legacy drivers, etc.
What features are you most impressed with?
Ease-of-use and stability! Never crashes on me… EVER!
I am really impressed with how the StudioLive mixer has recall of the effects and fader positions–it doesn’t have to rely on my computer and Studio One’s project settings if I feel like just using the mixer as a LIVE MIXER. But then, if I want to jump into DAW mode, I can make the mixer follow the computer’s settings. There is so much flexibility, it’s crazy. I cannot think of anything I need. I’m also impressed that PreSonus uses AVB, an open standard that allows any vendor to support it. It’s not closed-minded and just feels like freedom. I’m an open-source guy whenever possible–it’s transparent and honest.
Oh, here’s a bonus feature: the community. The PreSonus forums are the best support you could ask for. When I started out with Studio One and my StudioLive mixer, I had a couple basic question. Embarrassingly, the answers were in the manual that came with the mixer, but the community was friendly and helped point me in the right direction. It’s like a small town of nice people wanting to help because they share similar passions, supporting this company that cares about its customers.
Any user tips or tricks or interesting stories based on your experience with PreSonus hardware and software?
I recorded some amazing bluegrass artists on some of the old FireStudio hardware and it still sounds phenomenal today.
As for tips, I’m a HUGE believer in templates. That’s the best way to be productive and save so much time. PreSonus templates are the best.
For Podcasting, I literally have to do zero cleanup. I have my effects set on the mixer (I typically use the Male Voice 1 or 2) and it applies just the right amount of compression and gating. I can do these effects on each individual Mic channel for each podcast co-host. I receive lots of compliments on how nice and clear the audio is. I share my experience often in some Podcast Support groups on Facebook, including this one.
What features do you want to see next in Studio One or StudioLive?
I’d like to maybe just a see a few more default templates, that are Podcast-specific, heck, I’ll share mine with any other Podcasters, just shoot me a message.
What’s next for you?
I hope to learn my mixer / DAW more. I want to do a live podcast eventually. I’d like to use the SD Card feature on the StudioLive mixer, because I know that Studio One makes it easier than ever to take those recordings, directly off the SD card, then opening the project, ready-to-edit on my computer!
End Boring MIDI Drum Parts!
I like anything that kickstarts creativity and gets you out of a rut—which is what this tip is all about. And, there’s even a bonus tip about how to create a Macro to make this process as simple as invoking a key command.
Here’s the premise. You have a MIDI drum part. It’s fine, but you want to add interest with a fill in various measures. So you move hits around to create a fill, but then you realize you want fills in quite a few places…and maybe you tend to fall into doing the same kind of fills, so you want some fresh ideas.
Here’s the solution: Studio One 4.5’s new Randomize menu, which can introduce random variations in velocity, note length, and other parameters. But what’s of interest for this application is the way Shuffle can move notes around on the timeline, while retaining the same pitch. This is great for drum parts.
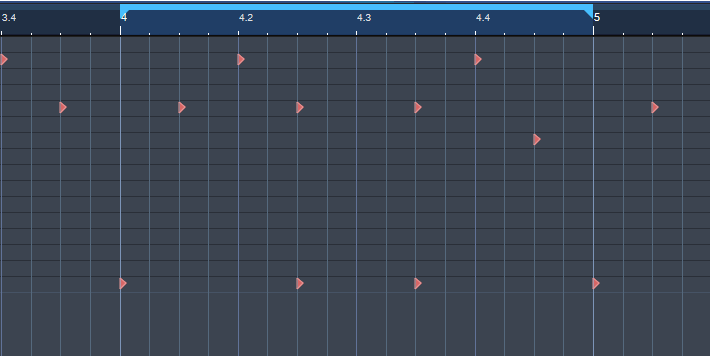
The following drum part has a really simple pattern in measure 4—let’s spice it up. The notes follow an 8th note rhythm; applying shuffle will retain the 8th note rhythm, but let’s suppose you want to shuffle the fills into 16th-note rhythms.
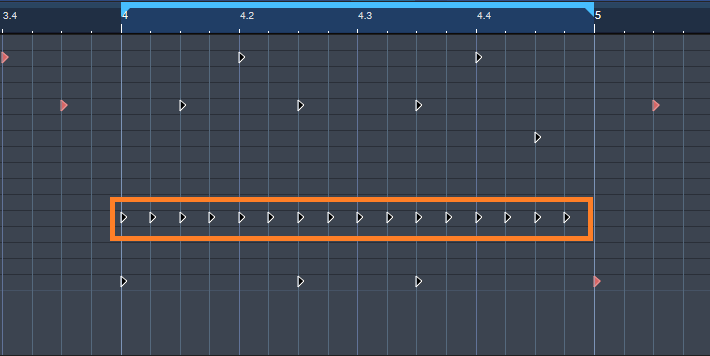
Here’s a cool trick for altering the rhythm. If you’re using Impact, mute a drum you’re not using, and enter a string of 16th notes for that drum (outlined in orange in the following image). Then select all the notes you want to shuffle.
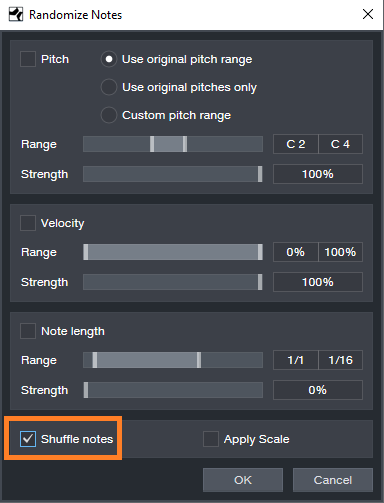
Go to the Action menu, and under Process, choose Randomize Notes. Next, click the box for Shuffle notes (outlined in orange).
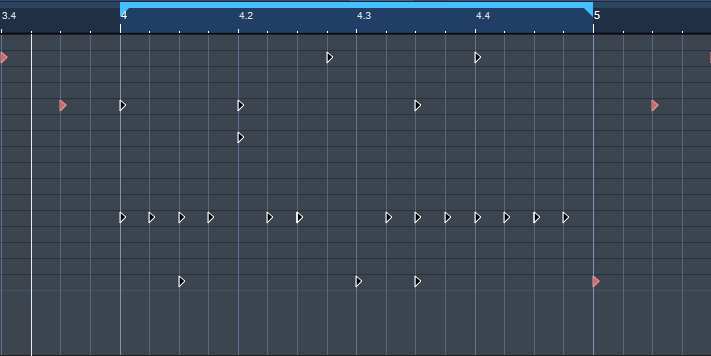
Click on OK, and the notes will be shuffled to create a new pattern. You won’t hear the “ghost” 16th notes triggering the silent drum, but they’ll affect the shuffle. Here’s the pattern after shuffling.
If you like what you hear from the randomization, great. But if not, adding a couple more hits manually might do what you need. However, you can also make the randomizing process really efficient by creating a Macro to Undo/Shuffle/hit Enter.
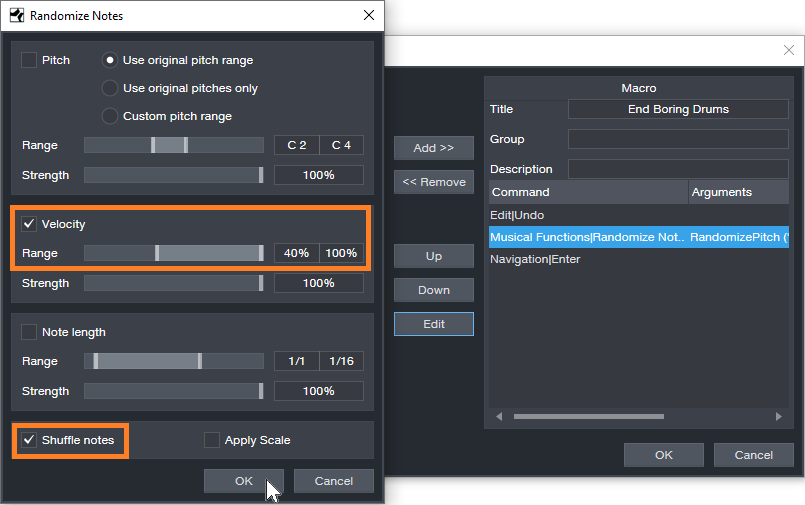
Create the Macro by clicking on Edit|Undo in the left column, and then choose Add. Next, add Musical Functions|Randomize. For the Argument, check Shuffle notes; I also like to randomize Velocity between 40% and 100%. The last step in the Macro is Navigation|Enter. Finally, assign the Macro to a keyboard shortcut. I assigned it to Ctrl+Alt+E (as in, End Boring Drum Parts).
With the Macro, if you don’t like the results of the shuffle, then just hit the keyboard shortcut to initiate another shuffle…listen, decide, repeat as needed. (Note that you need to do the first in a series of shuffles manually because the Macro starts with an Undo command.) It usually doesn’t take too many tries to come up with something cool, or that with minimum modifications will do what you want. Once you have a fill you like, you can erase the ghost notes.
If the fill isn’t “dense” enough, no problem. Just add some extra kick, snare, etc. hits, do the first Randomize process, and then keep hitting the Macro keyboard shortcut until you hear a fill you like. Sometimes, drum hits will end up on the same note—this can actually be useful, by adding unanticipated dynamics.
Perhaps this sounds too good to be true, but try it. It’s never been easier to generate a bunch of fills—and then keep the ones you like best.
Friday Tips: Testing, Testing!
Studio One has several analysis tools, and you can use them to learn a lot about how effects work. One of my favorite test setups is inserting the Tone Generator at the beginning of the Insert Device Rack to generate white noise (a test signal with equal energy throughout the audio spectrum), the Spectrum Meter at the end of the Rack, and the device under test in between them. Here’s the Tone Generator, set to generate white noise.

As one example of the benefits of testing gear, a lot of engineers like the gentle tone-shaping qualities of Pultec’s MEQ-5 midrange equalizer. So you need an MEQ-5 plug-in, or the hardware, to obtain that effect with Studio One…right? Maybe not.
One reason for the “sound” of Pultec equalizers is that they used passive circuitry, so the EQ curves were broad. But the Pro EQ can do gentle curves as well, simply by choosing a low Q setting. The screen shot shows Pro EQ settings for a “Pultec-like” curve, with a considerable amount of boost and cut.

But how much is it really like a Pultec? Let’s find out. Choose the same settings on the Pro EQ and on an MEQ-5, then run some white noise through both, using the Spectrum Meter’s FFT analysis.
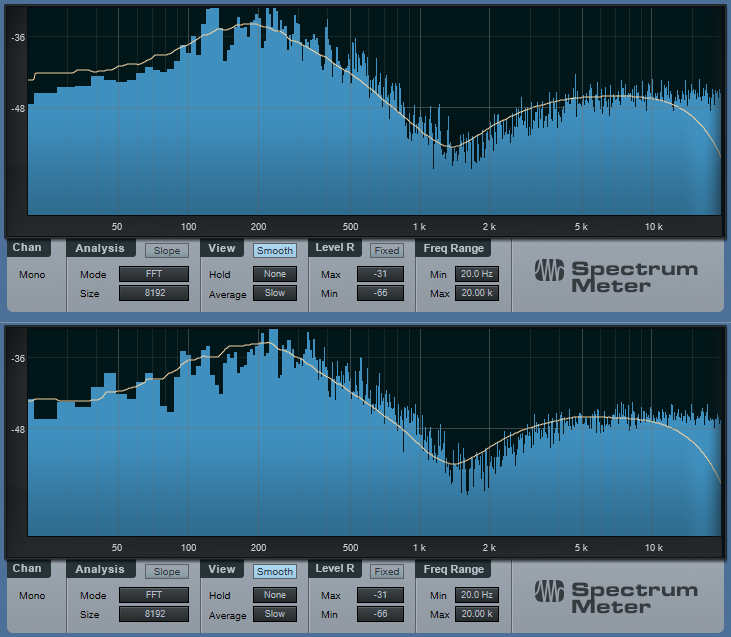
The white, smoothed line shows the average frequency response (white noise is changing constantly because it’s random, so in this case we want a smoothed, average reading). The top graph is the Pro EQ, and the bottom graph is the MEQ-5. Sure, there may be some subtle sonic differences due to the use of different filter topologies. But if you’re looking for those gentle, tone-shaping curves, the Pro EQ does just fine.
You can also find out exactly what’s going on with some effects. For example, Studio One has a phase shifter effect, and you probably know that phase shifting produces notches in the audio. But how deep are the notches? And how far apart are they? Let’s take a look.
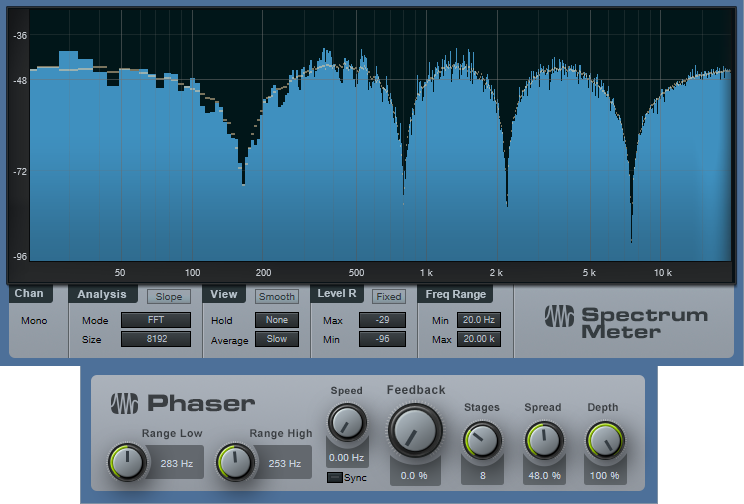
The Phaser is set to 8 stages, so there are 4 notches. For this measurement, we want to know the instantaneous value of the notches, so the average isn’t smoothed. With depth up full, the notches are around -35 dB or so.
While we’re at it, let’s check the frequency response of guitar cabinets, so we can find out why they sound so different from each other.
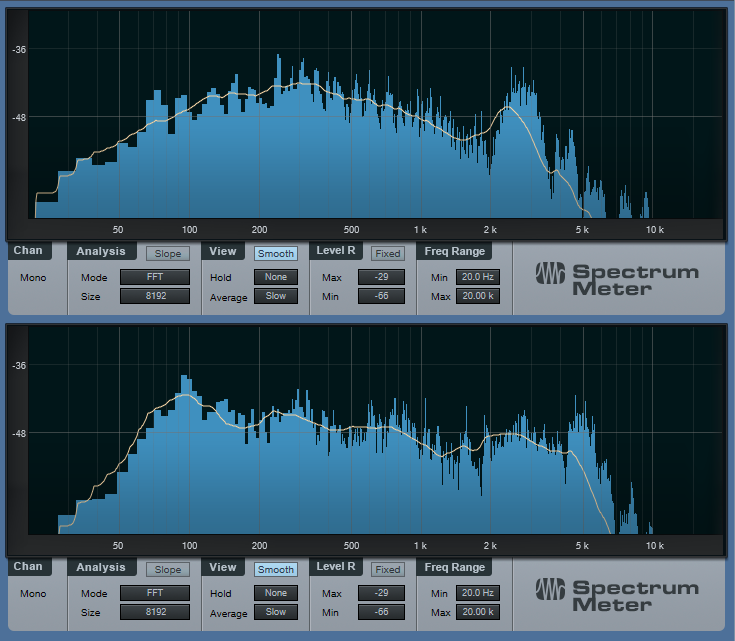
The upper image shows the response for a Mesa Boogie Mark IV cabinet. Note the prominent peak in the 3 kHz range, and the rolloff below 200 Hz—now you know why those solos can really cut through a mix. Compare that with the lower image of a 1965 Fender Princeton. It has a low end bump to give a full sound, a bit of a notch around 1.5 kHz, and has more high end above 5 kHz than the Mark IV.
As to why these readings matter, suppose you recorded a guitar part, and want it to have more of a Mesa Boogie vibe. Just tweak your EQ accordingly to approximate the curve.
Using white noise for testing can also show why SSL E-series and G-series EQ curves are different, the differences between standard and constant-Q parametric stages, what really happens when you move graphic EQ sliders around, and more. If you’re curious about scratching beneath the GUI of your effects, Studio One’s analysis tools can reveal quite a bit.
Friday Tips: The Air Machine
Boosting the highs a bit is a time-honored mixing and mastering technique. You don’t want to overdo it, but a little brightness can give a song a lift, increase vocal intelligibility, articulate instruments better, and add some welcome “ear candy.” If you look at the spectral energy of a lot of hit records going back decades, you’ll often find a few extra dB of boost in the 7 to 10 kHz range, to add some “air” and sweetness.
So just boost the EQ a little bit, right? Well, that’s one option…but we can do better. The Air Machine FX Chain (Fig. 1) is equally at home on individual tracks in the Song page (try it judiciously on drums, drum room mics, acoustic guitar, piano, vocals, etc.), or on finished mixes in the Project page. And yes, there’s a download at the end so you don’t even have to create this yourself.
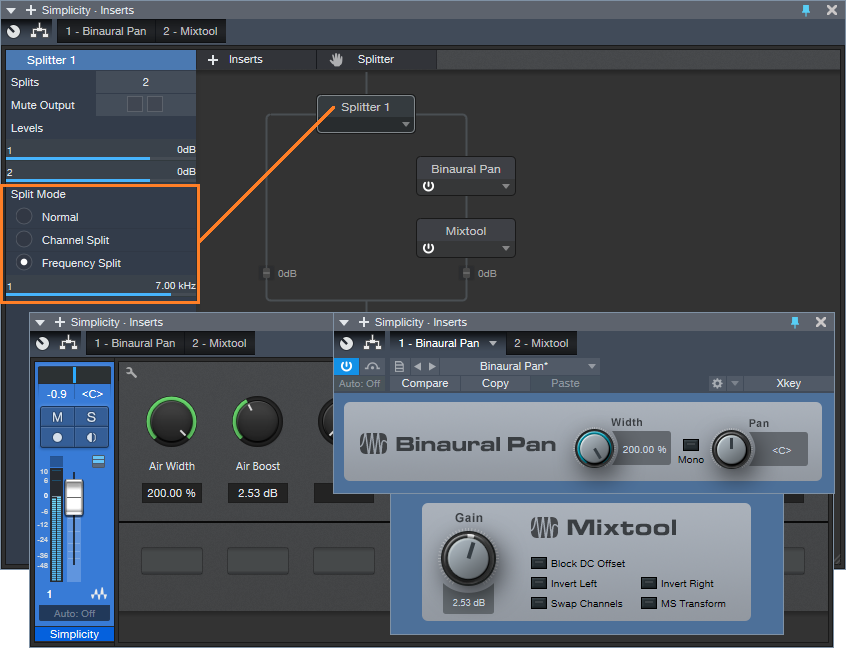
Figure 1: The Air Machine modules.
Here’s how it works. By choosing the Splitter’s Frequency Split mode (outlined in orange), the Splitter acts as a crossover that sends the high frequencies through the right-hand split. The default crossover frequency is 7 kHz, but we’ll have more to say about this later.
The high frequencies then go through the Binaural Pan processor, which spreads out the stereo imaging. Because high frequencies are very directional, this not only increases the sense of “air,” but the feeling of space. Then, the Mixtool adds the appropriate amount of high-frequency boost.
As to assigning controls to the FX Chain, see Fig. 2.

Figure 2: Under the hood of the Air Machine FX Chain.
The Air Width parameter alters the Binaural Pan Width parameter over its full range. The Air Boost control sweeps from no boost (0 dB Gain on the Mixtool) up to a maximum of about 6 dB. You really don’t want to go any higher than that.
The one control I couldn’t put in the FX Chain was the Splitter’s crossover frequency, so you may want to open up the FX Chain to alter this. The higher the frequency, the more boost you can apply without the high frequencies becoming overbearing. Sometimes, though, you might want to bring the crossover frequency down to 5 kHz or so if you want a more pronounced effect…or even up to 10 kHz for just a light dusting of high frequencies.
Yes, it really is that simple. And yes, the effect is best when used subtly. But try it—I think there’s a chance this may end up becoming one of your favorite FX Chains.
Download the Air Machine FX Chain here.
The Latest and Greatest Just Added to the SHOP!
We recently welcomed a lot of newcomers to the PreSonus Shop! Here’s a round-up of all the latest additions.
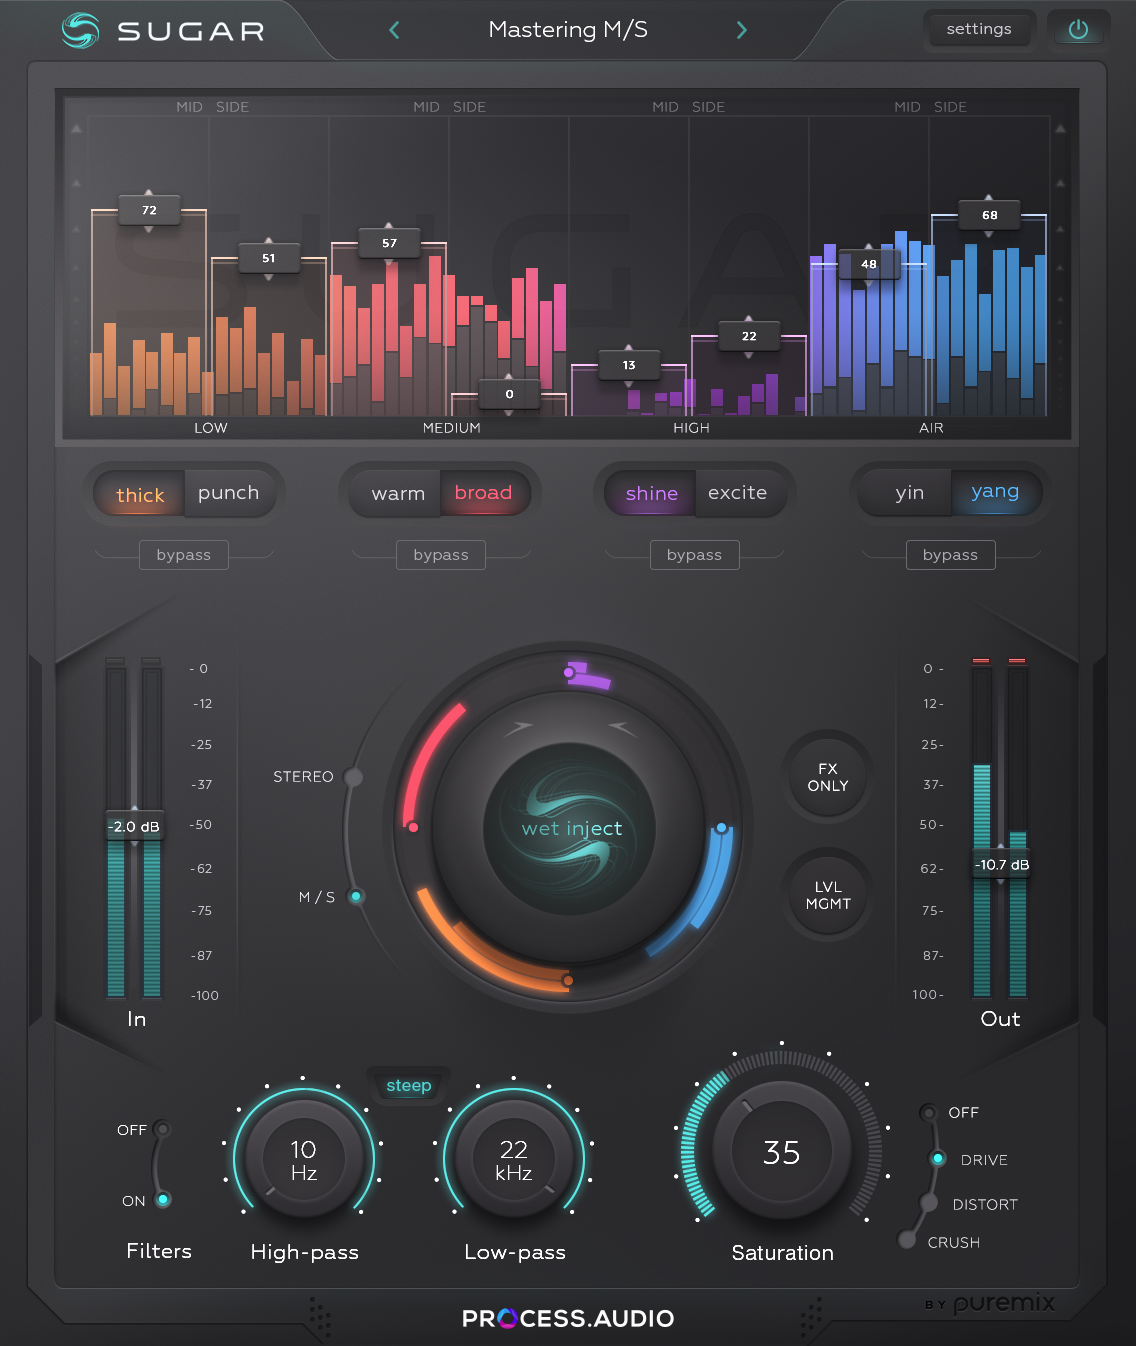
First up, Sugar: The Ultimate Full Spectrum Enhancer.
Shop Now!
Sugar is designed by a team of award-winning engineers to offer their most useful and essential harmonic enhancement techniques in one centralized plug-in. The resulting color palette is a fast lane to pro-sounding records—Sugar is a full-spectrum enhancer that will add punch, thickness, depth, warmth, edge, and grit to all your tracks. Sugar is a shortcut to those punchy kick drums, thick basses, sharp snares, edgy guitars, airy and creamy vocals, warm mixes and wide masters and much more.
Add Sugar to your workflow here!
Next, from Cherry Audio, check out Voltage Modular Core and Electro Drums and Voltage Modular Ignite!
SynthAnatomy.com says Voltage Modular is the:
“Best Software Modular Synthesizer Plugin Release of the year 2018!”
Voltage Modular is a virtual modular synthesizer that delivers the sound quality and “hands-on” experience of modular synthesis for a tiny fraction of the cost of equivalent hardware systems. Patches ranging from simple tones to wildly elaborate evolving soundscapes are easily created with surprisingly light processor overhead requirements. Voltage Modular is designed to be the best sounding, most powerful, flexible, and easy-to-use virtual modular instrument available.

Shop Here!

Shop Here!
Shop Now!
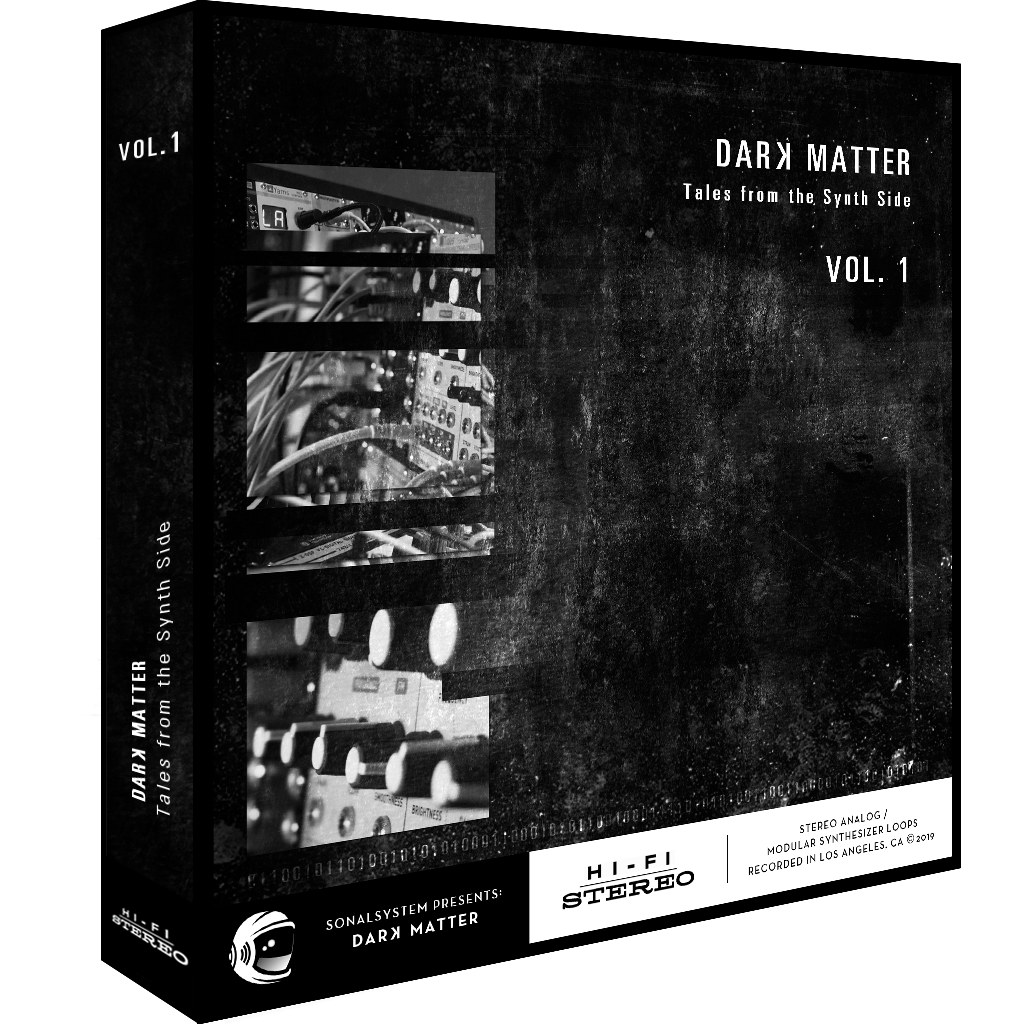
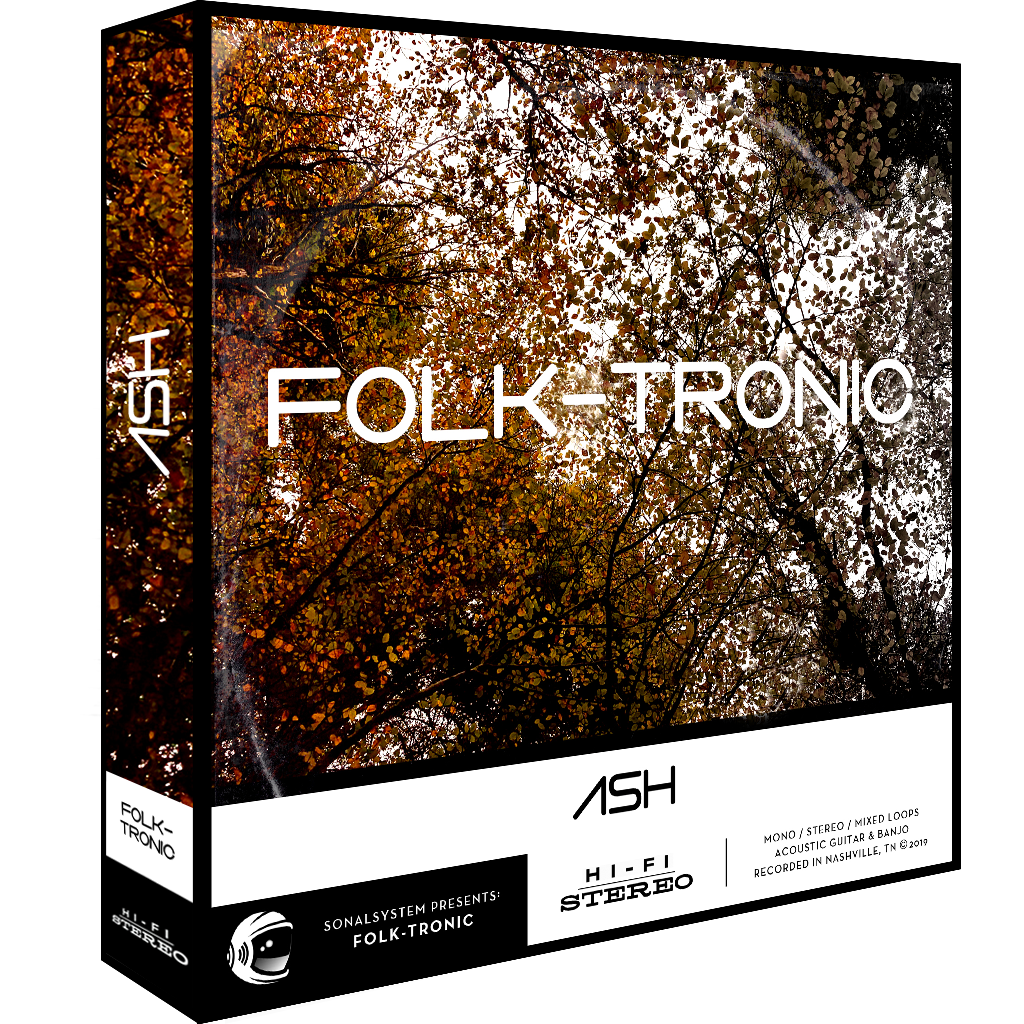
New from SonalSystem the Folktronic series and Dark Matter series.
Thoughtfully designed around electronic, left of center sounds and textures, Dark Matter was conjured for all types of users and scenarios: composers/artists/producers interested in cinematic style sounds and sequences, and anyone looking to add evocative modular and synthesizer based elements to their compositions.
Shop now!
Organic meets electronic in the latest loop packs from SonalSystem. While it may seem like an unusual pairing on the surface, Folk-Tronic allows you the freedom to explore new sonic possibilities and stretch the limits of your arrangements. Take your audience on a journey to escape the noise of the world and dive into a pastoral plane.
Last but not least, check out what’s new from BingoShakerz!
Shop Now!
“Trap Kits” features 630+ MB (uncompressed) of prime-time Construction Kits and samples for instant beat inspiration.
Packed with five fully mixed and mastered Construction Kits and an additional selection of single 808, Clap, Hat, Kick, and Synth sounds.
Each Construction Kit offers full mixes, and all components are broken out into constituent parts for maximum programming ease.
Booming 808 sounds, lush pads, crispy snares, warm chords, nostalgic synth and choir loops… “Trap Kits” delivers an expansive collection of sounds for any hip-hop and trap music producer.
JL & Afterman are back with their brand new package of essential production tools!
Soulful House is loaded with ten fully mixed and mastered construction kits and captures deep bass loops, funky beats, chunky guitars, soulful piano, Rhodes loops, no-kick top loops, driving percussion workouts, blistering pads, and string loops.
Each Construction Kit offers club-ready full mixes and all components broken out into constituent parts for maximum programming ease, including MIDI files.
Expertly crafted by JL & Afterman – Soulful House is a must-have collection for any Funky, Classic or Soulful House music producer!

Let’s Shop
Bingoshakerz are happy to present their latest imprint – Afro & Melodic House, by Lowton Records!
This collection features ten fully mixed and mastered Construction Kits. Packed with 550+ MB (uncompressed) of tribal beats, analogue bass loops, ethno-grooves, melodic synths, native and organic vocal sounds, percussion, and FX loops!
Each Construction Kit offers club-ready full mixes and all components broken out into constituent parts for maximum programming ease, including MIDI files.
All loops are ready for instant drag & drop action into Studio One.
This is a prime-time collection of sounds for any Deep, Afro, and Melodic House producer!
Explosive underground beats, industrial vibes, and analogue melodics: Melodic & Dark Techno 2 is here!
Packed with 630 MB (uncompressed) of analogue bass loops, dark and moody textures, stripped beats, pounding kick drums, tech-twisted percussion and top loops, modular synths, pulsating melodics, and FX loops!
This collection also offers a massive stack of single drum hits including kicks, claps, snares, percussion, and synth shot sounds!
Expertly crafted by Dominik Saltevski, (Autektone, Reload Black) Melodic & Dark Techno 2 is the definitive collection for any modern techno producer.
Melodic & Dark Techno 2 delivers the essential track building tools which are ready to be instantly loaded into Studio One.
ALL this for less than $20 US:
- 10 Atmosphere Loops
- 15 Bass Loops
- 15 Clap Loops
- 11 Song-starting Drum Kits (77 loops in total)
- 30 FX Loops
- 15 Hat Loops
- 15 Kick Loops
- 15 Melodic Loops
- 15 Percussion Loops
- 15 Synth Loops
- 20 Top Loops
- 75 Single Hits/One-Shots

Shop Now!
Introducing the SPARK Collections!
Hit the ground running with the new Spark Collection of loops and add-ons from PreSonus! These low-priced loop packs are a great place to start making music for less. These professional, royalty-free tracks are a great source of inspiration for starting a new song, learning how to mix, or adding a little flavor to your existing compositions. We’ve launched Spark Collections with a whopping 35 packs… with many more to come!
Everything from trap, reggae, pop, and sound FX are available in the Spark Collections – for just $4.95 USD each!
Shop Now!
Tailor make your ATOM!
Express yourself with these custom vinyl adhesive skins for your ATOM! Exclusively available at shop.presonus.com, you can pick a skin that best suits your creative mojo.
Available in seven stylish styles and for less than $10 USD!
Friday Tips: Attack that Autofilter!!
Studio One’s Autofilter has a sidechain, which is a good thing—because you can get some really tight, funky sounds by feeding a drum track’s send into the Autofilter’s sidechain. Then, use the Autofilter’s sidechain to modulate a track’s audio in time with the beat. Funky guitar, anyone?
But (there’s always a “but,” or there wouldn’t be a Friday Tip of the Week!), although this is a cool effect, a real wah pedal doesn’t start instantly in the toe-down position before sliding back to the heel-down position. Your foot moves the pedal forward, then back, and it takes a finite amount of time to do both.
The “decay-only” nature of autofilters in general is certainly useful with drums. After all, drums are a percussive instrument, and a percussive filter sweep is usually what you want. But the other day I was working on a song, and really wanted an attack/decay filter effect that was more like a real wah pedal—where the filter moved up to the peak, before moving back down again. Here’s the result.
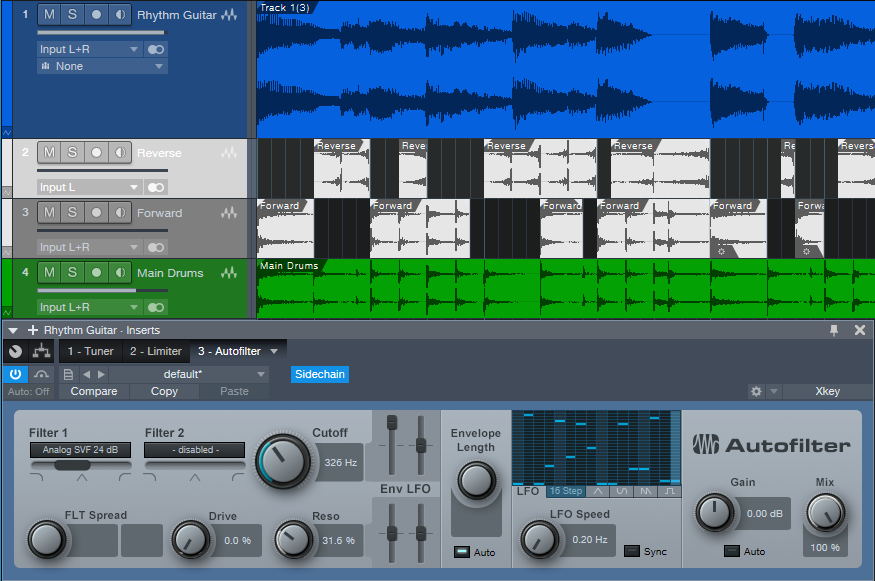
On the Autofilter, ctrl+click on the LFO sliders to zero them out, so that the LFO isn’t adding its own signal (although of course, you can do that if you want—the 16 Step option is particularly useful if you do). The screen shot gives a good idea of a typical initial setting.
The dark blue track is the guitar, and the green track, the drum part. I often cut up tracks are that modulating other tracks, and Track 3—a copy of the main drum track—is no exception. This track’s pre-fader send goes to the Autofilter’s sidechain input. The track’s channel fader is down, so that the audio doesn’t go through the mixer. We’re using this track only to provide a signal to the Autofilter’s sidechain.
Track 2 is a reversed version of the drum part. It also has a pre-fader send that goes to the Autofilter sidechain (conveniently, you don’t need to bus signals together to send signals from multiple tracks into a Studio One effect’s sidechain). Like Track 3, the track’s channel fader is down, so that the audio doesn’t go through the mixer
The end result is that the reversed drums provide an attack time that sweeps the filter up, while the forward drums provide a decay that sweeps the filter down. So is the sound more animated than using only the forward drum part? Listen to the audio example, and decide for yourself. The first section uses the forward trigger only, while the second section adds in the attack trigger—the effect is particularly noticeable toward the end.