Category Archives: Studio One
Using a Touchscreen with Studio One
The first touchscreens could detect a single touch, but modern touchscreens can handle up to ten touch points—which makes sense, because we have ten fingers. Studio One supports ten touch points natively on Windows, and thanks to a built-in TUIO extension, on the Mac as well.
DAW control with touch sounds sexy, but using touch on a large monitor is a different experience compared to using touch on a smartphone or tablet. Furthermore, whether a third-party plug-in supports multiple touchpoints is hit-or-miss. Also consider that a good touch monitor costs around $300—that’s quite a bit more than a standard monitor, so you need to decide how valuable touch would be to you.
Practically speaking, you probably don’t need touch, but it does offer two major advantages when working with Studio One. The main plus for me is being able to use a touchscreen control surface and mouse simultaneously—two-handed operation improves the physical workflow. The other advantage is being able to edit multiple parameters simultaneously with effects and virtual instruments (like adjusting filter cutoff while trimming the filter envelope amplitude, or editing EQ frequency and boost/cut8 simultaneously).
The Ergonomics of Using Touch
To use a touchscreen as a control surface, I lay the monitor down almost flat, at about a 20% angle (Fig. 1). It feels very much like working with a conventional hardware mixer. For this application, it’s vital that the monitor have an adjustable A-frame stand, so that you can adjust it to any angle you want.
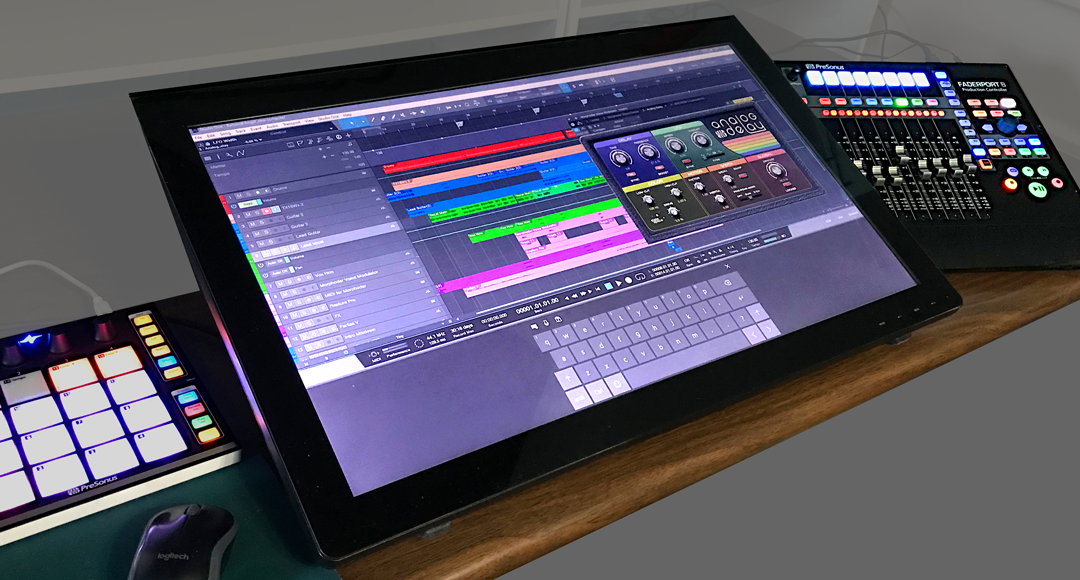
Figure 1: The Planar touchscreen is flanked by PreSonus control surfaces—that’s a lot of hands-on control. It’s at more of an angle than I normally use so that the screen is more visible.
Where touch doesn’t work, at least for me, is trying to use it with a conventional monitor placement (i.e., at a right angle to the desk surface, directly in front of you). Reaching out tires your arms; when I’m using the touch screen as a conventionally placed monitor for a project like writing an article, I rarely use touch. However, it can be helpful to move windows around while the mouse is doing something else, or touching a function after the mouse has made a selection. If you have RSI issues, touch can also provide a break from using a mouse all the time.
Also note that it takes a while to develop “touch technique.” You generally need to use the point of your finger to be sufficiently precise, and with the monitor at a low-lying angle, I usually have to aim a little toward the top of what I’m trying to hit. Also, you need to learn a few new tricks. You “right-click” simply by touching, and then continuing to hold your finger down until the context menu appears. And you can zoom tracks horizontally or vertically with two-finger pinches or stretches, which is pretty cool…as well move a project horizontally along the timeline by just swiping left or right.
Integrating a QWERTY Keyboard
You also need to decide how to integrate a QWERTY keyboard. If it’s in front of the touchscreen, then the touchscreen needs to go further back, which diminishes its ease of use because you have to reach further. One option is placing a keyboard on your lap, or adding an under-table keyboard drawer. Then you can slide the keyboard out when needed, and slide it back in when you want to concentrate on the touchscreen.
Another option is using Windows’ onscreen keyboard. Although primarily intended for tablet mode, right-click on the Taskbar, and choose “Show touch keyboard button.” This button will appear on the taskbar and persist; click on it to show/hide the keyboard. (Also for what it’s worth, you can enable a button for an onscreen touchpad.) Note that you have several keyboard options, from a mini-keyboard to one that includes Alt, Ctrl, Windows, and Function keys (Fig. 2).
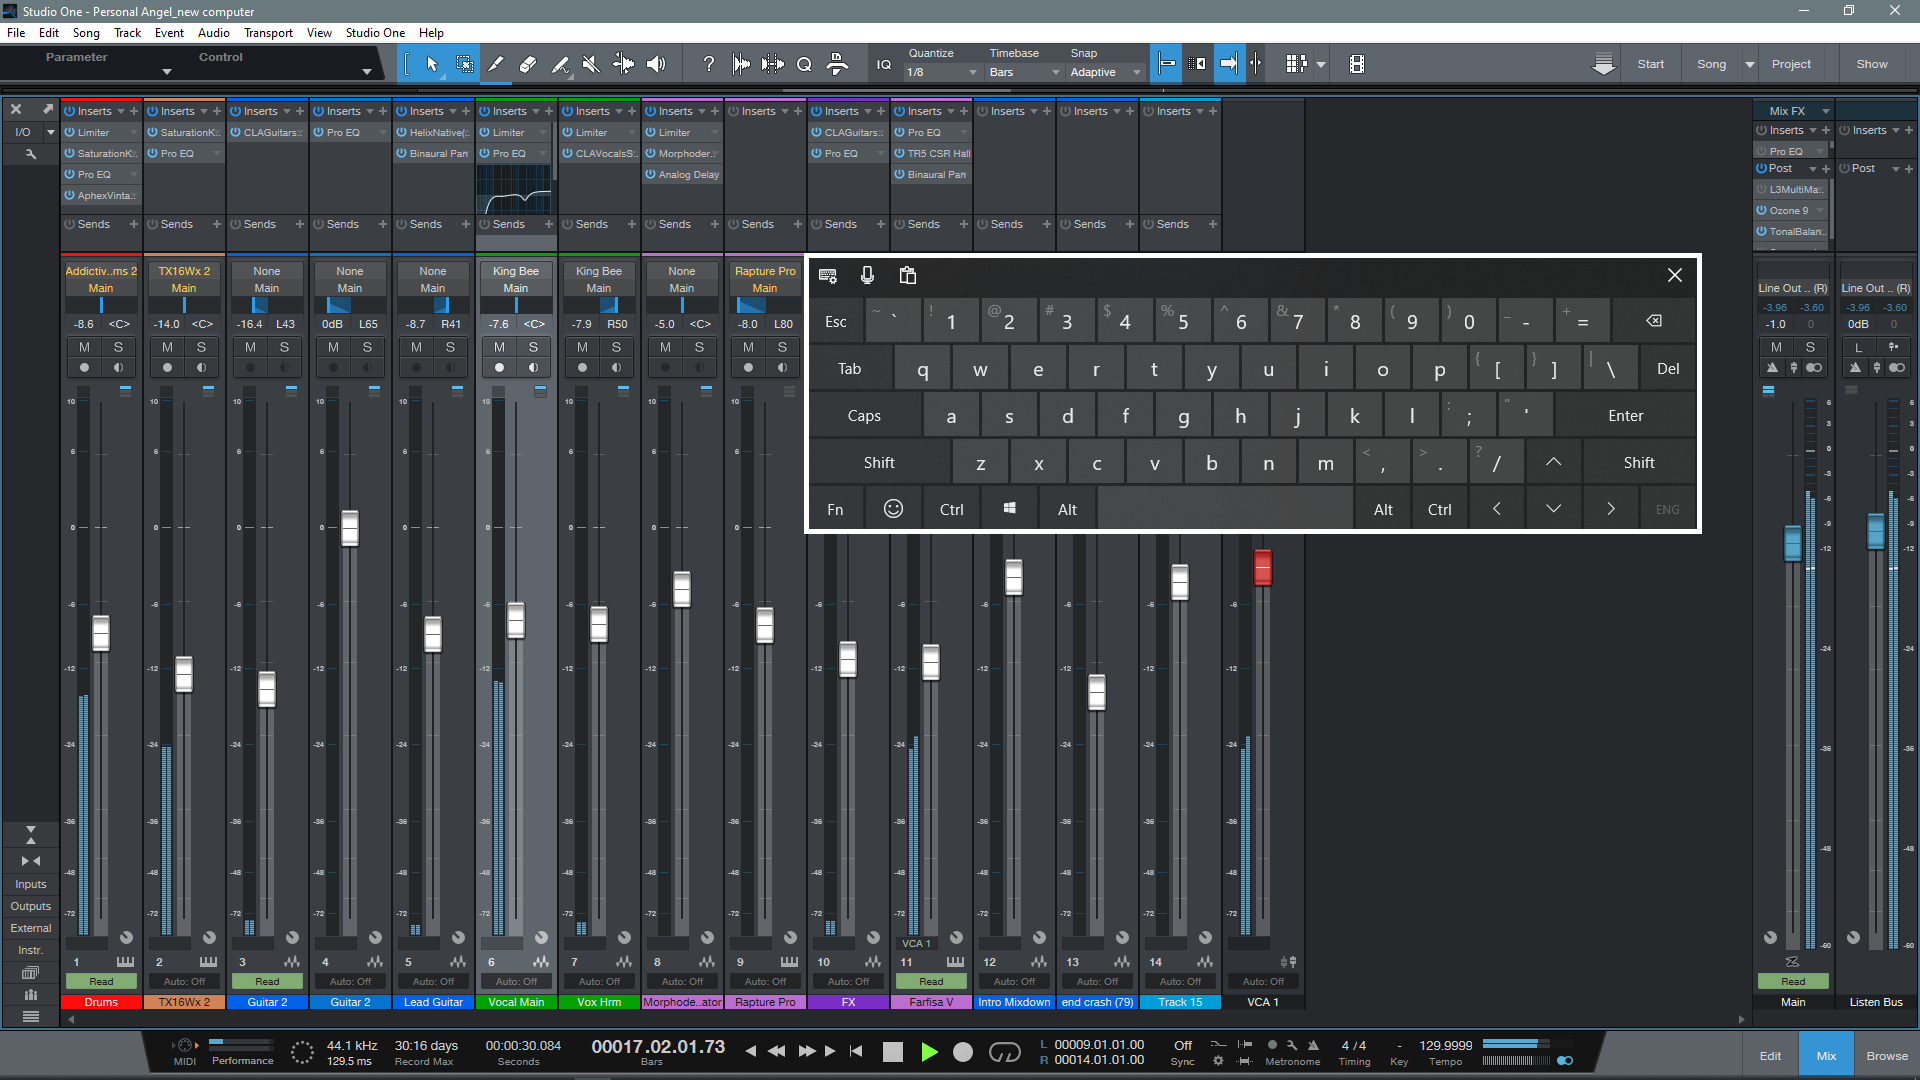
Figure 2: This shows the full keyboard, set for the option to float anywhere over the window. Note how the faders are stretched to give excellent touch resolution.
So Is It Worth It?
If you miss working on a hardware mixer surface, a gently angled, horizontal touch screen is pretty close to that experience. Studio One’s ability to extend the height of faders is also great—when you mostly want to concentrate on fine level adjustments, you can do so with touch. Multitouch on effect and instrument parameter adjustment is also welcome, especially compared to bouncing the mouse back and forth among parameters. Another factor is that unlike an external hardware control surface, you don’t have to “mentally map” the hardware to what you see on the screen—after all, you’re adjusting what’s on the screen.
If you have a choice between spending $300 on upgrading your speakers or buying a reasonably large touchscreen, I’d prioritize upgrading your speakers. But if you’re looking for a new tool that can give you an edge in certain workflows, a touchscreen may be the answer. And even if it isn’t, it can always serve as a conventional monitor, and provide an extra screen. And we can never have enough screens!
RMB Justize: Music Of The (PreSonus) Sphere
Discovering new sonic universes to explore is what being a musical artist is all about!
Let’s dive into RMB Justize’s discussion about his worlds of sound, and how he does it all with PreSonus Sphere:

“Versatility and persistence are a deadly combination of characteristics. They are much-needed weapons to have in an artist’s arsenal.”
Based in Chicago, IL with ties to the DMV area… Taylor Gang’s in-house producer Ryan “RMB Justize” Baker grew up in a musical household, his mother being a classical violinist for the Chicago Sinfonietta, exposing RMB’s ears as early as six years old.
“I caught the music bug from Mom, for sure. I remember turning 11 or 12 and having nothing but a voice recorder and a Yamaha DJX keyboard. Skateboarding was the thing back then, with influences ranging from Sum 41 to Incubus to The Neptunes and Noreaga. A couple of years later I finally dove into making music with computers, using every piece of software I could get my hands on until now. But… then came PreSonus Studio One, which changed it all for me.
“The interest came from an artist I worked with at the time—he wouldn’t stop mentioning it! After spending countless months into years on ProTools, FL Studio and Reason, I wanted a program that could do it all. I’m a religious template maker, as most are, so the workflow determines the imagination most if not all of the time and Studio One takes care of the madness with ease. Let’s just focus on the music and pushing envelopes more than finding where to click certain stuff. PreSonus did it right, ranging from AudioBox interfaces I’ve owned in the past, all the way to the new Quantum which gives me more than enough power to control the room.”
Since the premiere of Studio One version 5 in July of 2020, RMB has become a power user… eventually convincing a few fellow producers and artists to try it, if not make a full switch.
“There have been times where I’ve walked into big label studio sessions and people look confused because they’ve never seen Studio One in person! Once I show my way of doing certain things, using certain plug-ins in certain ways, they’re overly surprised. It’s hands-down the fastest program, which lets me flex my mind-work and turn my rough thoughts (even voice notes) into full records. I’ve had people come to my studio for sessions and look surprised when they ask why I use it. You have to try for yourself to find your workflow.”

Honorably noted, PreSonus Sphere has made his processes for online collaboration, recording, mixing, and mastering an album-quality one-stop-shop, helping the migration become a breeze. Especially during times of a pandemic where people can’t communicate like they normally would, it’s a necessity.
“I think all DAWs should have an ecosystem such as PreSonus Sphere, whether you’re just getting started or an A-list musician. The tools available make it seamless to share files and keep up to date on things like deadlines and most recent notes/mixes, rather than scrambling through emails and hard drives (which we can all relate to, I’m sure). Having that system in one spot, one site, one page, actually kept me in line when finishing a label record and staying up to date without confusion.” (Chevy Woods—Since Birth)
Recently focusing more on production and audio engineering as well, the AAF import feature has been a godsend.
“I still find myself walking people through how to convert sessions to AAF rather than tracking out. There is no other program that will line the session up identically with automation and fades, to say the least, which saves more time than I expected. That’s just a small piece of my realization, of how capable this DAW is. Cheers, PreSonus!”
Since the start of the COVID-19 pandemic, RMB’s main focus is to create cutting-edge music, knowing he has the perfect DAW to do so, with no issues.
RMB Justize @ PreSonus Sphere
Pro Tools Multi-Mono Mode with Studio One
A fundamental difference between Pro Tools and Studio One is effects handling, which can be confusing for Pro Tools users switching to Studio One (and yes, this tip is based on a true story). When you add an effect with Pro Tools’ mixer insert, you’ll see options for Multichannel and Multi-Mono effects—which Studio One doesn’t have.
Or does it? Actually, not only can Studio One emulate the Pro Tools Multi-Mono mode for people who’ve switched, but there are some advantages that are relevant to Studio One users.
In Pro Tools, Multichannel effects are like what we’re used to in Studio One (and other programs), where the effect processes a mono or stereo track. However, Multi-Mono effects insert separate effects for a stereo track’s left and right channels. Normally this is transparent to the user because the effects are linked, and have a single interface, so they seem like a Multichannel effect. However, Multi-Mono’s particular talent is that you can unlink the effects from each other, switch between the two channels in the interface, and process the two channels (or more, for surround) separately.
My Pro Tools friend was disappointed, because he would often use this feature when mastering, restoring tracks, working with two-track audio sources, and the like. For example, when prepping a file for mastering, he sometimes limited one channel to tame peaks, left the other channel with minimal limiting, then added a master limiter at the output to provide overall limiting (this isn’t the same as using a conventional stereo limiter, and unlinking the two channels). On occasion, the different channels needed different EQ as well.
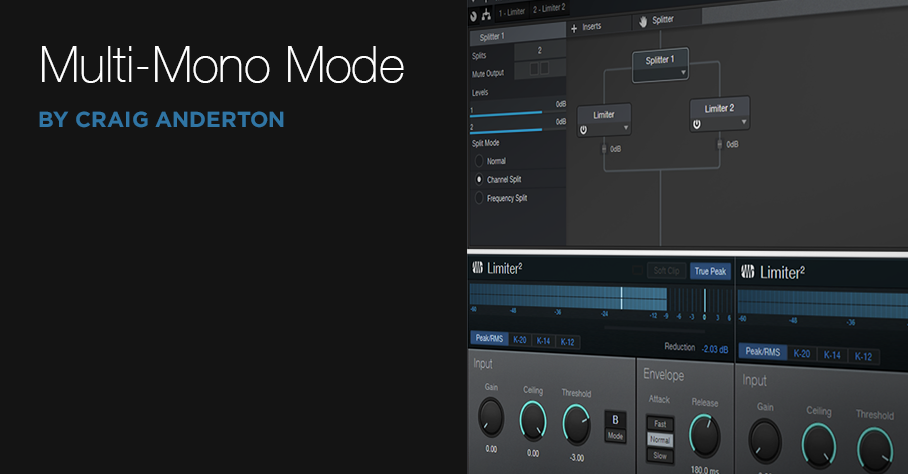
He knew about my Stereo to Virtual Mono blog post, but wanted to have everything in a single track, like Pro Tools. Fortunately, there’s a simple solution (Fig. 1). As an example, let’s use his scenario of wanting different limiters in each channel.
Figure 1: How to implement Pro Tools’ Multi-Mono effects functionality in Studio One.
- Open the Channel Editor, then click on the Routing button.
- Drag a Splitter into the Routing window.
- Set the Split Mode to Channel Split.
- Insert a Limiter2 into each split.
- (Optional) Insert a Limiter2 at the output, to provide the final limiting function.
Done! Now the left and right channels have their own limiters. But the Pro Tools guy also realized there was an advantage to Studio One’s pseudo-Multi-Mono mode: he didn’t have to switch between Limiter interfaces. Instead, he could pin them, and see both at the same time. When I reminded him he could bring out the Gain, Threshold, Ceiling, and Release controls for each Limiter to Macro knobs, save that as an FX chain, and use less screen real estate…let’s just say he was a happy camper.
This isn’t to diss Pro Tools, which (like any DAW) does some things well, and some things not so well. But it does show that when switching from one program to another, concerns you may have about needing to give up a favorite feature could be irrelevant.
Great Bass Sound—In 15 Seconds!
Compression and bass go together like ham and eggs, red beans and rice, or peanut butter and jelly (or gin and tonic, if you prefer something a little stronger). A lot of engineers plug in a compressor within milliseconds of turning up the bass track’s fader. Some “pro tips” on the web even recommend inserting lots of compressors in series. Hey, if one is good, then four must be better—right? Well, I’m not convinced.
Lately with electric bass (synth bass, too) I’ve been tossing compressors aside, and using Limiter2 when I want to get a solid sound down fast. And I mean fast—that 15 seconds is actually a bit misleading. I’ve clocked myself at under 12 seconds from drag-and-drop to pressing play, including editing the Limiter2 settings.
Check out the audio example. The drums are using my Bigness of Huge Drum Sound FX Chain. The first four measures are the bass sound as recorded, using the Limiter2. The next four measures are the same, but with the Limiter2 bypassed. Note that when the limiter is in play, the bass isn’t overwhelmed by the drums.
Fig. 1 shows the Limiter2 settings.
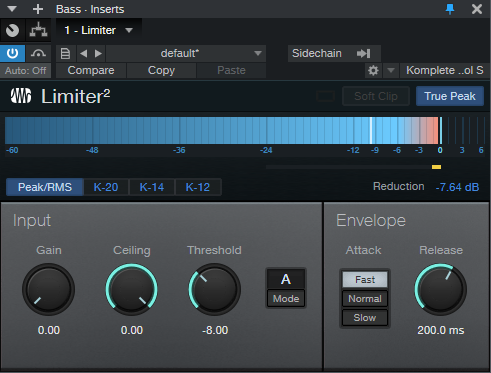
Figure 1: Settings for bass with the Limiter2.
That’s all there is to it. (But if you’re a 5-string bass fan, I do recommend changing the Release time to 300.0 ms.)
Granted, this isn’t necessarily a “one-size-fits-all” tip. You might want to add some EQ, some AutoFilter funk in parallel, or whatever. But this punchy, full sound will hold its own in the rhythm section, and get you through the tracking session. What’s more, if the bass player has a good touch and properly adjusted pickups, it maybe even take you to the final mix.
Create Ampire Cabs with Pro EQ2
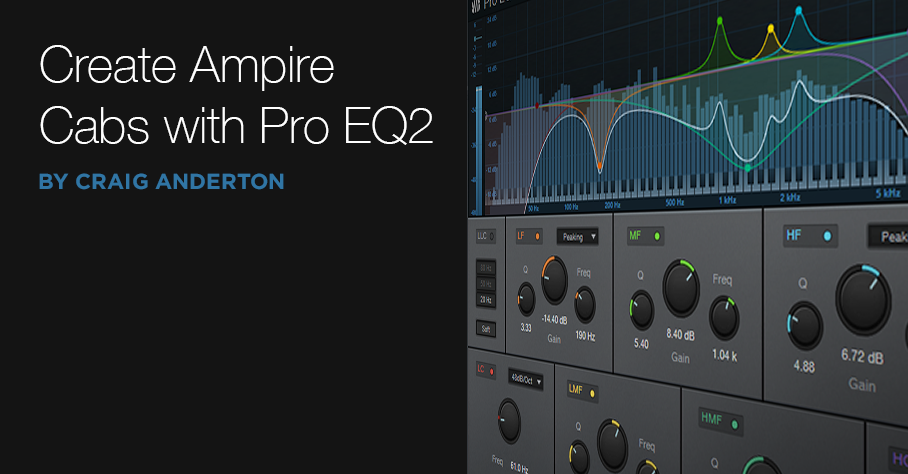
IR-driven cabs are often the weak link with amp sims Fortunately, cab emulations have improved dramatically over the years. Yet like samples, they remain “frozen” to a particular cab—they have their sound, and that’s it.
Although some guitar players think that a cab is a magical device, it’s really just a filter. To be sure, it can be a magical filter…but it’s still a filter. So, we can use filters to create our own cabs. They won’t be able to replicate a specific cabinet down to the smallest detail, but that’s not the point. Using the Pro EQ2 filter to create your own cabinet can give responses that IRs can’t give, with a different sound that can be satisfyingly smooth, and…well, “analog.”
I analyzed the frequency response of several cabs, using the Tone Generator’s pink noise along with the Spectrum Analyzer plug-in, then tried to replicate the response as closely as possible with the Pro EQ2. Although sometimes I was shocked at how close this could come to the cab, more often than not I couldn’t help but make some tweaks—it’s almost like I had taken that cab, brought it into a woodworking shop, and made specific changes for my needs.
If you want to experiment…be my guest! Insert Ampire, choose your amp (I particularly like the following curves with the VC30), select no cab in Ampire (important!), insert the ProEQ2 afterward, and rock out. Here are some ideas to get you started. Note that the white curve is the sum of all the other curves, so that’s the curve you actually hear.
This curve is based on a 1 x12 cabinet that’s designed for leads, but works with rhythm parts as well (Fig. 1).
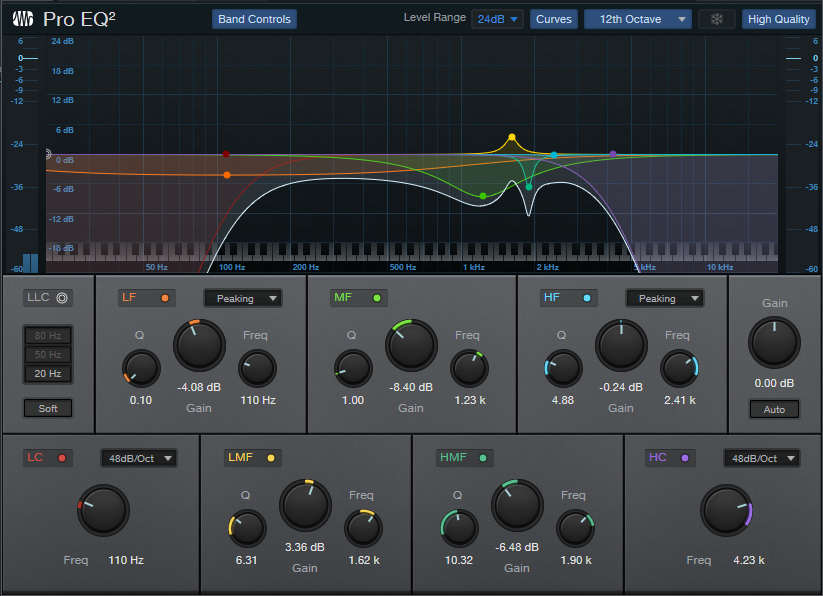
Figure 1
Here’s a curve that’s more “Tweedish” (Fig. 2)
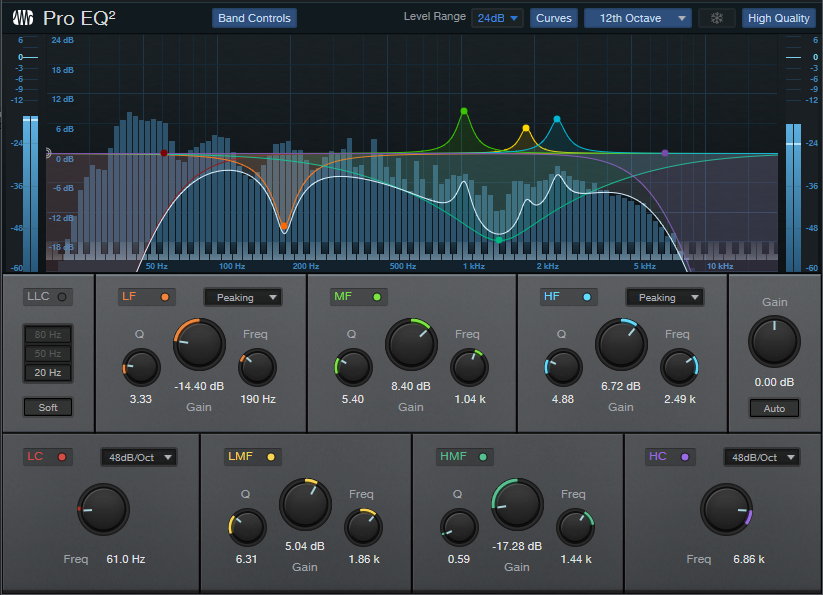
Figure 2
This curve (Fig. 3) is based on an amp by a company that no longer makes amps, but whose name I better not mention so that I don’t have to deal with lawyers. Suffice it to say they’re known mostly for making guitars that are popular with rock guitarists.

Figure 3
And here’s one more…just because we can (Fig. 4)! It’s based on a 2 x 12 cab.
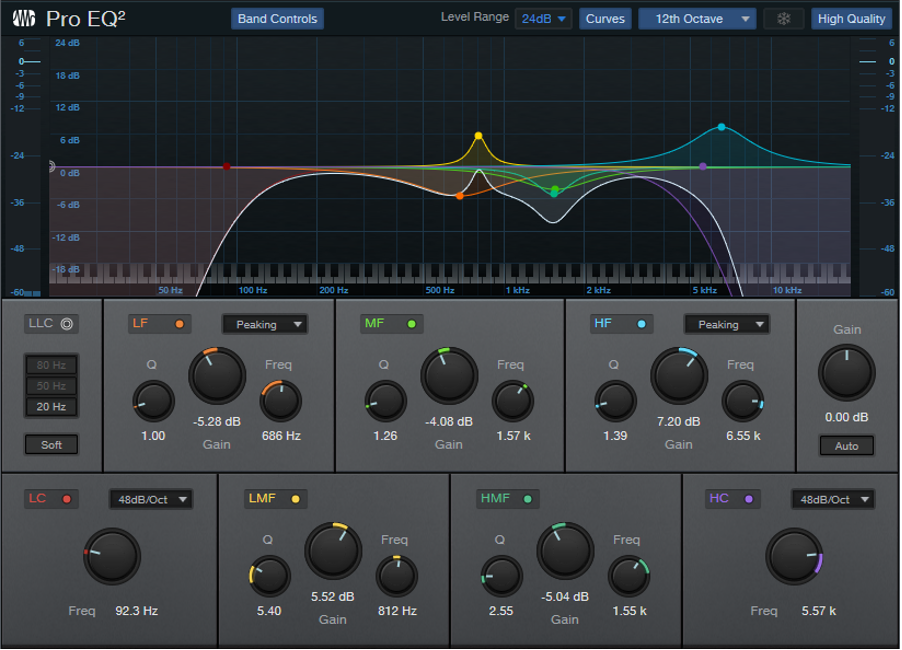
Figure 4
These all have two elements in common: high-frequency rolloffs, and interesting resonances. Although “EQ cabs” may not replace IRs, they’re not supposed to—this is about augmenting your options. Nonetheless, in many of my current productions, I prefer using the Pro EQ2-based cabs because it’s easier to tailor them to fit in with a specific mix.
For this week’s tip, I’m not providing presets because this isn’t about presets—it’s about editing an “analog” cab to give the sounds you need for your productions. So, the “best” curve will depend on what works best with your guitar, playing style, and production goals. In any event, I think you’ll find that constructing your own cabinet can provide a musically useful, and novel, way to expand on what IR-based cabinets can do.
Super-Simple Mono-to-Stereo Conversion

It may be a stereo world, but we still have a lot of mono signal sources. Although some people use delay to convert mono to stereo, this can be fraught if the stereo needs to collapse back to mono eventually. EQ can do an effective, albeit not as dramatic a job, and I wrote a blog post about How to Create Delay-Free Stereo from Mono using two Multiband Dynamics processors. This is a very flexible setup because you can automate the Multiband Dynamics parameters, as well as add in compression selectively if desired.
However, it’s also possible to convert mono into stereo within a single track—no buses needed—with a Splitter and some pan controls. While not as editable as the previous approach, it does the job, is simple to use, requires virtually no CPU power, and the stereo signal collapses back to mono with no problems.
How It Works
The mono-to-stereo conversion process works by splitting the incoming signal into five frequency bands (Fig. 1). A Dual Pan follows each band, with Link enabled and Width set to 0%. So, you can use the Pan controls (which are brought out to the Macro Controls panel) to place each band wherever you want in the stereo field. This is what creates the stereo image.

Figure 1: Block diagram for the Super-Simple Mono-to-Stereo Converter.
The Macros Control Panel
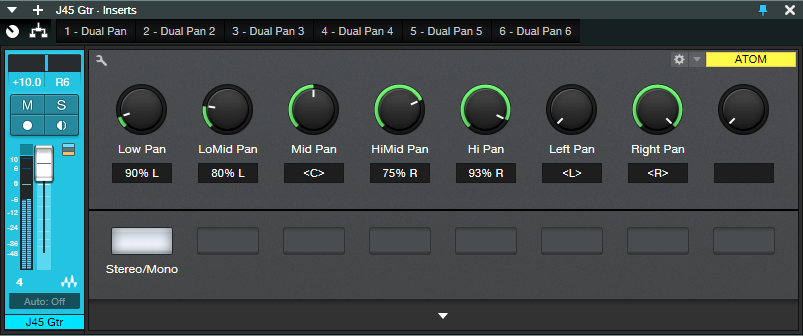
Figure 2: Macro Control knob panel.
There’s a downloadable FX Chain, which takes care of the parameter assignments for the Macro Controls (Fig. 2). However, it would be pretty easy to do it yourself. The five Pan knobs vary the Pan parameters in the five Dual Pans (one for each frequency band). The two right-most controls are tied to a Dual Pan at the output, and serve as “master pan” controls.
How to Use the Super-Simple Mono-to-Stereo Converter
The track being processed has to be in Stereo channel mode. It’s okay if you recorded the track in mono; just make sure Channel Mode is stereo when you play back, or convert the mono to “dual mono” by selecting the Event while the Channel Mode is stereo, and typing Ctrl+B.
The five left-most knobs control panning for the five bands. Pan the frequency bands as desired in the stereo field. Also note the Stereo/Mono switch. When dimmed, it de-activates all the Dual Pans, so it’s easy to compare the synthesized stereo and original mono sounds.
For the full stereo effect, set the Left Pan fully counter-clockwise, and Right Pan fully clockwise. To “tilt” the image more to one side or the other, bring the appropriate Pan control more toward center. For example, if you want to tilt the stereo spread toward the right channel, turn the Left Pan knob more clockwise.
One of my favorite applications is creating a stereo image from an acoustic guitar that was miked with a single mic (to avoid potential phase issues) or taken direct—you can still have a stereo “feel.” It’s also fun to follow Ampire with this FX Chain when you want to splatter a distorted rhythm guitar part across the stereo fiels, or give an old mono synth a stereo facelift.
As I said in the beginning, it’s a stereo world…but now your mono signal sources can be part of it a little more easily.
Friday Tips in the Real World
[Editor’s note, we’re publishing this “Friday Tip” on a Wednesday, since we’re closed for the holidays on Dec. 24 and 25; a Thursday and a Friday.]

The Friday Tip series started three years ago, and it’s been an honor to be part of the family of Studio One enthusiasts. Ultimately, these tips come out of doing projects, and the album I dropped last week was the first one done from start to finish in Studio One. So, I thought you might like to hear what a few of these tips sound like not as isolated SoundCloud examples in a weekly blog, but as integral parts of a musical collection.
The specific examples below include start times, so you don’t have to listen aimlessly—just drag the dot on the embedded video to the indicated place on the timeline. But first, let’s start with the tips that were used on pretty much everything.
This phrase-by-phrase normalization techniques described in How to Gain Better Vocals and Get Better Vocals with Gain Envelopes were used on every vocal—lead and background—in every song. Most vocals added light limiting, and a few added compression, but these tips were the key to consistent vocals. The appearance of Gain Envelopes in V5 became the icing on the cake.
The Streaming: Limiter2 to the Rescue technique was used when assembling songs in the Project page. If it sounds like the songs have the same perceived level throughout the album…that’s why! Anything with a fadeout uses the technique described in How to Obtain The Perfect Fadeout, and Why Overlap Correction Is Totally Cool was used on every bass part (they were all MIDI bass).
Now let’s listen to some specific examples:
Reverb Chord Progressions? Why Not!
The effect is applied here to cymbals and noise, not reverb, but the principle is the same—and the harmonic “tuning” provides what sounds like some strange kind of psychedelic organ behind the guitar at 08:18. This same “organ” effect occurs at 09:06, 09:38, and 10:25 (not to be confused with the obvious Farfisa organ sound). I’ll be exploring this off-the-wall harmonic editing application much more in the future…it’s very cool, and unique to Studio One.
Saturation (using the Softube Saturation Knob) was crucial on several bass and drum parts to help them cut through busy mixes, or to add drama. Saturation is on bass all the way through three songs; the bass comes in at 00:17, 03:02, and 13:59. It’s also on drums all the way through two songs, where the drums enter at 08:25 and 16:58.
The preverb effect provides the ghostly sort of sound that starts at 12:00 behind the lead vocal, as well as several other places throughout the song.
Synthesize Open Air Impulse Responses in Studio One
It’s easy to make your own reverb impulses, and I took advantage of that for lead vocals starting at 03:02, 08:34, 16:09 (the most obvious example), and all vocals (lead/background) starting at 18:50. Custom impulses are also on drums at 16:58, and the Mai Tai organ starting at 19:14.
Create the “Barberpole” Audio Illusion
I love the way the “barberpole” effect starting at 12:25 accompanies the moon in the video getting bigger and bigger. The barberpole also uses a custom Open Air impulse with a long reverb time, which enhances the illusion of a tone that never stops rising.
This is applied to the entire stereo mix at 12:49 (go big or go home, right?), but it’s also applied more subtly to the flanged guitar parts in the same song. And I didn’t write a tip about it, but you gotta love that factory preset Mai Tai bell sound…
Yes, even something done in the middle of a pandemic when you just want to de-stress can come in handy. This provides a transition between songs; the first one is at 10:45, and the second at 13:38.
Polyphonic Glide with Any Synth
The “steel guitar” sound that starts at 21.22 and goes through to the end is actually a synthesizer that uses this technique.
This doesn’t dial up the gritty blues sound as much as on my 2017 album Simplicity, but it does make the harmonica at 03:52 and 0 4:52 sound a little less wholesome. This is a good thing.
Although I converted a guitar to Nashville tuning to replace the “faux” part, it didn’t sound quite right…so I mixed some of the virtual Nashville tuning part back in at 17:02 and 17:55. It’s the kind of effect you don’t notice until you take it out.
Varispeed-Type Formant Changes
This was used most prominently at 07:20, on the background vocals by the Nashville QTs. The goal was to create a sound like there were more people singing, but without using time-based effects.
Three hand percussion parts, processed as described in the tip, kick in at 06:04, and again at 06:40, after a brief drum solo. The odd thing about this technique is the percussion sounds like what percussion should sound like…but if you take out the tremolos and have the parts going all the time, they sound repetitive. (Oh, and I think you’ll recognize what’s providing much of the video background…)
Tempo Changes for Already Mixed Songs—Reloaded
When doing a mostly continuous mix, you’re bound to have beats that don’t quite match up. This technique was used in the two segues that start at 02:29 (the guitar carries the transition and speeds up) and 05:02 (the keyboard carries the transition, and slows down).
Of course there were plenty of other workflow and FX Chain-based tips used throughout, but I think these are arguably the most interesting ones. I’m looking forward to seeing what PreSonus comes up with in 2021 as we work our way through a new year. Stay healthy, stay optimistic—and keep making music! As Quincy Jones says, it’s food for the soul.
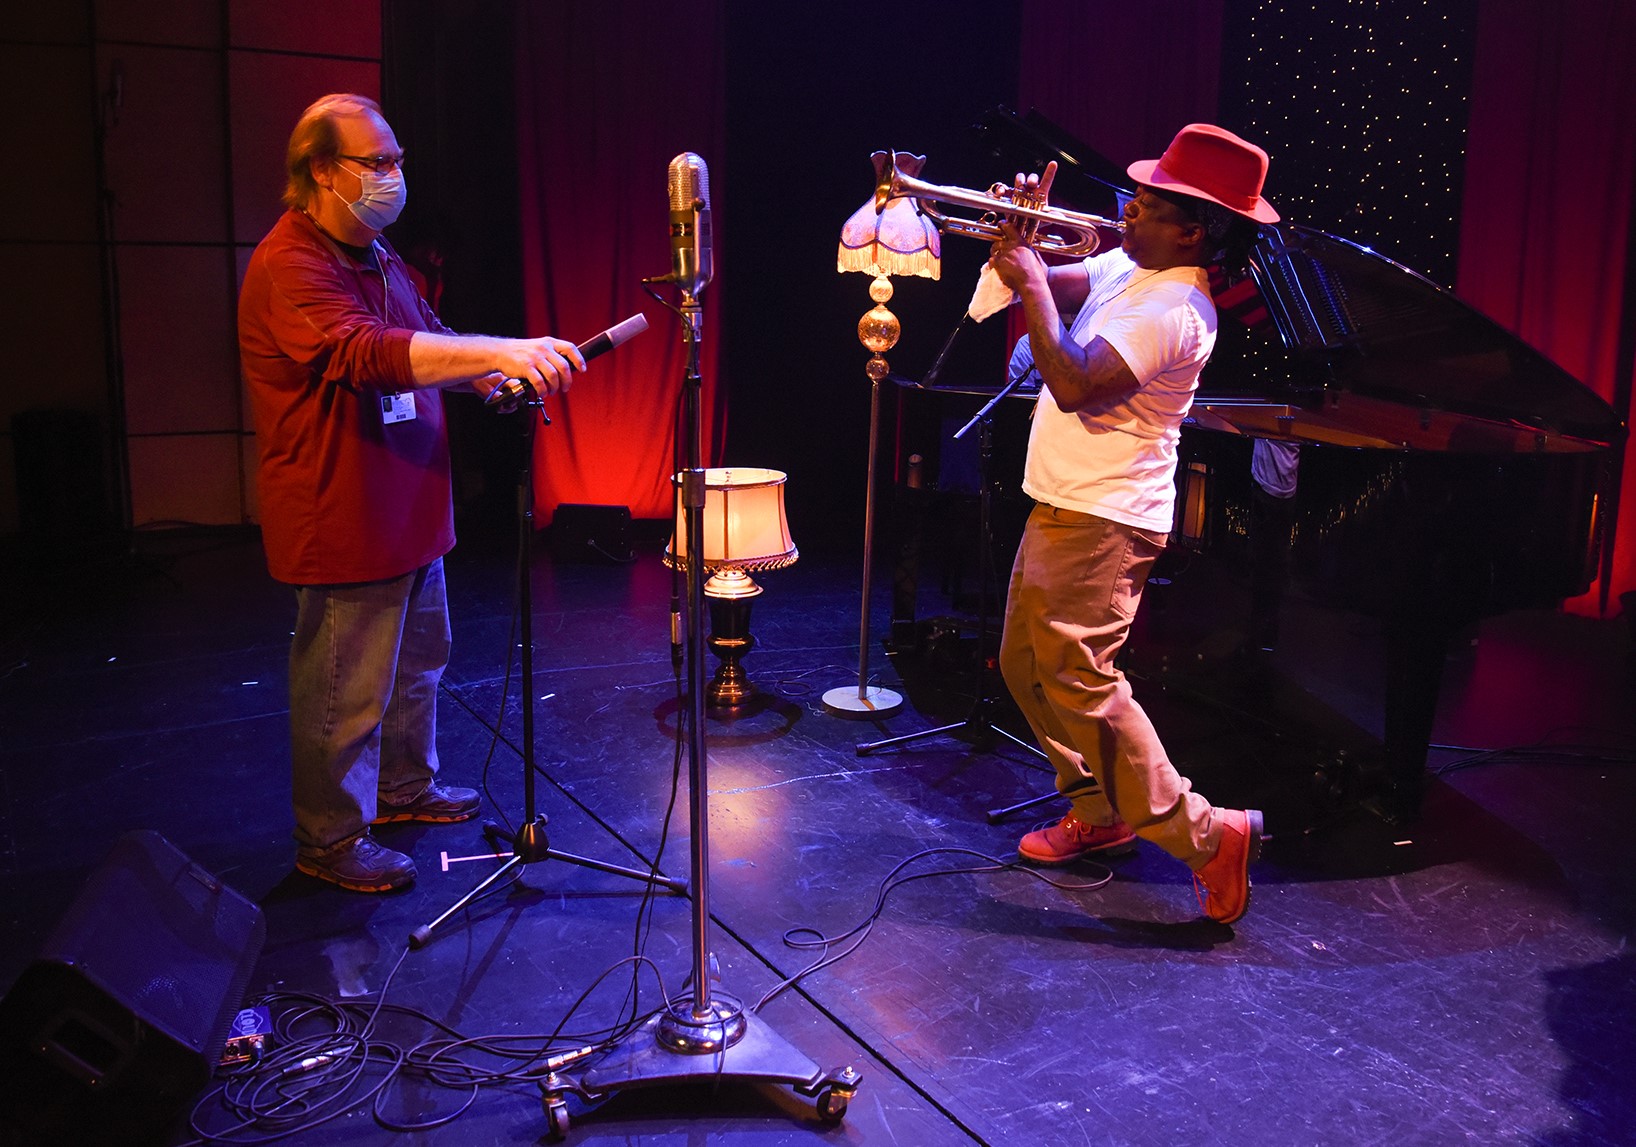
Home For The Holidays: Steve Himelfarb On Using The StudioLive 32S With Studio One At NOCCA
Home For The Holidays is a free virtual concert featuring holiday music by some of New Orleans’ favorite musicians including Jon Batiste, Preservation Hall Jazz Band, Irma Thomas, Kermit Ruffins, John Boutte, and others.

(click photo for NOCCA event details)
The performances by Irma Thomas, John Boutte, and Kermit Ruffins were recently tracked live at the New Orleans Center For Creative Arts (NOCCA) by professional recording engineer and faculty member, Steve Himelfarb using the PreSonus StudioLive 32S digital mixer and Studio One DAW software.
Let’s get to know him a bit better and hear what he has to say about integrating Studio One and StudioLive for use in live recordings!

Steve began working in recording studios around Los Angeles when he was about 18, doing the midnight til 9:00 a.m. cleanup shift at Cherokee Studios. As a result, he had priceless experiences including meeting Mötley Crüe (still one of the loudest he has ever heard to this day) when Roy Thomas Baker was mixing their debut record. Another fond memory was that of Ray Manzarek producing X’s Wild Gift during the heyday of the 80s music scene.
“Cherokee was super rock & roll, yet they were very strict with what they wanted from their cleanup people. I was taught how to conduct myself as a young would-be recording engineer,” Steve fondly recalls.
At 19, Steve began working for Capitol Records in the famed Capitol Studios building putting in a solid five years of work. Some of his album credits include Sheila E’s first album, Crowded House’s Crowded House, Bob Seager’s Like a Rock, Dwight Yoakum’s GTRs Cadillacs and Tori Amos’ Y Kant Tori Read. (Fun Fact: Tori and Steve have been friends since high school.)
Steve moved to New Orleans at the age of 25, and the first record he engineered in town was Buckwheat Zydeco’s On A Night Like This, which was produced by Chris Blackwell and nominated for a Grammy. He subsequently bought the studio that he worked at in the late 80s and rebuilt it with a Neve console and Studer tape machine. In 1993, Steve sold that studio and took a couple years off, sort of. To date, he has worked on 15 gold and platinum records and has five Grammy-nominated record credits to his name.
 Teaching himself to bake, Steve decided to open a small restaurant in the French Quarter of New Orleans called Cake Café, and became affectionately known as “The Cake Man” in the Marigny district. After 13 years of business (fast-forwarding past Hurricane Katrina to about four months ago), he sold the restaurant and wrote a cookbook.
Incidentally, around three years ago (after encouragement from Tori Amos) he started getting back into recording again and dove headfirst into the world of digital recording using Studio One.
Here are some thoughts by Steve, in his own words:
I really like the workflow of Studio One. It feels like I am working on a console and not a computer. The drag-and-drop integration is such a great feature. The plug-ins are very musical. Lately, my go-to has been the VT-1 on the stereo bus.
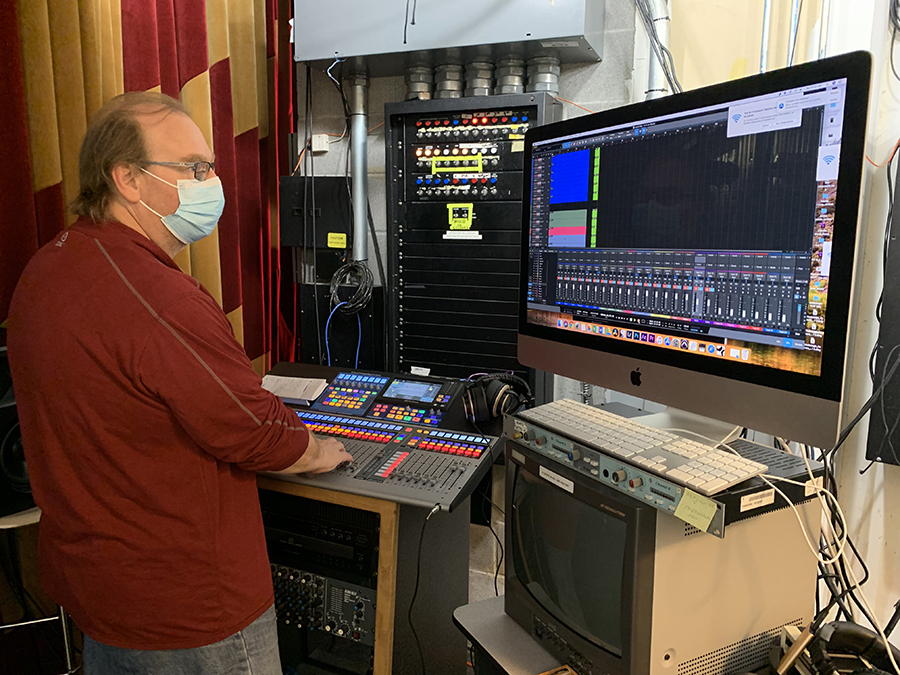
Using the StudioLive 32S in a live recording situation is wonderful. In all honesty, this type of setup used to be such an involved task with a mobile recording truck and countless hours of set up. The StudioLive 32S, along with the NSB digital stage box, is such a game-changer. Total set-up time takes about an hour. The sound is clean. I like the Fat Channel limiters. They are kinda my safety net against clipping in dynamic situations. I have used the StudioLive 32S on about eight projects over the past year, and it is truly a sturdy piece of equipment for such demanding situations. In live recording situations, you just need to count on your equipment and the StudioLive has always performed excellently.
 I really like how the company has developed the workflow of the recording studio in the current digital age. I could see how, about six years ago, PreSonus was ahead of the pack in their development of studio ecosystems. Now everyone is building small-format consoles and integrated systems.
Developing young artists has always been a large part of the work I have done. Teaching at New Orleans Creative Center For The Arts (NOCCA) is a natural extension of the work I love.
To learn more about this historic pre-professional arts training center for high school students in Louisiana, please visit and support them at: https://noccainstitute.com/ and https://www.nocca.com/
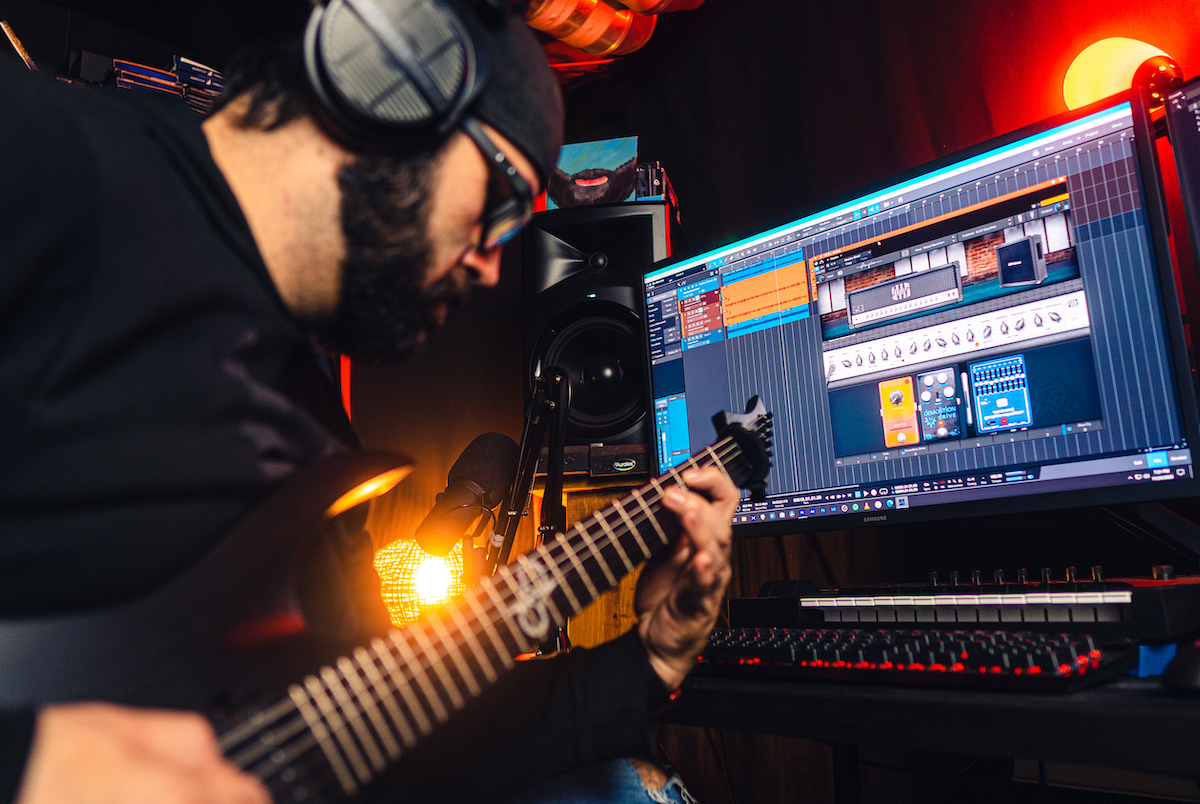
Extended Range Guitars With Ampire: Meet The Bunn, Nick Hill & Gary Hiebner
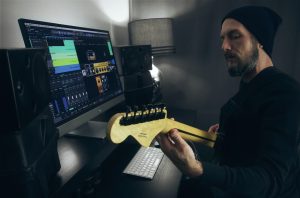 The Bunn

The Bunn (a.k.a. Scott Sokoloski) is a stoked dude from Canada who makes low-tuned, heavy music despite wearing guitars incredibly high, with very short straps.
After a life of touring and gigging throughout North America in bands, The Bunn started producing his own music, back around 2010. Super-low tuned stuff. Not djent though, and not with 7 or 8 string guitars. The tunes are a post-sludge/ doom kind of thing and with extra long-scale, 6 string baritone guitars.
Besides creating and producing material for Foreigns, Wetlands, & Venns, “The Bunn” is forever busy sharing production and practical techniques in working with super-low tuning and getting music done on his YouTube Channel.
Nick Hill
Guitarist, producer, sound engineer and Solar Guitars Artist, Nick Hill runs his YouTube Channel focuses on mixing, metal, and tones. There, he shows how to create modern metal guitar tones, mix, master, and learn the process of music production.
He operates on Spotify both a solo artist and as part of a project called The Partisan Component with Jeff Plewa, an amazing metal vocalist.
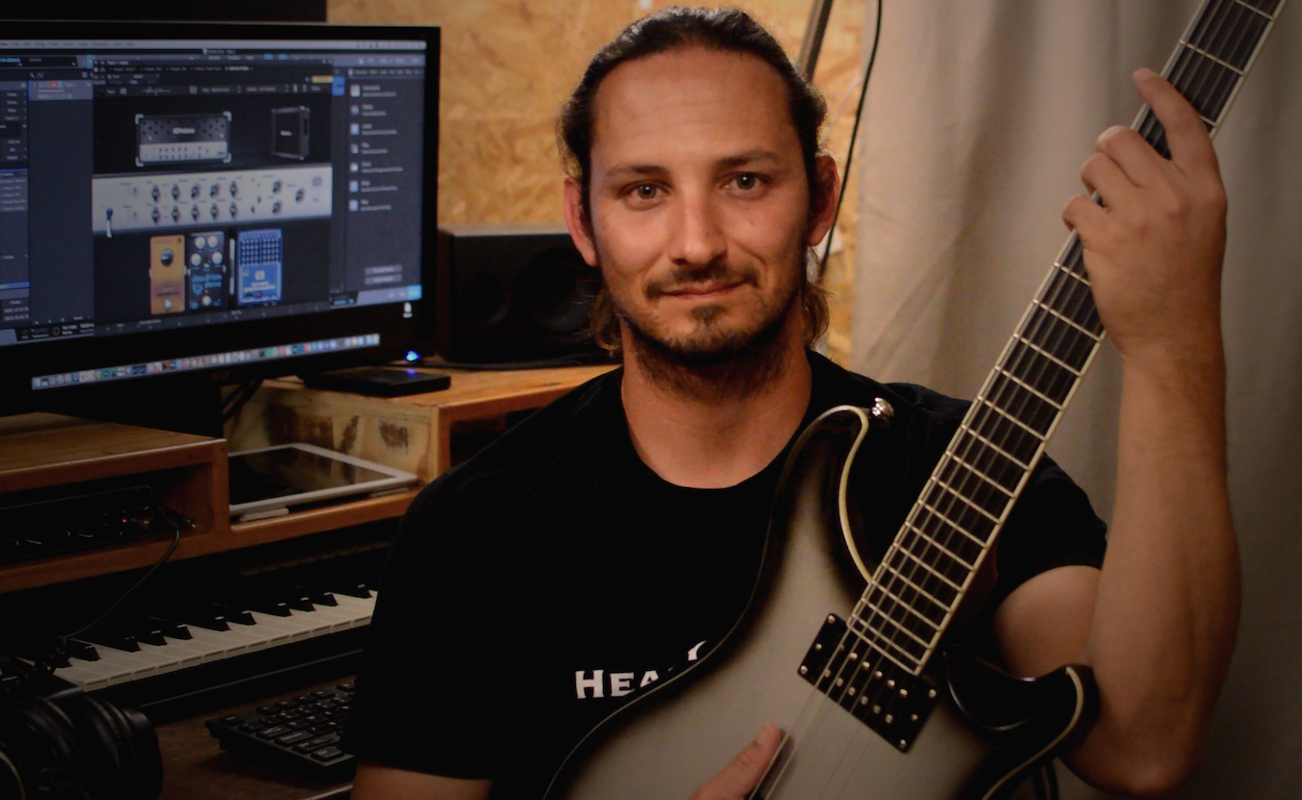
Gary Hiebner
Gary Hiebner is a South African guitarist, music producer, content creator, and YouTuber. He started off as a guitarist in the South African music scene in the early 2000’s and from there gathered an interest in music production.
Through learning the different software audio applications available Gary developed a keen interest in music tuition and for the last 8 years he has been creating and providing music tutorials courses on many of the audio DAWs, plugins and effects available on different teaching platforms.
Currently he is a course creator at Groove3 and he also runs a YouTube Channel (Heavy Tones) where it focuses on heavy, low tuned guitars productions and how to get the most out of your heavy low tuned guitars… from dialing in a killer tone for low tuned guitars all the way to guitars setups for low tuned guitars. Also, be sure to check out his new series at Udemy: Advanced Tips and Techniques in Studio One
Because of their depth of work and respect in the extended range guitar online community on YouTube, PreSonus was so fortunate to have these three gentlemen so graciously and enthusiastically help out with creating most of the Presets (and sound examples on our website) for the recent PreSonus Ampire High Density software add-on pack that was just released. Thank you so much for your time and effort guys!
Let’s get to know them a bit better and how their workflow history intersects with PreSonus hardware and software.
PreSonus: How did you discover Studio One?
GH: I started off working in ProTools probably in about 2004, and then moved over to Logic in about 2006 and used that for a good couple of years. But around 2012 I started using Studio One alongside Logic. But I found myself preferring the workflow of Studio One. The interface is smoother and cleaner and with the new updates they have really been adding some great features that help my workflow.
TB: Initially through owning PreSonus hardware (since the FirePod and FireStudio, currently STILL using an AudioBox22 VSL which has been super solid for the last 5 years!). Bundled with the interface was an “Artist” version of Studio One. I’ve really taken to it in recent years (Studio One Pro) since connecting and collaborating with fellow YouTuber, Nick Hill. Nick is a veteran Studio One user and a great mixer. In our musical collaborations everything happens in twin setups of Studio One so that Nick can seamlessly go to the mix stage.
NH: I was definitely a little late to the Studio One party. I recall my early days of audio recording exploration, this would have been the early 00’s, using early versions of DAWs like Digital Orchestrator Pro and then moving into Reaper thinking THAT jump was massive. I tried various other offerings and my best friend Lenny had discovered this DAW called Studio One. At this point, it may have been toward the end of Version 2’s life cycle but we jumped in headfirst and the rest, as they say, is history.
PreSonus: If you explored Ampire in previous versions of Studio One, what are your thoughts on it now versus then?
TB: I started to pay attention to Ampire in Version 4, of particular interest was the “Double”. I’m a huge fan of Rectifiers and needed to try it. The amp itself sounded pretty great, however Ampire as a environment was missing some key functionality and features in order to make it part of my regular routine.
NH: I remember trying early iterations of Ampire and thought, “oh this is neat, but I won’t really use it.” The personal workflow I’ve developed and grown to feel most comfortable with has been hardware or externally based ie audio interface, using mics, capturing real sounds/amps/acoustic instruments, and then on to using hardware like the Line 6 Helix but as Ampire improved, I found myself using it for various mixing and layering tasks, adding in some melody lines, ambient guitar parts and overall “ear-candy” to some of my mixes and projects.
GH: In the beginning, like in version 2 where I started, Ampire was very basic. I was jumping for other Amp sim plugins to get the tone I was after. But I only really started exploring Ampire again with the new State Space Modelling. The Amps sound sooooo much better now. More realistic on getting that sound that you hear from a real amp. Where it sort of sounds like you can feel the air pushing out the speaker. So yeah the new version of Ampire has really come leaps and bounds from the earlier versions.
PreSonus: What do you think about the 3 new amp models in the Ampire High Density add-on pack?
NH: Having had some time to play with the new High Density stuff, It’s safe to say that these newly modeled amps stack up against some of the big-name, 3rd party offerings.
GH: I love all the new amps. Obviously I am more inclined towards amps catering towards high gain. So these new amps are exactly the tones I’m looking for. My favorite being the German sounding Gasoline EMC2. I’m a big fan of the brand it’s being modelled after, so yeah you guys really nailed it with that amp model.
TB: The new amps and cabs sound really good offering a satisfying level of feel and spirit as in the real-life hardware. Both the new drive pedals, the Wild Drive and Demolition Drive really help to shape, tighten, and add dimension to the amps. The new Space Reverb is a very nice addition that I could easily use in a number of different scenarios. Very soft and organic vibes.
PreSonus: How easy was it for you to dive in and start coming up with presets?
GH: Yeah, I could jump in straight away and build up presets quite easily. I’m not into building up big huge chains of amps and pedals. I like to keep the chain quite simple. So with the interface it was easy for me to dial up the sounds I was after. Sometimes just an amp head, speaker cabinet, gate, overdrive and EQ. That’s it.
TB: Ampire, for me, needed no instruction. I just opened it and started using it. Maybe the only thing I got tripped up on was looking for features that I expected that do not exist. Hahaaa!
NH: I wish that I could say I labored for hours and hours over the process but the fact of the matter is, I spent more time jamming on my presets and making the final 1-2% finishing touches than I did creating the actual tones. The new High-Density Amps are straight up, easy to work with and I think users will see that.
PreSonus: What’s the best feature you like about Studio One?
TB: That you don’t need any 3rd party plugins other than perhaps a virtual acoustic drum suite (if you don’t work with a drummer) to produce finished, commercially viable tracks. Typically I need 3rd party dynamics, EQ’s and spatial effects to actually make a track. Studio One closes that gap, especially with the addition of Ampire. The only similarly competing platform in this way would be Logic.
NH: Having used Studio One for years now, I’ve grown to love so much about this DAW. It seems to get out of my way and lets me create but the coolest or the best thing about it speaks to PreSonus as a whole and that is their willingness to work WITH the artists, producers, mix engineers, and musicians who use it. They take feedback, suggestions, and input from the community and continually try to make Studio One better with every update. It won’t always be a perfect process and pleasing everyone is a fool’s errand, but they get marks for trying in my book.
GH: I really like the Pitch Shift pedal effect. I have been through some of the other pitch shifting emulations around and a lot of them suffer from adding too many artifacts when the sound is transformed up and down. But this one works great. I really like the sound and use of it.
PreSonus: What are your thoughts on 2020?
NH: What can I say about 2020 that hasn’t already been said? It’s been rough and scary but with challenge comes growth. I focused on making my community a positive place, a creative place, and a sort of escape from the world and the at times, overwhelming negativity. Not as a way to put on blinders, but as a coping mechanism. I’ll tell you one thing, it’s given me much more appreciation for all of the things we all seem to take for granted when life isn’t on its head, that’s for sure.
GH: 2020 has been a strange year, I’m sure for all. With the whole pandemic and lockdown restrictions. Luckily for me I work from home, and don’t do much gigging and performing outside of the studio anymore. So I haven’t been affected too much in that way like many others have.
But it’s been a great year for guitars. There’s been some great releases focused towards guitarists. And I have been spending more time this year than ever dialing in the tones I want for my guitars and fine tuning them to a level where I finally like the productions I’m getting. So if anything 2020 has been a year for me to dive deeper into my guitar productions.
From my side in the future I’m going to be focusing more on Studio One tutorials courses across the platforms I use. And working hard at my Heavy Tones guitar YouTube channel as am having a lot of fun with that and it seems to be growing nicely. So if you haven’t seen my channel yet I would highly appreciate you stopping by, watching a video or two and leaving your thoughts on what you think.
TB: It’s an interesting, transitional period for music production. Pro audio and bedroom producer spaces are melding into the same space. I think that the trends going forward are going to be software that runs really light, ultra clean and simple GUIs that go away from trying to look like in real life, and software that makes global collaboration accessible and easy.
With Studio One and Ampire specifically I would like to see the gate, smoothed out and further developed (the Fortin Zuul is an incredible gate if you need inspiration). As well, it would be nice to see the cab shaping tools expanded so as to be able to launch a single instance from the inserts that offers a fully refined tone without the need for any additional inserts in the FX rack. This is the big reason that I favour the Helix platform, (and previously BiasFX) and also why I don’t use Neural DSP or STL plugins. I want a single instance that sounds awesome, needs no additional plugins, runs light on my system, and gets out of my way so that I can focus on playing and being creative. Additionally I’d like to see a clean GUI without IRL graphics. Much of Studio One is leaning already in this direction, it would be nice to see it go all the way!
Overall, I really like the single platform for creators approach of Studio One. Just needs a killer acoustic drum suite. No other cross-platform DAW offers such a comprehensive list of pro level tools. And the cross platform thing (Mac/PC) is huge.
We hope that you have enjoyed this round-table discussion by 3 of the most down-to-earth and formidable extended range guitar players online who took the time out to share their personal thoughts here with us.
Visit their YouTube Channels:
The Bunn | Nick Hill | Gary Hiebner (Heavy Tones)
Vintage EQ FX Chain
While modern EQ can emulate pretty much any curve that a “vintage EQ” could produce, there’s more to EQ than the curve itself.
Vintage EQ, due analog technology’s constraints, wasn’t as flexible as today’s EQs. Therefore, the various parameters were limited to specific choices—and these choices were made for musical reasons. When people talk about dialing in a great vocal or drum sound within seconds using vintage EQ, I suspect it’s because those vintage EQs were engineered for fast, efficient changes that made musical sense.
So as an experiment, I created a Pro EQ2 FX chain that emulated (quite accurately, if I do say so myself!) not just the curves, but the controls of a Pultec MEQ-5 midrange equalizer (Fig. 1).
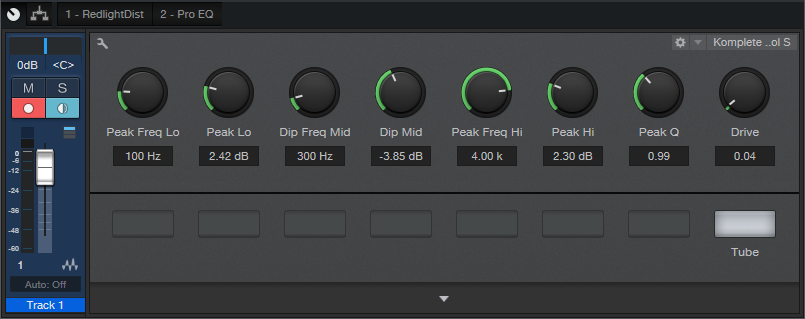
Figure 1: Control panel for Pro EQ2 Vintage Equalizer.
The Lo and Hi stages have a Frequency control and Boost (no cut) control. Originally, the low band had stepped frequencies of 200, 300, 500, 700, and 1 kHz, while the high band had 1.5, 2, 3, 4, and 5 kHz. The Freq controls cover mostly the same range, although in recognition of bass’s importance in today’s music, the low band goes down to 60 Hz. Another tweak is that the high band had a fixed EQ, which I always felt was a bit too narrow anyway—so I added a Q control.
The midrange section cuts (no boost) from 200 Hz to 7 kHz. However, the MEQ-5 had a subtle EQ shift that depended on the amount of cut, which is emulated here. I also added a RedLightDist to give subtle saturation effects.
So next time you need EQ, download and try out this FX Chain. It won’t sound different than what you can achieve with a Pro EQ2—but you may very well get where you want to go faster. Maybe even much faster.
Download the Pro EQ2 Vintage EQ here!