Category Archives: Studio One
So…What Does the CTC-1 Really Sound Like?
Good question, because the effect is subtle. If you play with the various controls while listening to a mix, you can tell that something is different, but you may not know exactly what. So, let’s find out what the CTC-1 actually contributes to the sound.
Bear in mind that Mix FX work across multiple buses, and the overall effect depends on the audio being sent through them, as well as the control settings. So while this tip can’t tell you what the CTC-1 will sound like under various conditions, you’ll get a sense of the character associated with each of the CTC-1’s mixer emulations. Note that the audio examples are not mixed songs, but only the effect added by the CTC-1 to mixes, and amplified so you can hear the effect clearly.
Also, it doesn’t look like PreSonus is letting up on Mix FX development any time soon (PortaCassettes and Alps, anyone?), so this tip should be handy in the future as well.
The Test Setup
- Load a track with a stereo mix of a song you like.
- Duplicate (complete) the track, and invert the copy’s polarity (phase). To invert the polarity, you can insert a Mixtool and click on the Invert Left and Invert Right buttons. Or enable the channel’s Input Controls, and flip the polarity with those (as shown in fig. 1).
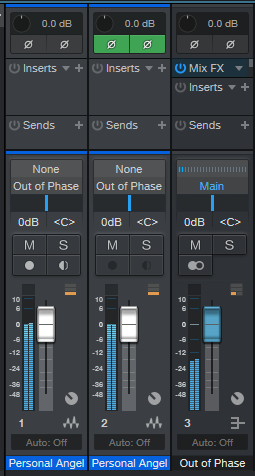
Figure 1: Test setup for evaluating the CTC-1 mixer’s various characters.
- Insert a Bus, and assign the out-of-phase track’s output to the Bus input. The Bus output goes to the Main output, as does the in-phase track output. Make sure the Main output’s Mix FX is set to None.
- Set all faders to 0 dB, and start playback. With the Bus’s Mix FX set to None, you should hear nothing—the only audio sources are the original track, and the out-of-phase track playing back through the Bus. If you hear anything, then the faders are not at the same levels, the out-of-phase track is somehow getting into the Main bus, or the Main bus has a Mix FX enabled.
Now you can check out various CTC-1 mixers. Fig. 2 shows the default setting used for the tests. In the audio examples, the only changes are setting the Character control to 1.0, or to 10. 1.0 is the most faithful representation of the console being emulated, while 10 adds the equivalent of a sonic exclamation mark.
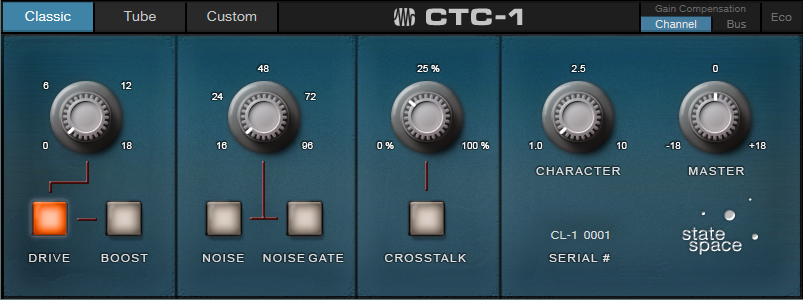
Figure 2: Default CTC-1 control settings used for these tests.
Let’s Start Testing!
Note that there’s a continuum of Character control settings between 1.0 and 10. Settings other than those in the audio examples can make a major difference in the overall sound, and you can really hear them with this kind of nulling test.
Here’s what the Classic mixer sounds like. Its main effect is in the midrange, which a Character setting of 10 really emphasizes. Among other things, this gives a forward sound for vocals.
The Tube sound kicks up the low end, but turning up the Character control emphasizes a slightly higher midrange frequency than the Classic sound, while retaining the bass.
The Custom mixer is about adding brightness mojo and bass. Bob Marley would probably have loved this. Turning up Character emphasizes lower midrange frequencies than the other two.
Snake Oil, or the Real Deal?
I don’t have the mixers on which these settings were modeled, so I can’t say whether this is the real deal. But I can say it’s definitely not snake oil. The effect is far more nuanced then just EQ, and the audio examples confirm that Studio One owners who say the CTC-1 adds some kind of mysterious fairy dust are right…it does add some kind of mysterious fairy dust.
These audio examples should make it easier to get the sound you want. For example, if you like the way the Custom hits the bass and treble, but it’s a bit much, then simply turn up the Character control for a little more midrange. If your mix is already pretty much where you want it, but it needs to pop a bit more, the Classic is the droid you’re looking for. The Tube really does remind me of all those years I spent on tube consoles, especially if I turn up Character a little bit.
Sure, you just turn select mixer emulations, and play with controls, until something sounds “right.” But I must say that running these tests have made it much easier to zero in, quickly, on the sound I want.
Combi-Band Processing
I’m a big fan of multiband processing, and setting the Splitter to split by frequency makes this easy. However, there’s more to life than bi-amping or multiband processing—so let’s look at what I call “combi-band processing.” It gets its name because although the signal is split into three frequency bands, the low and high bands are combined, and processed by a single effect. Meanwhile, a second effect processes the mid band.
Bi-amping is great for amp sims (choose the best amp for lows, and the best for highs). I find it doesn’t work so well for effects, because when you split an instrument (like guitar) into only lows and highs, many effects aren’t all that useful for low frequencies. But if you raise the crossover frequency so that the low effect covers a wider range of frequencies, then there aren’t enough high frequencies for the effect that processes the highs.
With the combi-band approach, one effect handles the all-important midrange frequencies, while the other processes the low and highs. As a result, both effects have an obvious impact on the sound—as you’ll hear in the audio example. This also results in a simpler setup than three or more discrete bands of processing.
Combi-Band Processing FX Chain
Apologies to Artist aficionados…this one requires Studio One Pro, because of the Splitter’s frequency-split talents. However, I’m trying to figure out an easy way to do this in Artist. If it works, you’ll see it in a future tip.
The FX Chain starts with a Splitter in Normal Mode, which feeds two Splitters in Frequency Split mode (fig. 1)
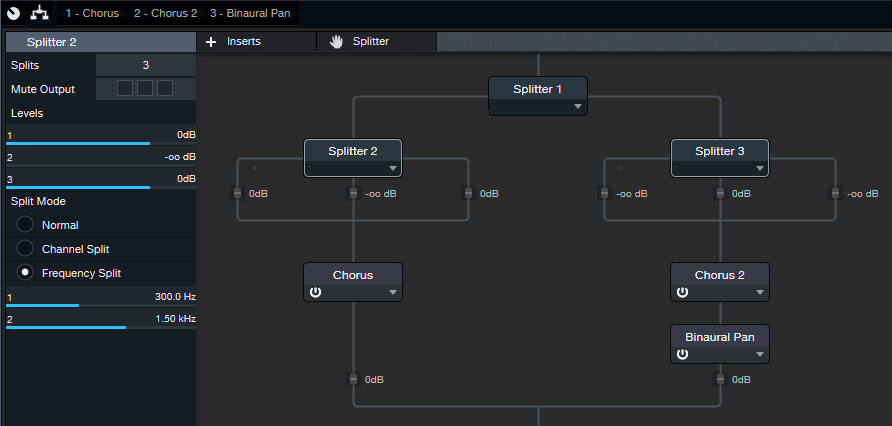
Figure 1: The FX Chain for Combi-Band Processing. The Chorus and Pan effects aren’t part of the process, but are the ones used in the audio example. Of course, other effects are just as suitable.
Both Splitters have almost identical parameters, including the split frequencies. In this case, they’re set to 300 Hz and 1.5 kHz, which seem to work well with guitar. Tweak the split frequencies as needed to optimize them for different instruments.
The parameters that differ are the various level controls. The level is pulled down for the middle band in Splitter 2, so its output consists of only the low and high frequency bands. Meanwhile for Splitter 3, the level for the low and high frequency bands is pulled all the way down, so its output consists of only the middle band. Fig. 2 shows what happens when you inject pink noise into the effects chain, and monitor the outputs of the two splitters.
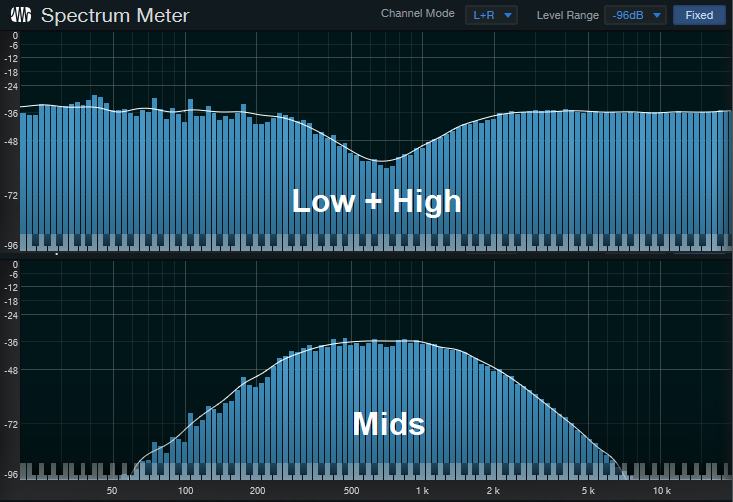
Figure 2: The top view shows Splitter 2’s frequency response, while the bottom view shows Splitter 3’s frequency response. If you sum these together, the response is flat.
About the Audio Example
Let’s listen to an example of Combi-Band Processing in action. There are three audio snippets. The first one is the midrange frequencies only, going through the Chorus, which is set to a fairly fast speed. The second snippet is the low and high frequencies only. It also goes through a Chorus, but set to Doubler mode. A Binaural Pan follows this to widen out the highs and lows.
The final snippet is the sound of combining the two paths together, which creates a gorgeous, rich chorusing sound. But plenty of other effects work well, like tempo-synched tremolos set to different LFO frequencies or waveforms, echoes with different delay times or feedback amounts, reverb on only the mids and echo on the highs and lows…you get the idea. So combi-up, and check out a different twist on signal processing.
Slapback Echo—Elvis Lives!
John D. made a comment in my Sphere workspace, which hosts the companion files for The Huge Book of Studio One Tips and Tricks: “How about a tip on how to create the original Elvis echo from his Sun Studios days? I really love that sound.” Well John, we take requests around here! So here ya go.
I asked the internet if anyone knew the time in ms for the slapback echo Elvis used. The various answers didn’t seem right, so I went to the source, and analyzed Elvis Presley’s “I Don’t Care if the Sun Don’t Shine” and as well as Carl Perkins’ “Her Love Rubbed Off” (he also recorded at Sun Studios). After measuring the duration for three repeats and dividing by 3, the answer was around 135 ms (fig. 1).
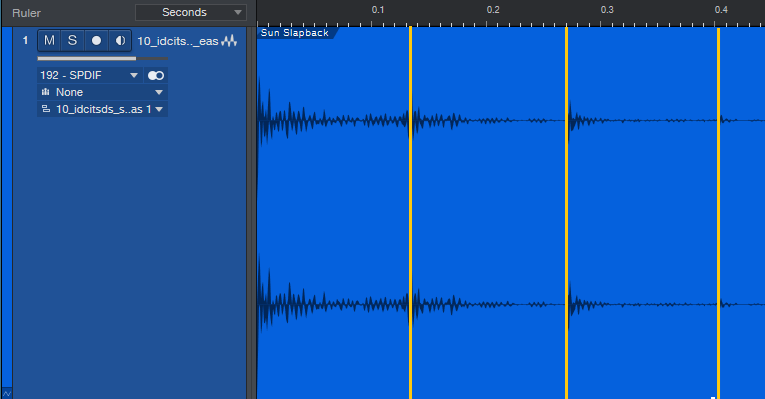
Figure 1: Measuring slapback echo time for the Elvis Presley and Carl Perkins songs.
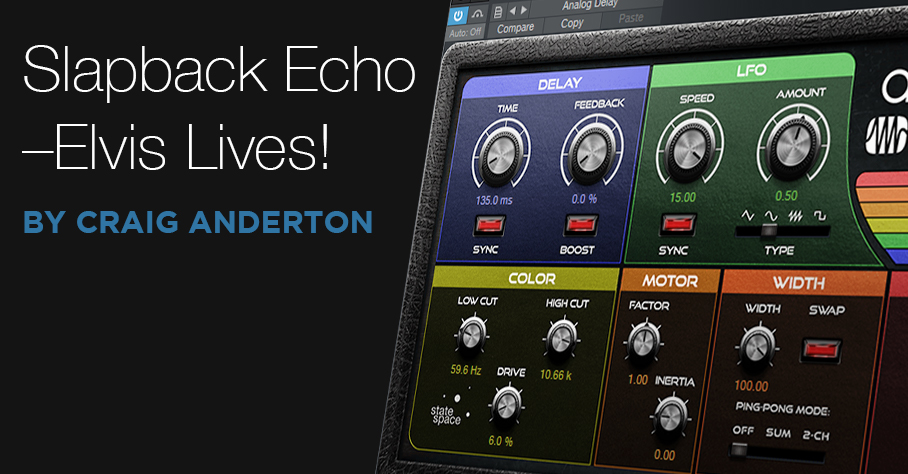
The analog delay has all the parameters needed to achieve this sound (fig. 2).
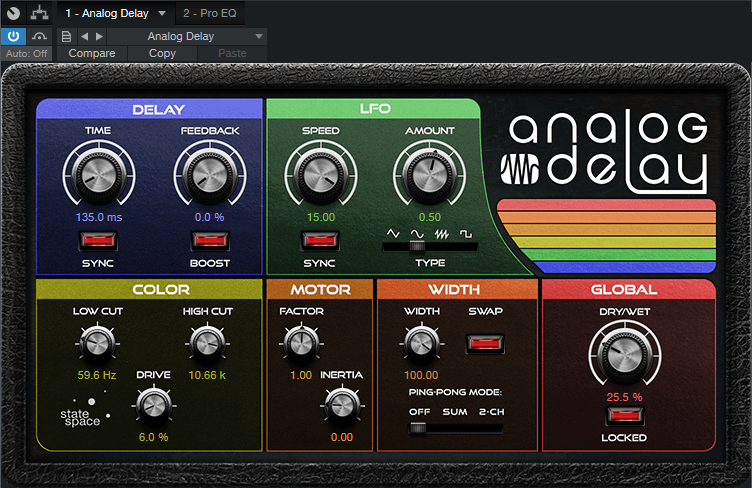
Figure 2: The “Elvis Lives” analog delay settings.
The time is, of course, 135 ms. Feedback is 0.0%, because the echo was run through a separate tape recorder. It didn’t sound like the echo was being re-routed back to the input on the recordings I heard, but it might have been, and later recordings did do this…so choose what works best for you.
The Color controls are important. I pulled back the lows just a bit, as well as the highs, because 7.5 IPS recorders don’t have as crisp a high-frequency response as 15 IPS machines (but who knows how the echo tape machine was aligned?). When you listen to these recordings, you’ll often notice some distortion, so kick up the Drive control as desired. 6.0% was about right for my taste. Adjust Dry/Wet for the desired amount ratio of echo to dry sound.
You’re probably wondering about the Speed and Amount controls. I decided what the heck, I’d add some mechanical tape flutter. 15 Hz corresponds to 7.5 IPS, and the amount seemed reasonable.
Does it really sound like that famous echo effect? Well, at the risk of great (and possibly irreversible) public embarrassment, I donned an Elvis impersonator outfit, put on 50 pounds, and did my approximation of a 50s-style vocal for “That’s All Right, Mama.” True, I didn’t write the song—that honor goes to Arthur Crudup, who recorded it in 1946. But it’s under 30 seconds, for educational purposes, transformed (done digitally by someone who doesn’t sound even remotely like Elvis), and doesn’t diminish the market value of the music. I think we’re cool from a Fair Use standpoint.
And there you have your vintage slapback echo. Yes, I do take requests—I’ll be here all week, don’t forget to tip your servers, and remember, every Thursday night the Chez PreSonus eatery in Baton Rouge has its famous 2-for-1 gumbo special! See you soon.
Studio One Sings!
Let’s get one thing straight: yes, I did promise a tip of the week. But, I specifically didn’t promise it would be normal. Besides, I know some EDM fans are just going to love this one. And with plenty of creative Studio One aficionados out there, who knows what you’ll do with this…
I wanted to see if it was possible to use a simple, no-cost text-to-speech synthesizer, create a phrase, load it into Studio One, and tune it with the Chord Track. While the results won’t be mistaken for Realitone’s Blue, this setup can do some cool tricks—check out the audio example, with a vocal that’s not being sung by a human.
Generating the Speech
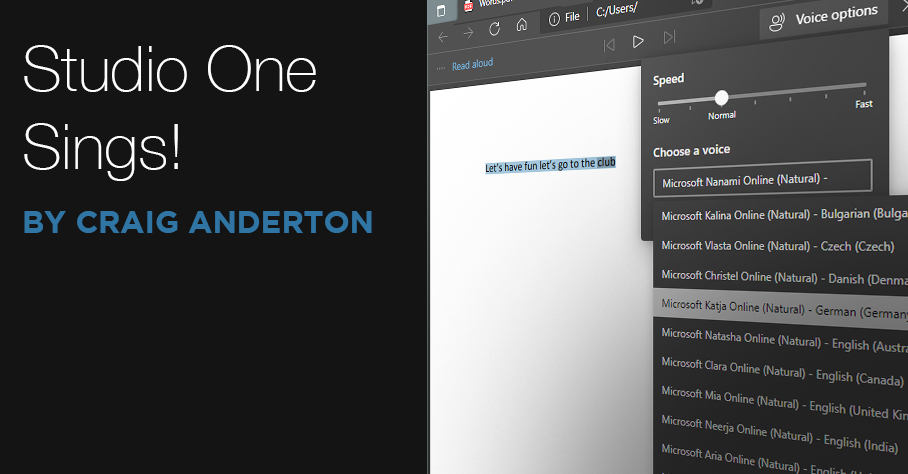
This all started because a person who had bought The Huge Book of Studio One Tips and Tricks mentioned that you could load the PDF into Microsoft Edge (which is cross-platform). Then if you invoked Edge’s Read Aloud function, the program would read the text to you. Say what? I had to try it.
There are plenty of text-to-speech converters, including ones built into MacOS and Adobe Acrobat. Extensions are available for various browsers, and there are cloud-based text-to-speech services. But Microsoft Edge’s implementation is a great way to get started—just open a PDF doc in Edge. (Non-PDF docs will have to be converted or exported first; you can always use a free option, like Open Office.) Select what you want it to read, and then click on Read Aloud. The fidelity is excellent, and you can speed up or slow down the reading speed.
There are 10 different English speakers, but if you choose one of the other 28 languages, depending on the language, they’ll read English with an accent (fig. 1). Of course, these languages are meant to read texts in their native language, but who cares? I used Katja, the German speaker, for the audio example. She speaks English quite well.
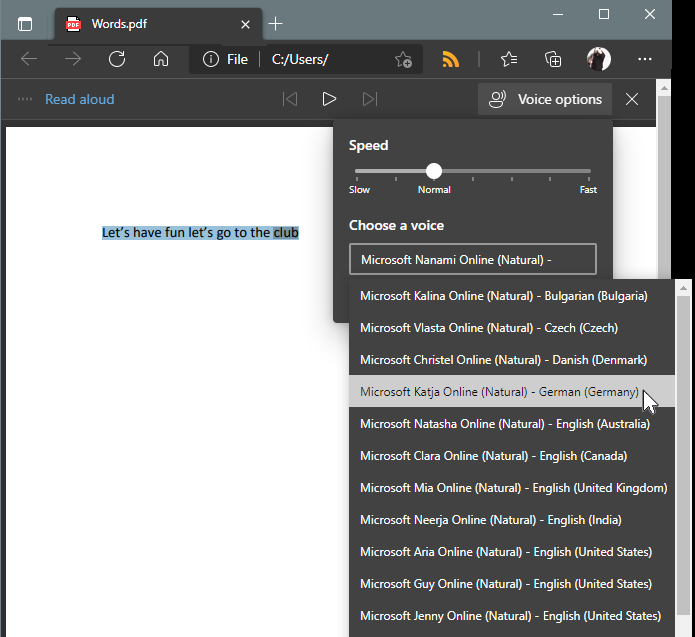
Figure 1: The text-to-speech feature in Microsoft Edge is surprisingly flexible.
Next, you need to get the speech output into Studio One. I have a PreSonus 1824c interface running on a Windows computer, and in that scenario, all that’s necessary is enabling the virtual input while Edge reads the words. Just remember that when you record the audio, to avoid feedback, don’t enable Input Monitor for the track you’re recording—just listen to the virtual input.
In addition to third-party apps that capture audio, the Mac has a fun way to generate speech. Open TextEdit, and write (or load) the text you want. From the TextEdit menu, choose Services > Services Preferences. Next, click Services in the keyboard shortcuts pane. In the right pane, scroll down to Text, and check its box. To create a recording, which you can bring into Studio One, select the text, go to the TextEdit menu again, and under Services, choose Add to iTunes as a Spoken Track. When you initiate the text-to-speech process, the audio file will be saved in the album you specify.
If all else fails, patch the audio output from a device that produces speech, to an audio input for Studio One.
Editing the Voice
Once the voice was in Studio One, I separated the words to place them rhythmically in relation to the Musicloop. Copying the vocal two more times allowed for panning, timing shifts (one track -20 ms, one track +20 ms, one with no shift), and reverb. To give a sense of pitch, the vocal tracks followed the Chord Track in Universal mode (fig. 2). If you want to get really granular, Melodyne does an outstanding job of varying inflections.
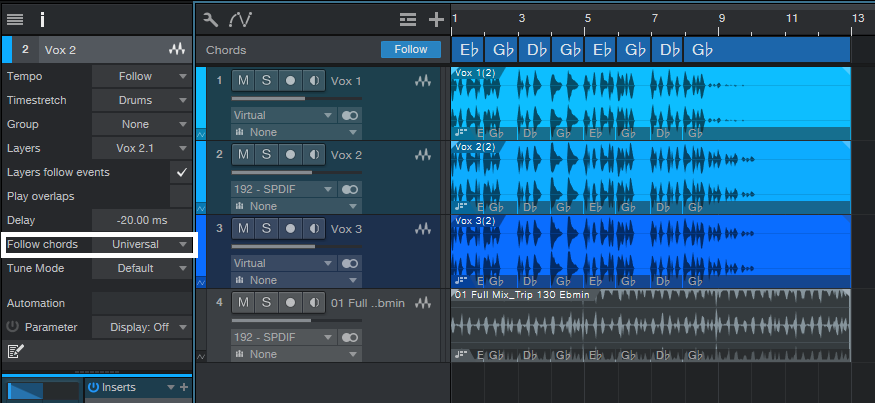
Figure 2: The vocals now accompany a Musicloop. It’s necessary to Follow Chords in Universal mode.
That’s really all there is to it. I just know someone is going to figure out how to use this to create some cool novelty song, it will be a big hit, get zillions of streams, and shower a Studio One user with riches and fame. That’s why it’s so important to read the Friday Tip every week ?
Why the Performance Monitor Is Cool
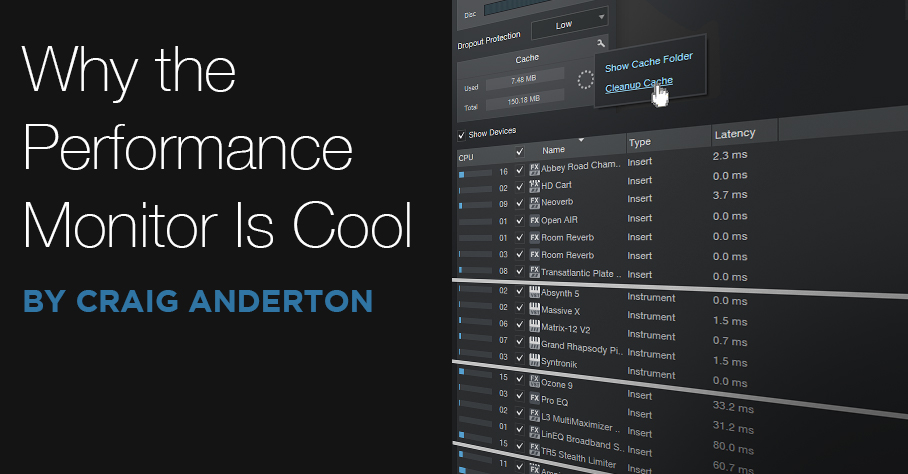
Ever wonder why inserting a particular plug-in makes the latency go through the roof? Which tracks you should transform because they require a lot of CPU power, and which ones aren’t a problem? The Performance Monitor, accessed via View > Performance Monitor, reveals all
But this isn’t just about interesting information. The Performance Monitor will help you decide which block settings to use, whether native low-latency monitoring will work for you, what level of dropout protection is appropriate, and more. Then, you can make intelligent tradeoffs to process audio in the most efficient way, while optimizing system stability.
Start at the the Top
Referring to fig. 1, the readout at the top indicates CPU and disk activity. Check this periodically to make sure you aren’t running your CPU up against its limits. This can lead to audio crackles, dropouts, and other potential glitches. You can also set the level of dropout protection here.
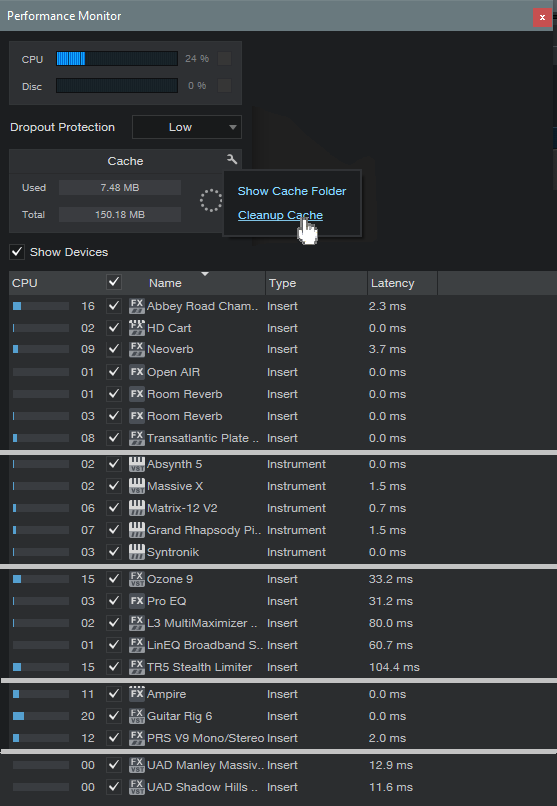
Figure 1: The Performance Monitor window (the UI has been modified somewhat to make analyzing the data easier).
The Cache readout lets you know if you’re wasting storage space. The Cache accumulates files as you work on a song, but many of these files are only temporary. If you invoke Cleanup Cache, Studio One will reclaim storage space by deleting all unused temp files in the cache. If you have lots of songs and haven’t cleaned out their caches, you might be surprised at how much space this frees up. I usually wait until I’m done with a song before cleaning it up.
Finally, there’s a list of all the plug-ins that are in use. The left-most column shows much relative CPU power a plug-in consumes, as a bar graph, and numerically. The next column to the right shows the plug-in name and format. The Type column shows whether the plug-in is an instrument or insert effect. The final column on the right shows the delay compensation a plug-in requires.
(Note there’s also a column that shows the plug-in “path,” which is the track where the plug-in resides. For effects, it also shows the effect’s position in the insert section. However, fig. 1 doesn’t show this column, because it takes up space, and doesn’t really apply to what we’re covering.)
Figure 2: The transport shows useful performance information.
The transport includes a performance summary (fig. 2). Toward the lower left, you’ll see meters for CPU consumption (top meter) and disk activity. Click on Performance to call up the Performance Monitor window. The circle of dots indicates writing activity to the cache. Also note the figure under the sample rate—this is the total time Studio One has added for plug-in compensation.
Analyzing the Data
I’ve altered the UI graphic a bit, by grouping plug-ins, and adding a line in between to separate the groups. This makes it easier to analyze the data.
The top group includes a variety of reverbs, which in general tend to consume a lot of CPU power. Waves Abbey Road Chambers, iZotope’s Neoverb, and Rare Signals Transatlantic Plate clearly require the most CPU. Neoverb and Abbey Road Chambers also require the most latency compensation.
HD Cart is more efficient than I would have expected, and Studio One’s reverbs give a good account of themselves. Open Air and Room Reverb in Eco mode are extremely efficient, registering only 01 on the CPU meter. However, bumping up Room Reverb to HQ mode registers 03.
Bear in mind that lots of CPU consumption doesn’t mean a poor design—it can mean a complex design. Similarly, minimal CPU consumption doesn’t mean the effect won’t be as nuanced; it can simply mean the effect has been tightly optimized for a specific set of tasks. Also note that CPU-hungry reverbs are good candidates for being placed in an FX Channel or Bus. If used in individual tracks, Transform is your friend.
The next group down compares virtual instruments. You’ll see a fair amount of variation. I didn’t include the native Studio One instruments, because none of them requires delay compensation. Mai Tai and Presence typical register 01 or 02 in terms of CPU consumption, while the others don’t move the CPU meter noticeably. Bottom line: if you want to have a lot of instruments in a project, use as many native Studio One versions as possible, because they’re very efficient.
The next group down is plug-ins that use phase-linear technology. All of these require large amounts of delay compensation, because the delay is what allows for the plug-in to be in-phase internally. The Pro EQ2’s reading (which alternates between 3 and 4) is for only the phase-linear stage enabled; the nonlinear EQ stages draw very little CPU power. This is what you would expect from an EQ that has to be efficient enough to be inserted in lots of tracks, as is typical in a multitrack project.
The next-to-the-last group is amp sims. The figures vary a lot depending on which amps, cabinets, and effects are in use. For example, the Guitar Rig 6 preset includes two of their new amps, in HQ mode, that use a more CPU-intensive modeling process. The PRS V9 doesn’t have a lot of bells and whistles, but concentrates on detailed amp sounds—hence the high CPU consumption. Ampire is somewhat more efficient than most high-quality amp sims, but there’s no avoiding the reality that good amp sims consume a lot of CPU power—which is another reason to become familiar with the Transform function.
Finally, the last group shows why even with today’s powerful computers, there’s a reason why people add Universal Audio’s DSP hardware to their systems. Both the Manley Massive Passive and Shadow Hills compressor draw a lot of power, and require significant delay compensation. But, they don’t draw any power from Studio One, because they get their power from UA’s DSP cards, not your computer’s processor.
It’s interesting to compare plug-ins. You’ll sometimes find that free plug-ins draw a fair amount of CPU because they’re not optimized as tightly as commercial products. You’ll also see why some plug-ins will bring your computer to its knees, while others won’t.
All this reminds me of a post I saw on a forum (not Studio One’s) where a person had just bought a powerful new computer because the old one crashed so much. However, the new one was still a “crashfest”—so he decided the DAW was the problem, and it must have been coded by incompetents. A little probing by other forum members revealed that he really liked iZotope’s Ozone, so he put it on almost every track instead of using a more standard compressor or limiter. Oh, and he also used a lot of amp sims. Ooops…I’m surprised his CPU didn’t melt. If he’d had Studio One, though, and looked at the Performance Monitor, he would have found out how to best optimize his system…and now you can, too.
The Multiband Limiter
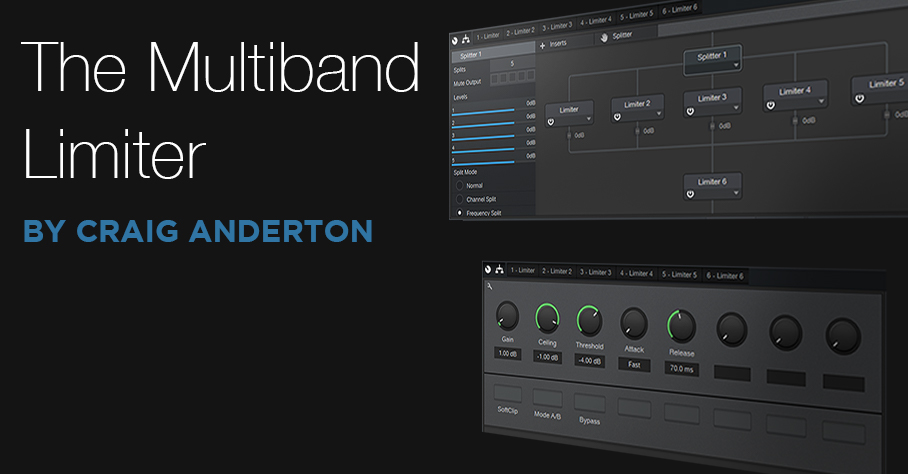
Although Studio One offers multiple options for dynamics control, there’s no “maximizing” processor, as often implemented by a multiband limiter (e.g., Waves’ L3 Multimaximizer). The Tricomp and Multiband Dynamics come close, but they’re not quite the same as multiband limiting—so, let’s use Studio One Professional’s toolset to make one.
The concept (fig. 1) is pretty simple: use the Splitter in Frequency Split mode, and follow each split with a Limiter2. The final limiter at the end (Limiter 6) is optional. If you’re really squashing the signal, or choosing a slower response, the output limiter is there to catch any transients that make it through the limiters in the splits.
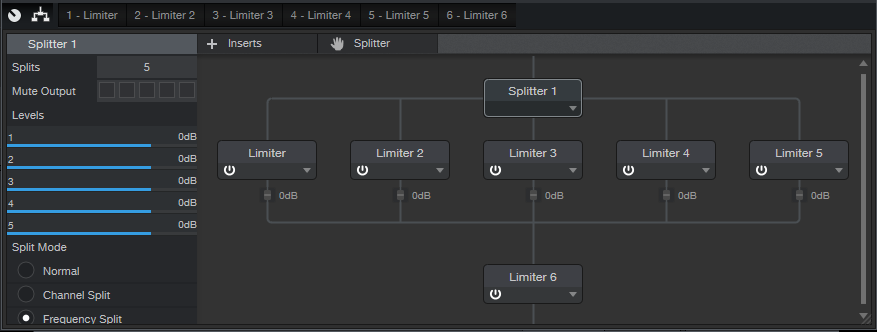
Figure 1: Each of the five parallel limiters processes a specific frequency band.
The Control Panel with the Macro controls (fig. 2) is straightforward.
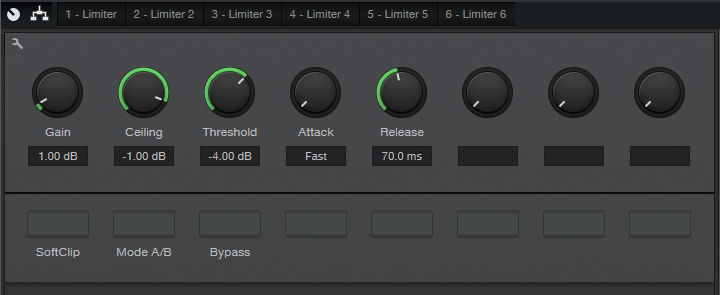
Figure 2: The Macro controls adjust the controls on the five Limiter2 processors that follow the splits.
Each Macro control corresponds to the same control in the Limiter2, and varies that control over its full range, in all the Limiter2 modules that follow the splits. For example, if you vary the Threshold Macro control, it controls the Threshold for all limiters simultaneously (except for Limiter 6 at the output, which has “set-and-forget” settings), over the control’s full range. However, you can get even more out of this FX Chain by opening up the Limiter2 GUIs, and optimizing each one’s settings. For example, using less limiting in the lower midrange can tighten up the sound.
You can download the multipreset from my public PreSonus Sphere area, so you needn’t concern yourself with the details of how it’s put together (although you might have fun reverse-engineering it). And is it worth the download? Well, check out the audio example. The first and second parts are normalized to the same level, but the second one is processed by the multiband limiter. Note that it has a louder perceived level, and is also more articulated. This is because each band has its own dedicated limiter. I rest my case!
Bonus Supplementary Nerd Talk
The Splitter’s filters are not phase-linear, which colors the sound. There’s an easy way to hear the effects of this coloration: Insert a mixed, stereo file in a track, then copy it to a second track. When you play the two together, they should sound the same as either track by itself—just louder.
Next, insert a Splitter in one track, select Frequency Split, and choose 5 splits. Play the two tracks together, and you’ll hear the result of the phase differences interacting. Choosing a different number of splits changes the tonality, because the phase shifts are different.
This is why for mastering, engineers often prefer a phase-linear, multiband limiter—the sound is transparent, and doesn’t have phase issues. The downside of phase-linear EQ is heavier CPU consumption, and increased latency. But it’s equally important to remember that phase issues are an inherent part of vintage, analog EQ, which have a “character” that phase-linear EQs don’t have.
So as usual, the bottom line isn’t choosing one over the other—it’s choosing the right tool for the right job. If you’ve worked only with phase-linear multiband limiters, give this variation a try. With some material, you may find it doesn’t just give more perceived level, but also, gives a more appropriate sonic character.
Sound Design for the Rest of Us

Last May, I did a de-stresser FX Chain, and several people commented that they wanted more sound design-oriented tips. Well, I aim to please! So let’s get artfully weird with Studio One
Perhaps you think sound design is just about movies—but it’s not. Those of you who’ve seen my mixing seminars may remember the “giant thud” sound on the downbeat of significant song sections. Or maybe you’ve noticed how DJs use samples to embellish transitions, and change a crowd’s mood. Bottom line: sound is effective, and unexpected sounds can enhance almost any production
It all starts with an initial sound source, which you can then modify with filtering, delay, reverb, level changes, transposition, Chord Track changes, etc. Of course, you can use Mai Tai to create sounds, but let’s look at how to generate truly unique sounds—by tricking effects into doing things they’re not supposed to do
Sound Design Setup
The “problem” with using the stock Studio One effects for sound design is…well, they’re too well-designed. The interesting artifacts they generate are so low in level that most of the time, we don’t even know they exist. The solution is to insert them in a channel, amplify the sound source with one or two Mixtools set to maximum gain, and then enable the Channel’s Monitor button so you can hear the weirdo artifacts they generate. Automating the effects’ parameters takes this even further.
However, now we need to record the sounds. We can’t do this in the normal way, because there’s no actual track input. So, referring to fig. 1, insert another track (we’ll call it the Record Trk), and assign its input to the Effects track’s output. Both tracks need to be the same format – either both stereo, or both mono. (Note that you can also use the Record track’s Gain Input Control to increase the effect’s level.) Start recording, and now your deliciously strange effects will be recorded in the new track.

Figure 1: Track layout for creating sound effects orgies.
The FX channel is optional, but it’s helpful because the Effects track fader needs to turned way up. With it assigned to the Main bus, we’ll hear it along with the track we’re recording. That’s not a problem when recording, but on playback, you’ll hear what you recorded and the Effects track. So, assign the Effects output to a dummy FX bus, turn its fader down, and now you’ll hear only the Recorded track on playback. The Record Trk will still work normally when recording the sound effects.
After recording the sounds, normalize the audio if needed. Finally, add envelopes, transpose the Event (this can be lots of tun), and transform the effect’s sound into something it was never intended to do. Percussion sounds are a no-brainer, as are long transitions from one part of a song to the next. And of course, the Event can follow the Chord Track (use Universal mode).
The Rotor is a fun place to start. Insert it in the Effect track, and run through the various presets. Some DJs would just love to have a collection of these kinds of samples to load into Maschine. Here’s an audio example.
Audio Example 1 Rotor+Reverb
The next example is based the Flanger.
Audio Example 2 Flanger
Now we’ll have the previous Flanger example follow a strange Chord Track progression, in Universal mode.
Audio Example 3 Flanger+Chord track
Other Effects
This is just the start…check out what happens when you automate the Stages parameter in the Phaser.
Audio Example 4 Phaser Loop
Or turn the Mixverb Size, Width, and Mix to 100%, then vary damping. The Flanger is pretty good at generating strange sounds, but like some of these, you’ll have the best results if you set the track mode to mono. OpenAIR is fun, too— when you want a pretty cool rocket engine, load the Air Pressure preset (under Post), set Mix to 100% wet, add some lowpass filtering…and blast off!
Studio One 5.3 has arrived
The best DAW just got better. Again.
Studio One 5.3 adds new features, enhancement, and powerful workflow improvements to Studio One 5. This is a free update for Studio One 5 users and PreSonus Sphere members.
1. Sound Variation improvements for composers
Musical Symbols and Dynamics Processing are now integrated with Sound Variations
Both Musical Symbols and Dynamics Processing have been added to the Sound Variations editor. The integration of Musical Symbols allows composers to add symbols to their scores in a manner already familiar to them—and virtual instruments will respond with the appropriate performance articulations. Dynamics symbols are tied to MIDI Velocity, with customizable values.
Musical Symbols also now receive their own Lane in the Note Editor—any changes made in Score View will be reflected in Piano View, and vice-versa. The Lane is divided into note-based Articulations—such as Staccato, Accent, or Portamento; and range-based Directions like Pizzicato, Vibrato, or Col Legno. Musical Symbols are now displayed directly on Note Events, and there’s even a Variations Global Track view atop the Piano View.
Musical Symbols can be mapped by hand, or Auto-Assigned based on the Sound Variation names of the currently-loaded instrument. And perhaps best of all, orchestral libraries from our friends at Vienna Symphonic Library, UJAM, and EastWest have already done the Sound Variations mapping of their robust libraries for you—a major time-saver!
MIDI channel support for Sound Variations and improved selection
Studio One 5.3 has extended the output mapping of Sound Variations to include MIDI channel information as part of an activation sequence. MIDI channel mapping can be used alone or in combination with other activation messages like keyswitches, controllers, or velocity—deepening Sound Variations’ usability with Kontakt instruments.
Sound Variations are faster and easier than ever to search and apply thanks to a quick right-click menu of recently-used Variations—for quick re-application—and a one-click “apply” button to place the currently-active Sound Variation at the cursor point.
Learn more about Sound Variations and Musical Symbols here.
2. Show Page improvements
Drag ‘n’ drop more things to create Patches on the fly

Drag ‘n’ drop now works in the Show Page for virtual instrument Presets—drag a Preset from the Browser to a Player and it will create a new instance of the associated Instrument and create a new Patch. The same works with dragging Ampire to a Real Instrument or Backing Track Player—it even works with complex FX chains.
Seamless patch changes
When playing virtual instruments live, seamlessly switching between different sounds is a must! Virtual Instrument Player Patch changes are now gapless during a performance, so long notes held across patch changes will not be cut off while the new instrument is activated. Try it!
Learn more about Show Page Improvements here.
3. Format conversion and backup options
Zip and upload to PreSonus Sphere
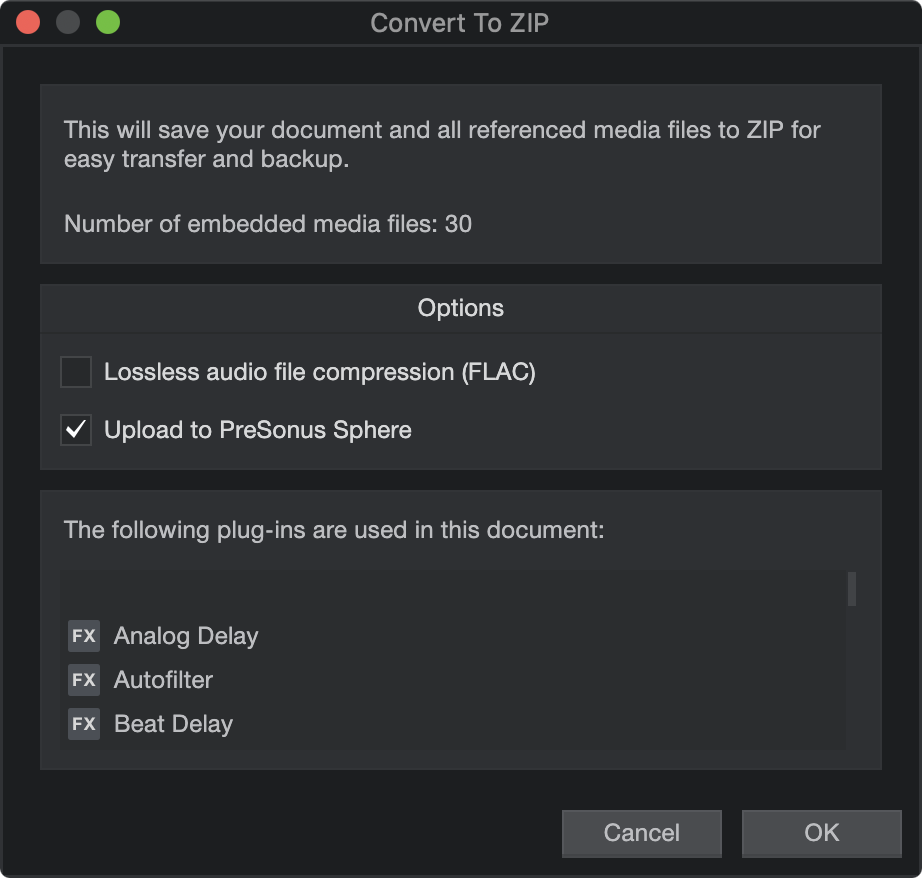
In 5.3, you can now save any Document (Song, Show, or Project) to a .ZIP file, with the options to convert all media to .FLAC and/or exclude any unused media—keeping your file sizes down. And with one extra click, Studio One will upload your .ZIP to PreSonus Sphere Workspace for safekeeping or collaboration. Of course, you and your collaborators can download them again straight from the Cloud tab of Studio One’s Browser—you don’t have to leave Studio One and mess about with your computer’s file explorer or Internet browser. And Studio One can also open any Zip it makes.
You’ve also got new options to quickly export .AAF, Capture Sessions, MIDI Files or Open TL via the “Convert To…” option in the File menu.
Learn more about Archive and Backup improvements here.
4. New creative applications of The Chord Track
Rapid chord progression prototyping via D’n’D
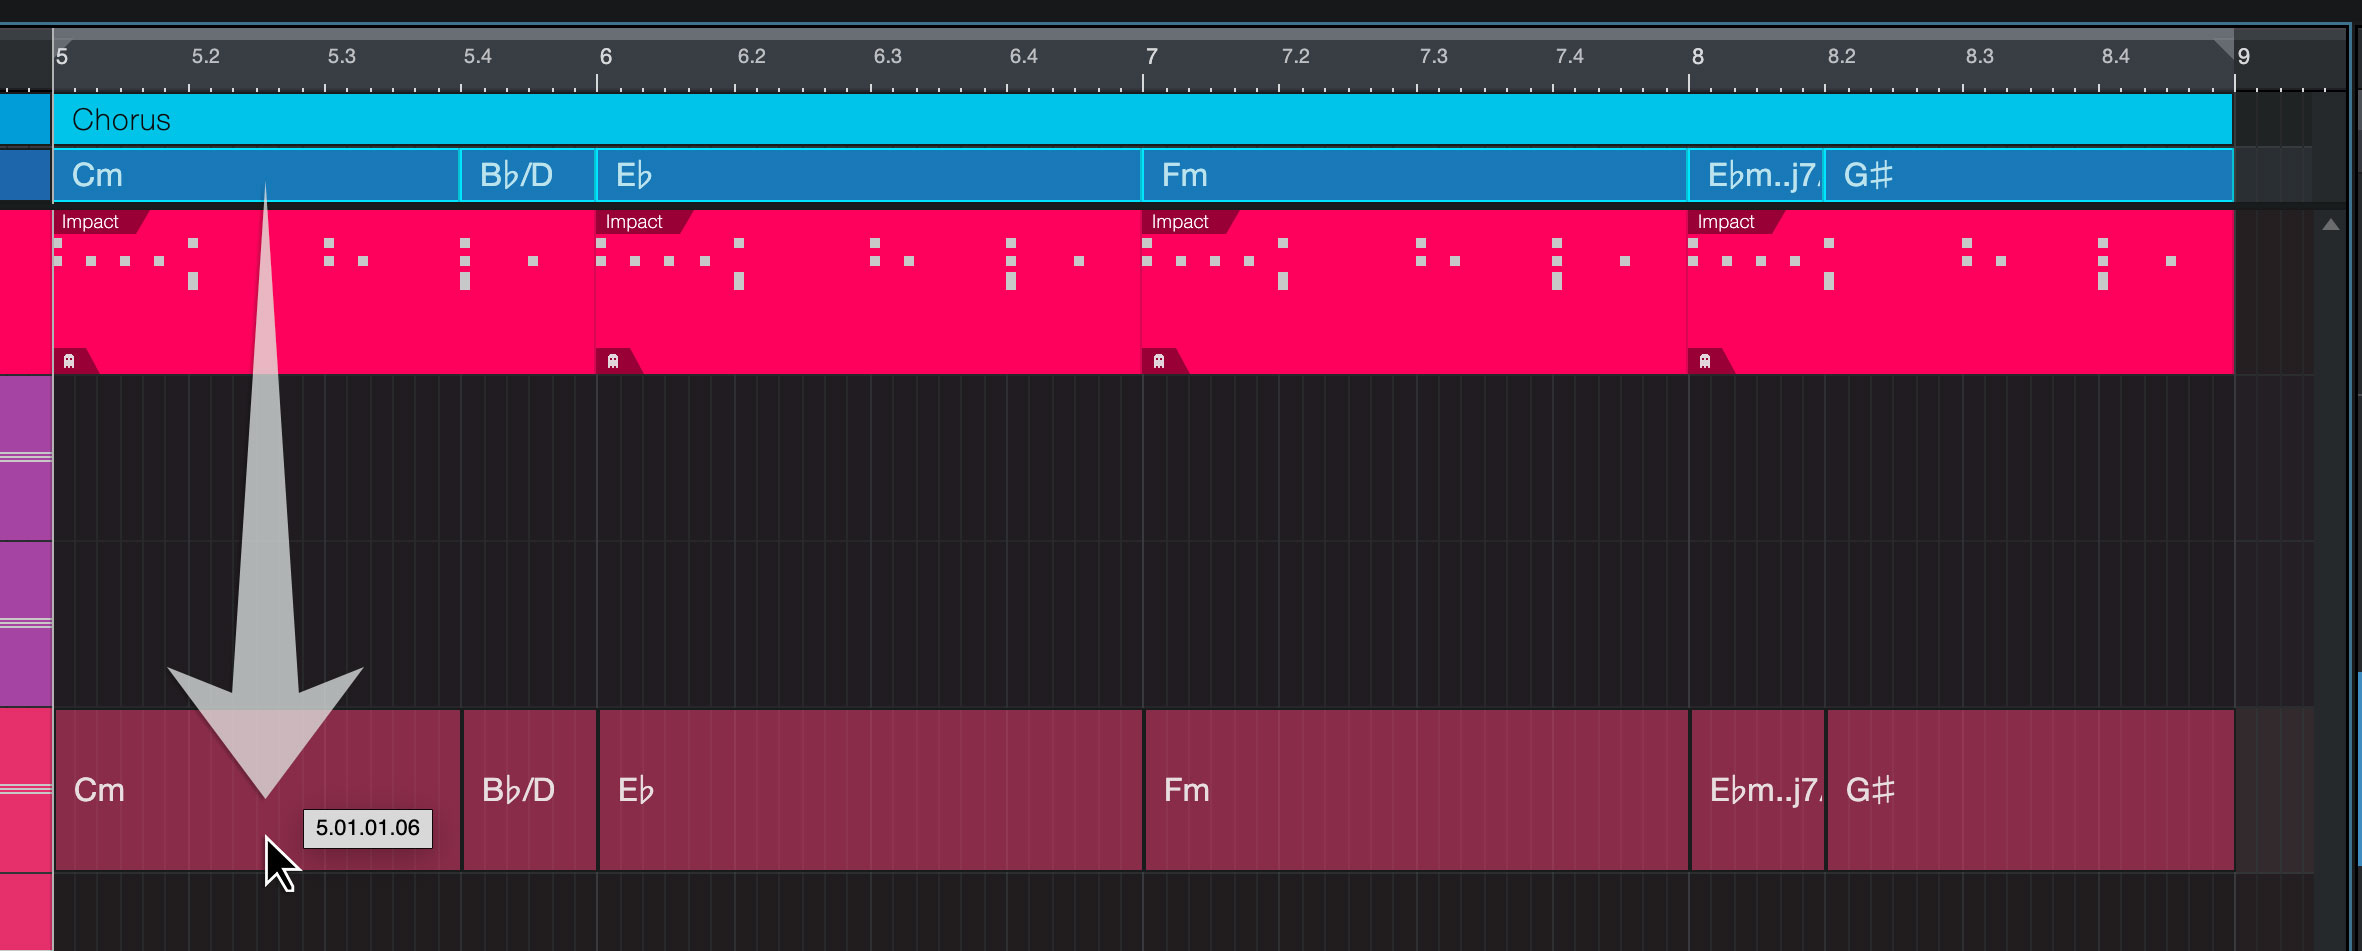
With a single drag ‘n’ drop (of course), you can now drag a Chord Event from the Chord Track into an Instrument Track to render a simple Note Event chord to play with—great for auditioning and prototyping new arrangements.
You can even drag an Audio Event directly to an Instrument Track to render your chords as a Note Event, if the chords had been detected before.
Learn more about Chord Track updates here.
5. MPE support for VST3 instruments
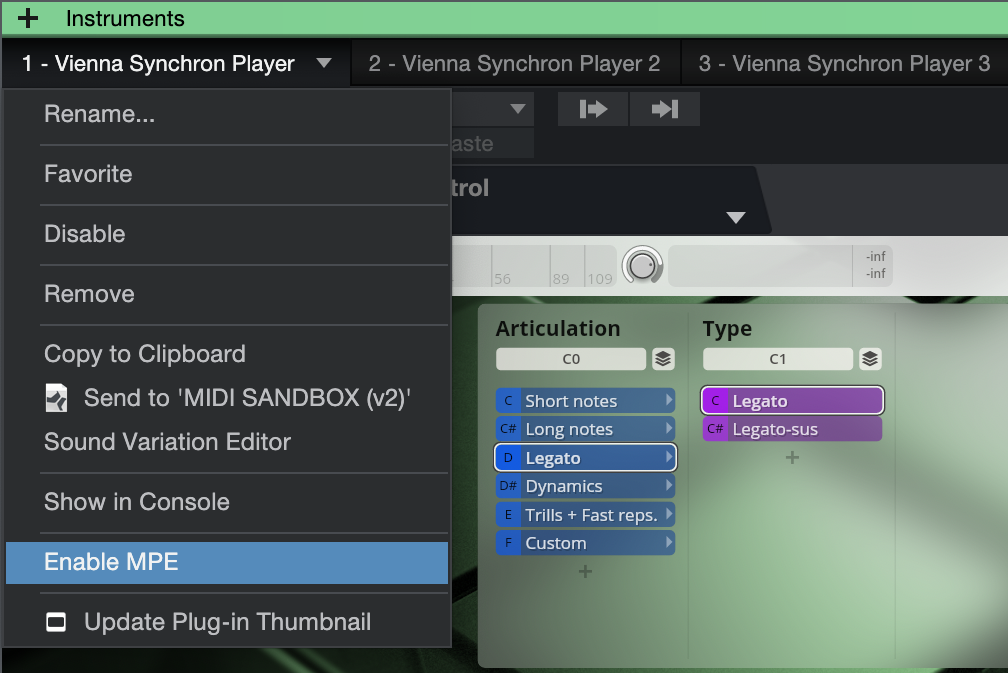
5.3 adds MPE support for VST3 instruments using Note Controllers in Studio One. This allows MPE compatible VST3 instruments to work with Studio One and compatible hardware controllers. Great for users of those instruments which automatically hide their VST2 counterpart when a VST3 version is installed.
Learn more about MPE support here.
Full Studio One 5.3 video playlist:
Check out the “What’s new in Studio One 5.3” playlist!
Learn more about Studio One
Shop Studio One
PreSonus Studio Monitors now include Studio Magic and Studio One Prime
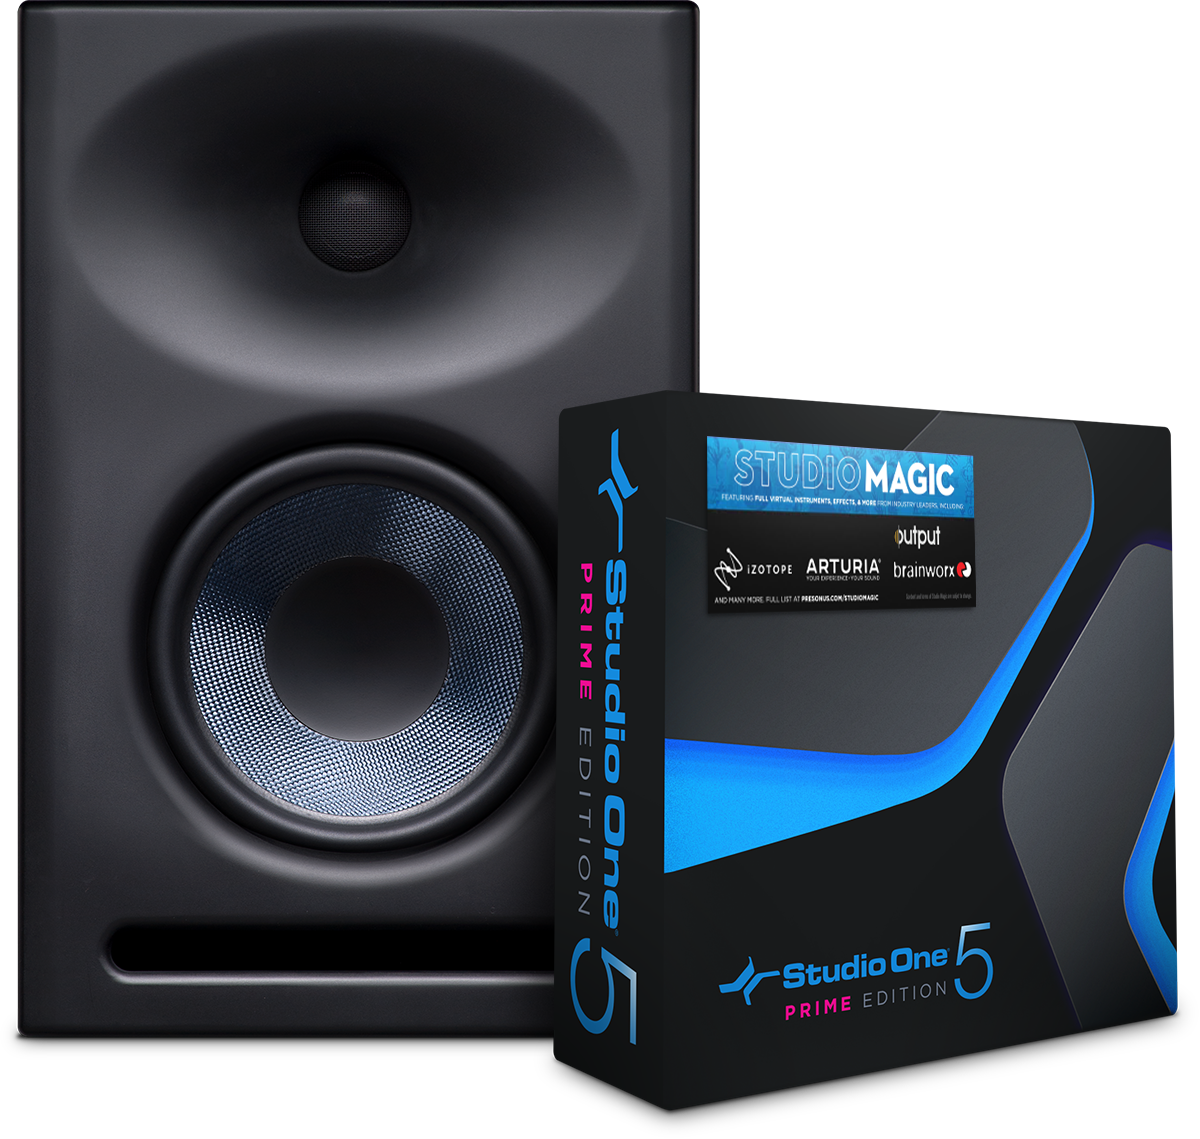
What some folks may call “something a little extra,” or “a bonus,” we like to call lagniappe. It’s that thirteenth beignet in a baker’s dozen, or the recipe in the back of your PreSonus manual.
And it’s in that spirit that after the success of a limited time promo, we decided that all PreSonus customers who henceforth purchase our qualifying studio monitors (including the subwoofers!) will get a big ol’ Studio Magic software bundle worth over $1000 US bucks, that includes tons of plug-in effects, virtual instruments, and even music lessons—as well as a special version of Studio One Prime that grants access to all of those aforementioned plug-ins!
Click here to learn more about what you get in Studio Magic. It’s a lot!
Qualifying monitors include:
- Eris-series
- R-series
- Sceptre-series
- Temblor-series subwoofers
Metal Guitar Attack!

They’re called “power chords” for a reason—that delightful mix of definition, sludge, and hugeness is hard to resist. But can we make them more huge and more powerful? Of course, we can, so let’s get started
This tip gives two options: non-real-time, and real time (using the High Density Ampire pack, although other amp sims and processors can work, too). Either technique also works well for LCR mixing fans.
Non-Real-Time Hugeness
- Insert Ampire in your guitar track, and edit it for your ideal sound (the Default Ampire preset is a good place to start).
- Right-click in the track’s column, and select Duplicate Track (Complete).
- Repeat Step 2. Now you have three identical tracks with identical processing.
- The key to getting Total Hugeness is transposition. Click on one track’s Event, open the Inspector (F4), and set Transpose to -12 (fig. 1). Click on another track’s event, and in its Inspector, set Transpose to +12. Don’t change the pitch of the remaining track.
After the next section, we’ll get into panning and EQ.

Figure 1: The guitar power chord track has been duplicated twice. The audio on the track to the right has been dropped an octave.
Real-Time Hugeness
Follow the steps above for non-real-time hugeness, but don’t do Step 4. Instead:
- For one of the tracks, open up Ampire. Insert the Pitch Shifter before the amp, choose “dn 1 Oct” (fig. 2), click on the top of the pedal, and then drag up until the pedal’s Tune tooltip shows 100. The audio will now be transposed an octave down. If you don’t have the Ampire High Density pack, the transposers in other amp sims will work, but the one in High Density seems better than average.
Figure 2: The Pitch Shifter processor provides real-time transposition.
- Similarly, do the same processing on another track, but this time choose “up 1 Oct.”
What’s Next
Whether you chose real-time or non-real-time hugeness, you now have three tracks: Standard pitch, tuned down an octave, and tuned up an octave. Let’s do panning and levels. Here are some options.
- Standard pitch full left, +12 center, -12 full right. This gives the biggest sound and is used in the audio example.
- Standard pitch full left, -12 full right, and mute the +12 track. This is ideal for all you LCR fans. It opens up a big hole in the center for bass, kick, snare, and vocals.
- Standard pitch full left, +12 full right, -12 full right. Another LCR favorite. The +12 gives a more defined sense of pitch in the right channel, so something else with a strong sense of pitch (e.g., Organ of Doom) can fit comfortably in the left channel.
- Standard pitch center, +12 full left, -12 full right. This emphasizes the main guitar track with the standard tuning.
This approach also lends itself well to automating mute on the various channels. Unmute the octave below when you want to fatten the sound, unmute the octave higher when you want a more defined sense of pitch.
Applying EQ to the transposed audio can customize the sound further. If you’re doing a duo with only drums and guitar, on the octave below track, boost the bass and trim the highs. Pan it to center, and pan the other two tracks left and right. Another possibility is giving more definition to the octave higher track by rolling off the lows and highs a bit and boosting the mids around 2 kHz or so.
Let’s check out the audio example…remember, it’s only one guitar.