Friday Tips—Studio One Meets Vinyl
Although vinyl represents a tiny fraction of the media people use to listen to music, you, or a client, may want to do a vinyl release someday. Conventional wisdom is split between “you don’t dare master for vinyl” and “sure, you can master for vinyl if you know certain rules.”
Both miss the point that the engineer using the lathe to do the cutting will make the ultimate decisions. You can provide something mastered for CD, and the engineer will do what’s possible to make it vinyl-friendly—but then the vinyl version may sound very different from the CD, because of the compromises needed to accommodate vinyl. Conversely, you can “prep for vinyl” and if you do a good job, the engineer running the cutting lathe will have an easier time, and there won’t be as much difference between the vinyl and CD release.
But before going any further, let’s explore why vinyl is different.
TRADEOFFS
A stylus moves side to side, and up and down, to create stereo. Louder levels mean wide and deeper grooves; if too loud, the needle can jump out of the groove. Lower frequencies hog “groove space” more than high frequencies, but also, a stylus has a difficult time moving fast enough to track high frequencies, which leads to distortion.
To compensate, the RIAA initiated an EQ curve that cuts bass up to -20 dB at low frequencies before the audio gets turned into a master lacquer, and boosts highs by an equally dramatic amount to help overcome surface noise. On playback, an inverse curve boosts the bass to restore its original level; cutting highs restores the proper high-frequency balance to reduce surface noise and encourage better tracking (Fig. 1).
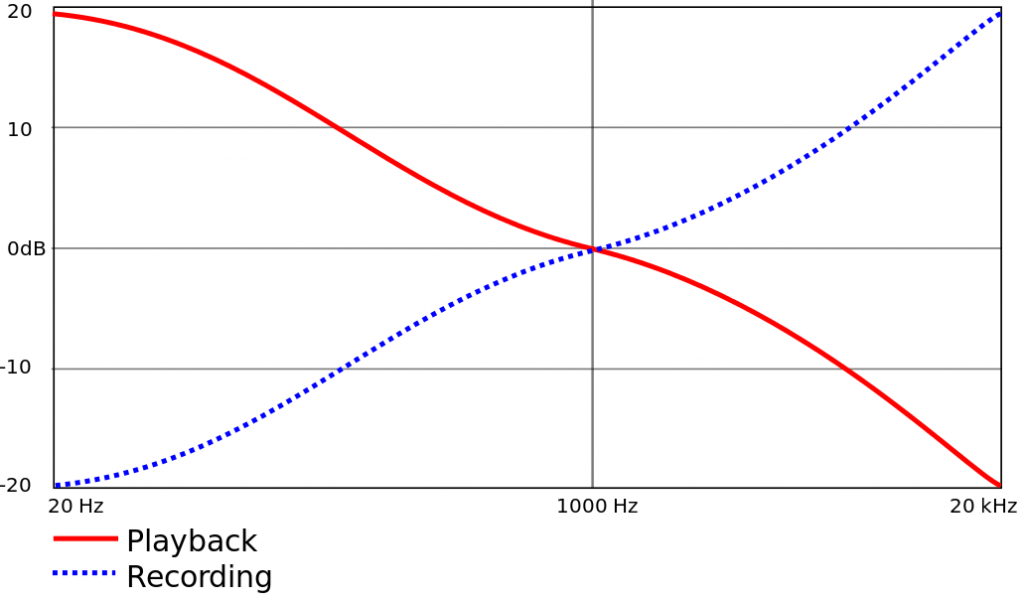
Figure 1: RIAA equalization record and playback curves for vinyl records.
PREPARATION IN THE SONG PAGE
There are four main ways to make more vinyl-friendly mixes in the Song Page.
- Avoid excessive high frequencies. Use de-essing on vocals, but de-essing can also tame distorted guitar, cymbals, and other high-frequency sound sources (Fig. 2). Excess sibilance or brightness translates to splattering distortion with vinyl.

Figure 2: Studio One’s compressor can do de-essing and other frequency-selective compression.
- Trim the lows and highs, as appropriate for the program material. Use a 48 dB/octave Pro EQ LC filter to cut everything below 20 to 40 Hz. Back in the vinyl days, sharp cuts above 15 kHz or even 10 kHz were also the norm (Fig. 3).
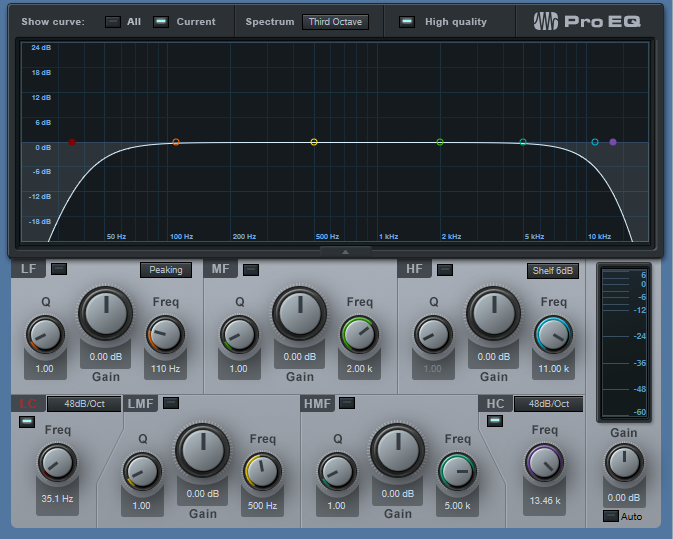
Figure 3: Sharp LC and HC filters trim out vinyl-hostile frequencies.
- Center the bass. The worst-case audio for a stylus to track is out-of-phase bass in the left and right channels. Besides, low frequencies aren’t very directional, so any stereo is more or less pointless unless you’re listening on headphones. The easiest way to center bass in Studio One is to place a Splitter in the master bus, and split by frequency. There is no “rule” for the correct crossover frequency; too low, and potentially problematic frequencies can get through. Too high, and you’ll start interfering with the lower end of guitar and other instruments. That said, 70 to 170 Hz is a good place to start. Then, follow that low split with the Dual Pan, and center both channels (Fig. 4). Also consider avoiding hard left/right panning for lower-frequency instruments, like toms.
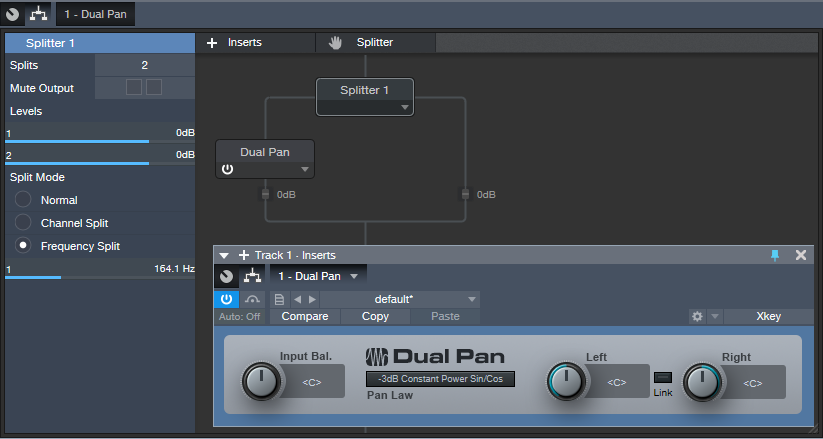
Figure 4: Using a Splitter as a crossover, with a Dual Pan, can center low frequencies in the stereo spread.
- Check your mix in mono. Phase issues, whether accidental or deliberate (i.e., psycho-acoustic processors) can really mess with the cutting lathe. Use Studio One’s Correlation meter to confirm there aren’t major phase issues (see the Friday Tip for September 28, 2018).
PREPARATION IN THE PROJECT PAGE
You can take matters only so far in the Project Page before taking your mixes to a mastering engineer who knows how to prep for, and cut, vinyl. But there are steps you should take to assist the process of creating a vinyl-friendly master for duplication.
- Follow the rules for album length. The two sides should be of approximately equal length, and for a 12” record, should not exceed 20 minutes. Longer sides mean narrower grooves, lower levels, and more issues with surface noise. There’s a reason why many classic albums were 30-40 minutes long total.
- Follow the rules for album order. Fidelity deteriorates as the stylus works its way toward the inner grooves. Place your loudest songs, with the most complex spectra, at the beginning of a side, and the quieter songs toward the end. This may require choosing whether you want to compromise your art, or the sound quality.
- Don’t try to win the loudness wars. You can ask the engineer cutting the vinyl to put as loud a level as possible on vinyl, but don’t try it yourself. Loud, distorted or partially clipped audio only sounds worse when translated to vinyl because the stylus can’t follow clipped waveforms easily. Think about it—a mechanical object can’t snap to a maximum value and then back down to a lower value instantly. What matters is the average, not peak, level; I master to around -10 or -11 LUFS these days, and that works for vinyl. You can maybe stretch that to -8 with some material, but the louder you go, the greater the chance of distortion.
- Create a complete, continuous disc image file (Fig. 5) that represents exactly what you want each side to sound like. The process of transferring from a final mix to a cutting lathe is done in real time. The image should include the desired silence between cuts, crossfades, and song order. Of course you can have a mastering engineer assemble the album from individual cuts, but you’ll pay extra.
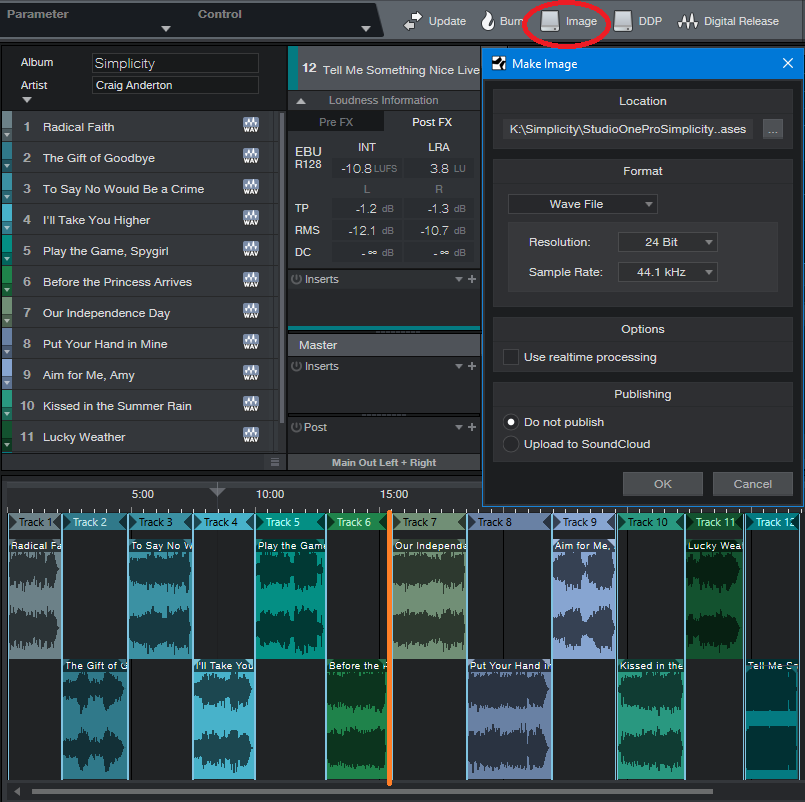
Figure 5: I mastered my 2017 album project, Simplicity, with vinyl in mind “just in case.” The total length is about 31 minutes, and the project splits into two sides of almost equal length between songs 6 and 7 (shown with an orange line). An image of the entire project is about to be created.
- Get a reference lacquer. You’ll pay extra for this, but it lets you “proof” the settings the mastering engineer uses to create the final master lacquer. You can play the reference at least a dozen or more times before the quality starts to deteriorate audibly. If changes need to be made, the mastering engineer will have written down the settings used to make the reference, and re-adjust them as needed.
SO THAT’S WHY VINYL SOUNDS BETTER!!
Yes. Properly mastered vinyl releases didn’t have harsh high frequencies, they had dynamic range because you couldn’t limit the crap out of them without having them sound distorted, and the bass coalesced around the stereo image’s center, where it belongs. In fact, if you master with vinyl in mind, you just might find that those masters make CDs sound a whole lot better as well!