Friday Tips: The Virtual Pop Filter
Hate those p-pops and breath noises? So do I, especially when I’m being paid the big bucks for voiceovers and have to edit the pops out by hand. Granted, the Pauly pop filter is a fantastic solution—it’s the best pop filter I’ve ever tried—but its $300 price tag is pretty daunting. And no matter how hard you try to control pops at the source, sometimes those pesky, problematic pops work their way into a track anyway. So, it’s time for a do-it-yourself pop filter project. And because it’s virtual, this one doesn’t involve taking panty hose and stretching it over a hanger. Instead, we’ll stretch the Pro EQ into being a virtual pop filter.
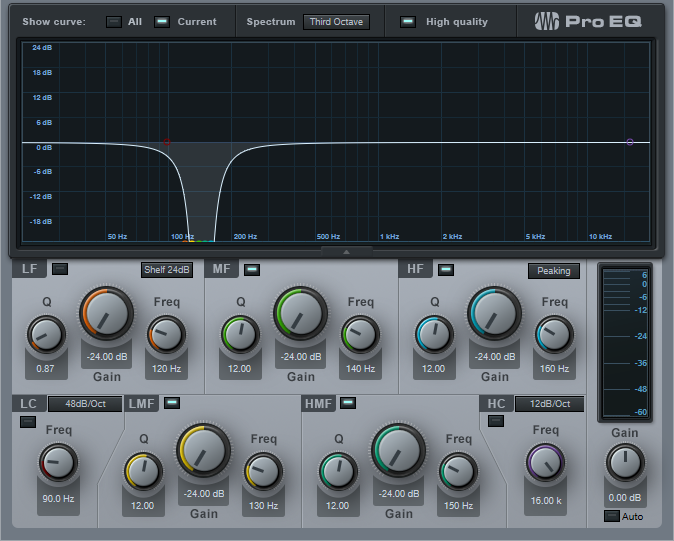
The key is creating an ultra-steep cutoff frequency that kills the low frequencies, but lives below the range of the voice so it doesn’t thin out the vocal. The easiest way to create a steep cutoff is with multiple sharp notches (Fig. 1). There are four notches, all with a Q of 12 and a gain of -24 dB. Frequencies are 130, 140, 150, and 160 Hz.
Figure 1: Use notch filters to create a super-steep low frequency slope.
Now we need to get rid of the low frequencies. Enabling the Low Cut filter helps, but if we turn it up too far, it starts rounding off the slope, which makes it not as steep. A slope of 48 dB/octave, with a frequency around 90 Hz seems about right (Fig. 2).
Figure 2: Adding a Low Cut filter starts carving away at the low frequencies.
That’s better, so it’s time for the coup de grâce—the Low Frequency Shelf stage. This gets rid of the remaining low frequencies, while still keeping the insanely steep slope (Fig. 3).
Figure 3: The Low Frequency Shelf completes the virtual pop filter.
However, note that the Low Frequency Shelf is also the key to versatility. By increasing the Q, you can add a low-frequency “bump” that’s just above the cutoff frequency. This adds extra depth, and a deep kind of vocal resonance that still keeps the p-pops under control.
Of course, every voice and mic is different, so you may want to edit the parameters somewhat. To preserve more bass, drop the frequency of all filter stages by 10 Hz and see if that helps. Conversely, if the p-pops are still too prominent, raise the frequency of all filter stages by 10 Hz until you hit the desired response…or if you’re impatient, use 20 to 30 Hz jumps.
In any event, you now have a super-steep low cut filter that can remove plosives, wind noises, most breath noises, earthquake sounds, and even the rumble from those pesky UFO flyovers—you might be surprised at just how effective this little project can be in banishing pops from your life.


